To create a simple link, just drag an Item from project window and drop it on a object.
Menu objects can be either active (meaning it has links to another Movie or Menu) or in-active.
An active object is commonly referred to as a "Button", though it can be any shape. A an active object could be text or a frame as well.
![]() Create a simple link
Create a simple link
To create a simple link, just drag an Item from project window and drop it on a object.
DVD-lab will automatically create a highlighted picture from the object.
![]() Create links to Chapter Points
Create links to Chapter Points
A very convenient and intuitive way to create a link is to right-click on the Menu object and select link. From there you will be shown a list of places to link to that DVD-lab knows about and keeps track of for you. As shown in the screen shot here, if we select a Movie that has Chapter Points defined, we can directly link to a specific Chapter Point.
This method will give you access to link to any object in the project.
![]() Remove Link
Remove Link
To remove a Link, right-click on the object and select Remove Link.
![]() Button order
Button order
When you create a link, a number will appear near the top left of the object showing that button's order.

The button order is not so much the order in which you created the links, but the order in which the objects will be navigated on the player's remote control. That means, if you start adding text from the top, the top button will always be button number 1 no matter in which order you created the links. As you add or remove links, DVD-lab will keep track of the button number order.
It most important for us to know which button is first.
![]() First Button
First Button
Each Menu will display Button 1 as selected, by default. That's why it is important to set a first button. You can make any Button a first Button by right-clicking on it and choosing "Set as First Button". Another way is to select the object and move it to the back with the layer buttons. You can also Force Select any other button to be selected.
![]() Frames as links
Frames as links
We know that if you drop a frame on an object it will position the frame to surround the object. And that if the object happens to have has a link, the frame will pick-up that link. Defining a frame as an object to link to gives us good creative options, especially for thumbnails and images.
Notice the following images:
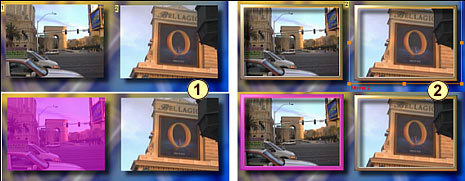
1 - Here are two video stills each with a link (top). When the Menu plays (bottom) the whole image is highlighted.
2 - Here we have a frame around the thumbnails (the frame was dragged to the Menu from the Assets / Buttons & Frames bin) and the frame has a link (top). When the menu plays (bottom) only the frame is highlighted rather than the image creating an outline effect.
![]() Overlapping
Overlapping
Buttons on DVD can not overlap. This is DVD illegal as the player could not determine which button to activate. If you create a new object or move two active objects so that they overlap, you will see the overlap warning as show by the rather obvious red grid.
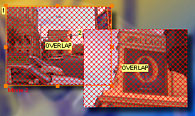
Just move the buttons some where else until the Overlap warning disappears.
![]() Visibility
Visibility
Now the fun part starts. A button may have visibility properties.
This is a setting in the Link tab of Menu Properties. An active object may be:
- Visible (default)
The object is always visible on a background. If it is selected then the object is highlighted with some color.
- Invisible Normal
The object is not visible on the background. If it is selected then just the highlighted image is shown
- Invisible Selected
The object is visible on background but when it is selected it doesn't show the highlighted image
- Invisible All
The object is both invisible on background and as highlighted. The user cannot see that such a button exists but can navigate there and press Enter. This is sometimes used for "Easter eggs" or secret buttons.
The most useful are the first two settings.
Here are some examples. We have two text objects which each link to a movies.
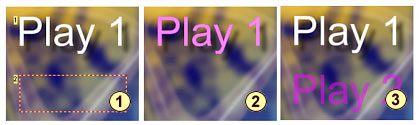
1 - The first text is set as default Visible. The second text we set as Invisible Normal.
2 - When the menu is played and the first text is selected, it is highlighted. Since the second text is Invisible Normal we don't see anything else there
3 - When the second text is selected (press Enter), the player then shows only its highlighted picture.
Application of visibility
Besides creating Easter eggs, the visibility settings has a quite important role in customizing the menu.
Please consider the image below:
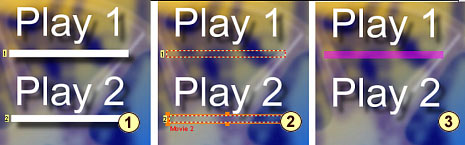
1 - We removed the Links from the text 1 and text 2 objects and added a rectangle below each text. Next we add links to each of the rectangles. (See the button numbers on the left of them).
2 - Next we set both rectangles to Invisible Normal.
3 - When we play the menu - it looks like the selected text is underlined.
Similarly, we can modify the example with frames where we set the frames to Invisible Normal:
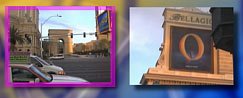
Though the thumbnail images have no visible frame, when the menu plays, only the "Invisible Normal" frame which has a link defined will be highlighted.
These settings let you customize a menu in many ways. Instead of highlighting what the user sees as a button you can instead highlight a frame around an object, highlight a bullet such as an arrow placed over an object or beside it, an underline etc...
These features give the DVD Author a lot of freedom and creative options. When used along with the Group Hotspot feature, this gives you some very impressive design tools.