Menu - Cloning
Until now every menu you have created was a separate and independent of all others. That's probably the most common case. However on DVD you can be really creative and use menus a bit different way.
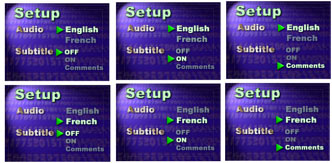
We can for example create a series of similar menus where user can switch between them, which (if done right) will create an effect of much richer menu, like created on a multimedia PC application. Consider the image below. We have six similar menus linked together in a special way to create illusion of a menu with special functionality.
All works fine until you need to change one thing, for example replace text "French" with text "Spanish". You would obviously need to do it on all six menus. What about if you need to redesign the whole menu - put that text there, move this somewhere else? To do it on all six menus exactly the same way would be a tough job. It would be actually easier to start from scratch.
For this sort of projects we have something that is called Menu Cloning. If we would design the above menus using Cloning Technique, moving or changing one object will automatically do it for all other menus.
Cloning
Cloning is at first may look like a Duplicating menu, except that the objects in both menus continue in a special relationship.
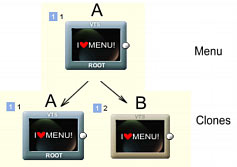
Here we cloned menu A to new menu B. It is important to mention that with Clones we don't have a true Master-Slave relationship, both menus, the new menu B and the original menu A becomes equally same what we call "Clones". Changing objects in menu A will change the same objects in menu B and vice-versa.
We can now decide to clone again menu A to menu C or we can clone menu B to menu C. Since menu A and B are both Clones, cloning from any of them will produce the same menu C and we will have 3 menu clones A,B,C. Changing any of them will change all the rest.
Cloning Relations
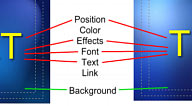
Cloning is not just blindly copying whatever we do on one menu to all other clones. That wouldn't be much fun. Instead each object can have specified the cloning relationship with others. This is very powerful feature that allows us to clone only the parameters we want.

For example we may want one particular text on each menu have its own color which is not affected by cloning and also we need the text to have different links. We can set up the relations for each object separately, in our case we would need something like this:
Symmetric Relation
The clones relations are always symmetric. If we for example change a relation of our object to ignore Color and Link that will be true for the same object on every cloned menu. That means the same object one every clone menu can now have separate color and link.
Adding Object to Clone Menu
Once we create Clone menus, all objects on these menus prior cloning will be cloned by default relation. After that we can add separate objects to any of the Clone Menus and the object will be "local". That means adding new object to Clone Menu will be by default NOT added to all other Clone menus. However we may later decide to do so.
Similarly we may delete an object from Clone Menu, and choose if we want to delete all cloned objects or only this object in particular. In the latter case the objects on other clone menus will continue to have the clone relation.
![]() Note: By deleting an object only in one Clone menu and then immediately adding a new object and cloning it to all other menus may in some situations simply substitute the new object for the deleted one and replace (instead of just add) the objects in other Clone menus.
Note: By deleting an object only in one Clone menu and then immediately adding a new object and cloning it to all other menus may in some situations simply substitute the new object for the deleted one and replace (instead of just add) the objects in other Clone menus.
Clone Group
In our example all the cloned menus A,B,C are part of the same Clone Group because they were all cloned from each other. If we create brand new menu and then clone it, it will be member of another Clone Group.
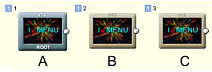
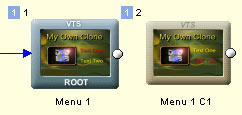
A selected object that is a "clone" will display a small icon and a number on left side. The number is the Clone Group.

Not all objects in a menu must be set as clones, but if they are, they can be members only of the same Clone Group.
![]() Note: Every time we say that something will apply to "all Cloned menus" we actually understand that it will apply to all Cloned menus in the same Clone Group. Two clone groups are totally independent of each other.
Note: Every time we say that something will apply to "all Cloned menus" we actually understand that it will apply to all Cloned menus in the same Clone Group. Two clone groups are totally independent of each other.
Clone Bitmap
Not all data is automatically cloned. For example the bitmap of the object (like Video Still) is not Cloned. We are therefore able to freely change it or apply some effects which will be not picked up by the other Clone menus. If needed, the Bitmap of the object can be copied to the clones.
That's enough, let's see some real life examples
This all may sounds complicated, but the real application of it is quite simple.
Let's first design some menu. Three text objects and one video frame were dragged from the video preview into the menu.
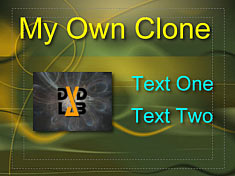
With cloning it is always best to first create the menu as completely as possible. This is as far as we get today.
Now while the menu is still open either choose Cloning submenu from the main menu bar under Menu, or right click and choose Cloning from the pop-up menu.
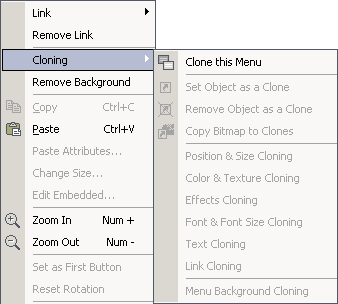
As we can see, there is not much to do here yet, just Clone this Menu.
A Clone Menu dialog will appear with the default values for object relation.
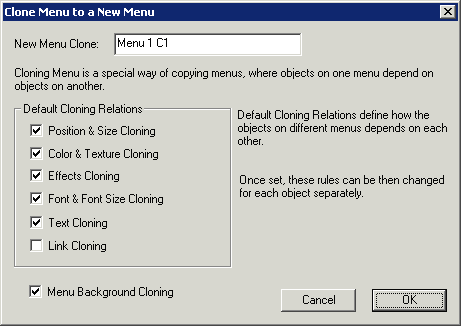
Since Relation of each object can be later changed, these default values are just right.
Clicking on OK will create our new Clone Menu
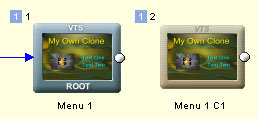
Now you can check it out. Open either of the menus and try to move or resize any object. Then try to change color or text of the objects. Whatever you do the other menu will follow.
Select any of the object and right click, then open the Cloning menu. Now there is much more to do here.
Remove Object as a Clone
This will remove the Clone properties from this object (and from all the same clones in all other clone menus) The object will become independent You can try it on one of the text in the menu.
The object still remembers the previous relations so we can later set the object as clone back and it will connect to the correct objects in other menus.
Set Object as a Clone
An object that is not a clone (or the clone properties has been removed as above) can be cloned to all the Clone menus. If we add a new object, then after "Set Object as a Clone", this object will be copied to all other Clone Menus.
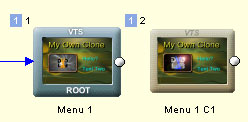
In our example let's add a frame to the picture:

As explained above, the frame will be not automatically added to other Clone but it will remain as a local object in this menu. However we want to have it on all Clone menus, so we select the frame and apply "Set Object as a Clone". The frame will appear also on the second menu.
Bitmap Data
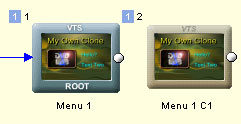
Now we have frame around Video Still on both menus. We decide that on one of the clone menu we want a different video still (yet we want its position to be linked with the other still in other clone menu). This is simple. Since bitmap data are not being cloned all we need to do is to drag another video still from preview over the old one. (This dragging-over works only with Video Stills).

The current bitmap has been replaced with a new one, but in the other Clone Menu it still remains the same.
Copy Bitmap to Clones
In previous example we ended up having on each clone menu different video still. Yet the stills are linked, we can move or resize one and the other will move as well.
This time we may want to copy the bitmap data of the still to all Clones. This can be done with the Copy Bitmap to Clones command.
We need to first select the video still. It is behind the frame , but a simple trick - holding ALT will allow us to cycle between objects behind when clicking on them. Now we need to go to menu: Menu-Clone-Copy Bitmap to Clones (because we have selected bottom object, right clicking on it will select back the frame so we have to do it from main menu)
That's it all Clone menus have now the same bitmap data in Video Still .
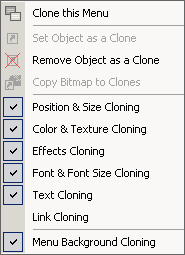
Object Relations Settings
The bottom part of the Cloning menu is devoted to the Relations setting for selected object.
We mentioned this before that the default object relations between clones can be changed later for each object. This is the place.
In our Example let's see the text "Text One" and "Text Two". We would like to have it different color on each menu. But right now if you change the color of the text it will be changed in all Clones.
All we have to do is to remove "Color & Texture Cloning" checkbox from both, the "Text One" and "Text Two".
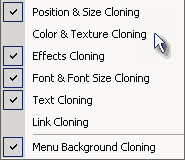
It is enough to do it on one menu. Because of the symmetry, if you open the second menu you will see that the checkbox "Color & Texture Cloning" is removed here as well.
This means we can set both text to any color on any menu without the color data being "cloned". All other things like position cloning etc. still works!
That sums up the cloning. But this is just the beginning. Cloning is a very special feature that can be used to easily create many advanced menu projects.