Menu - Export - As Style
You can create your own Scene Selection Template which DVD-lab calls a "Style". Styles are used during "Add Scene Selection menus from chapter points". See Menu - Add Scene Selections.
Similar to Templates, the Style objects are distinguished by the Button label in the Link tab in Menu properties.
There are these functional commands DVD-lab expects to be placed inside the button label:
place
placeholder
up
prev
previous
next
number
hide first
show first
hide last
show last
hide noparent
show noparent
All other labels are non functional and simply ignored during building the Menu. Here are explanations of what each of these functional command do for us.
placeholder (or place)
This is the object that the chapter thumbnail will be inserted into. The object will retain its shape when loaded with a thumbnail, so if for example, you use a circular button the result will be a circular thumbnail.
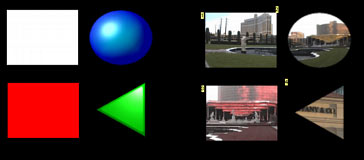
On the image above we created 4 placeholders. Each object has a the command: placeholder entered in the Button Label box. If we export this Menu as a Style (*.sty file) and then use that style to create Scene Selections, each of the thumbnails will automatically be placed inside the placeholders. Note that for the bottom rectangle we changed the color to Red. When a thumbnail is inserted, if the color is different than White (Automatic) DVD-lab will colorize the thumbnail as explained in the Video Still and Images section.
![]() Note: The placeholders must be created in the order in which the chapters are to be inserted. This is typically starting from the Left Top corner. The order is determined by the position in layers - the first created object is on bottom layer, next object is on top of it, etc. That means you can reorder the objects by using the Object order buttons shown here:
Note: The placeholders must be created in the order in which the chapters are to be inserted. This is typically starting from the Left Top corner. The order is determined by the position in layers - the first created object is on bottom layer, next object is on top of it, etc. That means you can reorder the objects by using the Object order buttons shown here:
![]()
If you create objects one after another in a straight sequence, then this is not an issue. However, as soon as you change the order or delete an item or add an item, the object order may be mixed up. To help you to visualize the button order, you can drop a link on each object (for example on Movie 1). The number which appears on the top left of each object is the number of the order in which the thumbnails will be placed.
Using Styles, you don't have to worry about dealing with multiple pages. If there are more scenes identified than buttons on your Style page, DVD-lab makes more pages for you. You then only need to create one page as a Style, then when Scene Selection processing occurs, the wizard will automatically create new pages if necessary and smartly uses the rules found on the first page. It will also delete unused objects from pages.
Pick-up links.
There is one important rule on the placeholders. If the placeholder is on top then it will get the link to the chapter point. If there is any other object or objects directly on top of the placeholder, then the top most object will pick-up the link.
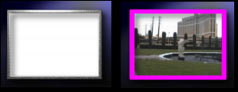
That means while the thumbnail will be always inserted into the placeholder object, the actual link may be added to a frame or other object on top of the placeholder. The image above is an example. The white rectangle has the placeholder set in Button Label, but a frame is on top of it. When Styles are used, the frame will become the actual link. You may set the Frame to Invisible Normal, or use a different Color Map and Group Hotspot over the objects. This enables you to customize Styles much further.
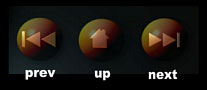
up, previous (or prev) and next
These are objects which will be linked to the next, previous or parent (up) Menus. Typically you would use arrows or some buttons such as below:
number
This is a label on a text object saying that the number of the chapter point will be inserted here.
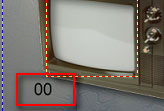
Typically you put 00 in a text object to hold the size and then type: number in the Button Label.
![]() Note: you must create the number objects in the same order as the placeholders. See the note in the placeholder section.
Note: you must create the number objects in the same order as the placeholders. See the note in the placeholder section.
show/hide first/last noparent
For a larger number of chapters, more than one menu will be created. These menus will be linked with next and prev buttons. Normally object on top of prev or next buttons will be deleted from the first and last pages together with the prev and next buttons themselves.
However we can also use the show/hide commands to show or hide any object(s) from first or last menus. We can use show command to cover up a buttons and hide command to hide the buttons themselves.
show first - this will show the object on a first menu (1) (cover up PREV button)
hide first - this will hide the object on a first menu (1) ( hide PREV button)
show last - this will show the object on a last menu (3) (cover up NEXT button)
hide last - this will hide the object on a last menu (3) (hide NEXT button)
show noparent - this will show the object if there is no parent menu defined (cover UP button)
hide noparent - this will hide the object if there is no parent menu defined (hide UP button)
![]() Routing
Routing
The Style can have automatic or customized routing which will be carried forward to the new created Menus. This will help you to create styles which are not typical for example the style below.
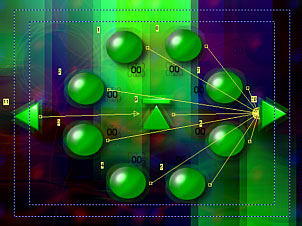
The thumbnails (placeholder) are in the circle. Such design can't rely on Auto-Routing because the user will be confused. Instead, we created manual routing where - key up on the remote will go clockwise, key down will go counter-clockwise, key right will go to the Next button, key left to the Previous button. The Up button will be placed in between prev and next. (On the image above you can see routing to the right)
The blurry effect was created on background using Gen-EFX.
![]() Scene (Style) template storage
Scene (Style) template storage
The Style templates (*.stm) files (see how to create Styles above) are stored in the Styles folder in the DVD-lab installation.
You can also create sub-folders in the Styles folder and fill it with your styles, which will then appear in the Scene Selection window. Note, there are already by default three sub-folders (Filmstrip/Panorama/Quiz) to hold other templates. These three folders will not appear in the Scene selection template selector, only folders you add later.
If you want to copy a Style from folder to sub-folders, you need to copy the *.stm, *.jpg, *.tmb files with the same name.