 To see how to design Subpicture menu go to Subpicture chapter.
ReelDVD
ReelDVD supports 2 kinds of menus
Subpicture with automatic buttons and auto-routing (The easy way)
You design the Subpicture menu in DVD Menu Studio the same way as for any other application. This is the real strength of DVD Menu Studio.
To see how to design Subpicture menu go to Subpicture chapter.
Note: Using the automatic features (auto buttons and auto-routing) the ReelDVD will merge all subpictures colors (Subpicture 1-4) into one Subpicture 3. You don't have to worry about this during design, but note that you will be able to use only one color of Subpicture in ReelDVD. (This is enough for most of the work anyway.) If you require more than one subpicture color, then you have to use the manual setup.
Export of Subpicture menu:
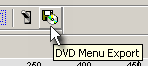
Click the DVD Menu Export button or use from menu File - DVD Menu Export.
After selecting the NTSC or PAL system and choosing ReelDVD as your export, click NEXT to go to the ReelDVD export settings
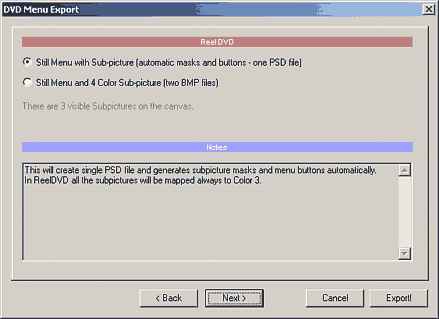
Select Still Menu with Sub-Picture (automatic masks and Buttons). The result will be one PSD File.
Import in ReelDVD
Now you need to Import the PSD file in ReelDVD.
1. In the Explorer window browse to the place where you saved the psd file.
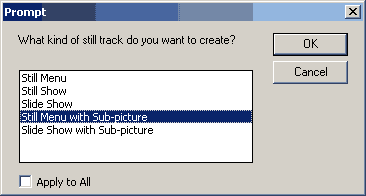
2. Drag the psd file to the main Story Board area. A window "Prompt" will be displayed. Select Still Menu with Sub-picture:
3. A new window "Select Layers" will appear. Here you see a Subpicture on top, the background on bottom and the layers on right. You don't have to select anything in this window. The PSD file is formatted so all necessary settings are done for you. Simply hit the OK button.

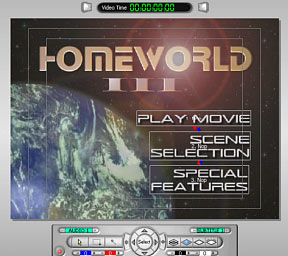
4. If you now click on the imported menu in the Storyboard the Preview will show the menu and you can see all the buttons and auto-routing were done for you.
5. What you have to do now, is to only select the color mapping of the subpicture for selected and activated state. Only the third color in the ReelDVD preview window is the one you need to set (regardless what color you designed your subpictures)
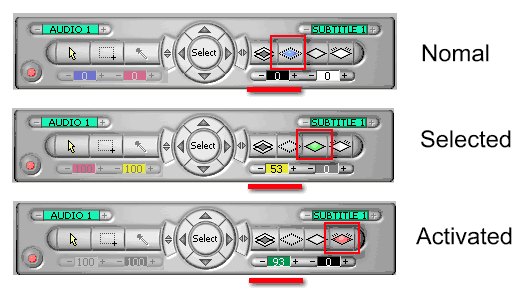
Normal: Click the second Subpicture Mode Button - Display Color. Now look at the third color (Black). It should be Black and the "contrast" set to 0. The next color on right should be white and also set to 0.
Selected: Click the third Subpicture Mode Button - Selection Color. You can now set the color mapping for the subpicture and the transparency. Here we set yellow and 53%.
Activated: Click the third Subpicture Mode Button - Action Color. You can now set the color mapping for the subpicture in Activated state and its transparency. Here we set some greenish color and 93%.
That's it.
Subpicture (the hard way)
You design the Subpicture menu in DVD Menu Studio the same way as for any other application.
To see how to design Subpicture menu go to Subpicture chapter.
Note: Using the manual way will not create the automatic routing, nor buttons, however you will be able to use all 3 colors for subpicture (Blue, Red and Black. White is for background) This is often rarely used, but here it is how.
Export of Subpicture menu:
Click the DVD Menu Export button or use from menu File - DVD Menu Export.
Select Still Menu and 4 color Sub-Picture. The result will be two BMP files.
Import in ReelDVD
Now you need to Import the 2 BMP files in ReelDVD.
1. In the Explorer window browse to the place where you saved the bmp files.
2. Drag the background *.bmp file to the Storyboard. From the Prompt select Still Menu.
3. Drag the subpicture file *_sub.bmp over the previously created menu background in storyboard. In the Track window the Sp 1 track will appear below the Video (Background) Track which signalize the subpicture was added to the menu.
4. Now you have to draw buttons on the Preview in Editing mode and set routing. The ReelDVD manual will assist you.
Adobe Photoshop is a trademark ©Adobe Systems Incorporated
Impression DVD-PRO is a trademark of Pinnacle Systems, Inc,
DVDMaestro is a trademark of Spruce technologies and Apple Computer
ReelDVD, Scenarist and DVDit are trademarks of Sonic Solutions.
All other products and names mentioned here may be trademarks of their respective owners and we fully honor that.