|
Perspective Correction |
  
|
|
Perspective Correction |
|
Menu: Adjust -> Perspective Correction
A very useful tool you can find in menu Image-Adjust-Perspective Correction.
Imagine you take a shot of some picture from weird angle as shown below:
Nothing special about it; you may have a few images like it. Of course, when you try to take a picture of an image, you don't usually choose such a bad angle. You will most likely try to position your camera facing parallel the image on the wall. But sometimes you can't access the best angle (in a museum, for example) or simply there is a strong reflection from a window directly opposite the wall.
How can you fix the perspective of such an image?
Open the Perspective Correction box.
You will see a large window with a net and a small preview of the result.
The net has four handles in the corner. By moving these handles, you are changing the perspective of the net:
Now your goal is to move these handles so the net aligns to the desired perspective of our image. So in our case we will move the handles to align with the 4 corners of the Image frame.
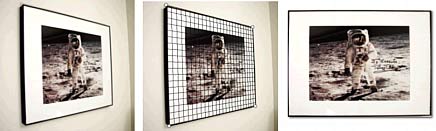
When you do this, you will see that the preview shows the Image with the perspective fixed.
Now press OK, and this magic will be applied on the full quality image.
Note: The result image still suffers from a Barrel Distortion. The right way is always first correct the barrel distortion and then fix the perspective.
You may already see the big potential of this tool. You can align images from museum, building facades or anything else.
This is definitely great for architectural shots since almost always you can't take shot of a building without distorted perspective - because you can't get too far from the building:
The tool uses high quality interpolation, so if your picture has enough resolution you won't see any artifacts.
Since this tool will stretch the new image into the original image size/ratio, it is recommended that after applying Perspective Correction, you resize the image to correct proportions and then optionally apply the unsharp mask.
Perspective Correction is also necessary tool for 3D game developers.
Options:
There are just a few options:
Allow Matrix outside image edge - this will let you to drag the corners of the net also outside the image frame. This may be good for some incomplete images; however, the result will also be obviously incomplete.
In the image above we needed to drag the lower-right handle beyond the image edge to have as much image in the result as possible. However, the result has obviously missing some parts of the image.
Note: You don't have to drag the exact edge handle - you can click anywhere on the net and the closest handle will be affected. Also the lines in the grid will help you to align the matrix even if you can't see all the edges.
Zoom Preview - Simply zoom into the preview and then drag it to see part of interest.
Reset matrix - Lost? Reset the net to the default position.
Interpolation: Choose Bi-Cubic for best quality or Bi-Linear for speed. None affect the preview (the preview is without any interpolation)