|
Pressure Sensitive tablet |
  
|
|
Pressure Sensitive tablet |
|
Tools -> Tablet...
Photo-Brush has support for pressure sensitive tablets. This gives you not only better control over the stroke, but also it allows you to control the opacity or density of the brush. In cases of Art brushes it really gives the impression of a painted stroke.
To set up the pressure support, open the Tablet properties from menu Tools. You will see if you have any tablet installed.
Each brush can handle the pressure differently. There is an option in the Brush Properties for that.
Any tablet which supports WINTAB should work with at least Pressure Sensitivity.
Example of a few Artistic brushes using pressure sensitivity.
Airbrush can be also controlled with pressure very well.
Eraser.
The pressure sensitive stylus has in many cases (for example Wacom series) an "eraser" on the top of it. When you turn your stylus over and use it as an eraser you will:
| • | If no Original image is defined, you will erase into the background color (defined in Color & Texture) |
| • | If the image has an original (it was opened from file, or you used Set as Original) you will erase into the original image. |
Try It! It is very convenient!
Wacom Intuos Tablet.
The previous should work with any pressure sensitive tablet, however there are few more options beside "Tablet Pressure Sensitivity" which works with WACOM Intuos or compatible tablets:
Airbrush FingerWheel
If you have an Airbrush tool, you can set which parameter the FingerWheel of the airbrush controls.
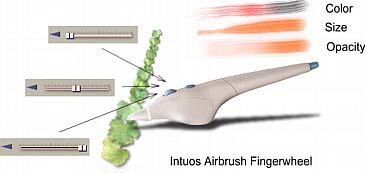
You can control Opacity, Size or Color Intensity of the brush by the FingerWheel.
Tilt
Intuos and few other tablets support Tilt and Angle. That means the tablet is not only sensitive to pressure, but also is sensitive to the tilt of the stylus (tilted toward the tablet) and the angle of the tilted stylus (tilted left, right...). This brings you more control for the Brush. Each brush can control different aspects by the tilt: for example, hue of the color, intensity, etc. You need to set the specific action for each brush in the Brush Properties.
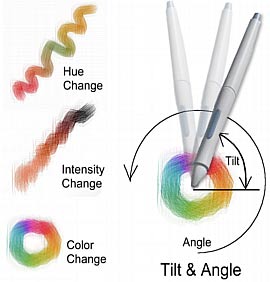
Tilt is a very convenient way to add a natural painter’s feel to the strokes. In the example below we used an Artistic brush with Tilt: Hue Change. By tilting the pen and using different angles (tilting to left right...) we can simple produce realistic brush effect:
Note: When you are using the stylus to draw, and then you switch to mouse, the first stroke with the mouse will be "silent" . This is needed in order to properly reset the tool.