Wavelet Noise Reduction
This is the core of PureImage. Unlike all conventional methods of Noise
reduction, our wavelet NR produce much higher quality of noise
reduction while retaining image sharpness and details.
Unlike some
frequency domain profile based NR, PureImage will automatically
auto-tune the noise function to different noise type across the image,
making the interface much simpler and universal for all digital or film
cameras.
In addition PureImage includes advanced Color Correction, Color Matching and Crop functions
The main screen has four display modes:![]()
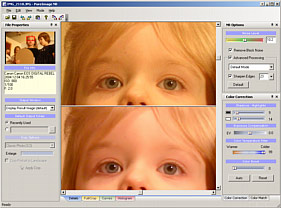
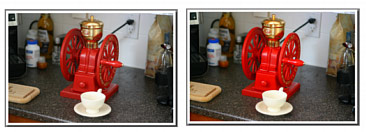
You can compare the noise reduction of the original image. If you make any change to the parameters, the bottom part will need to be recalculated. This is relatively quick and should take a second.
![]()
Since this mode display the image in pixel size you will see only small part of the image. You can drag the image around to see and to compare how the noise reduction affect various parts of the image.
On the Preview window you will
see marked the part that is
displayed. You can drag the red rectangle also there.
It is important to realize that to see the true effect of the Noise
Reduction function, the image must be displayed in pixel size (1:1).
Zooming out will distort our perception of noise so this mode does not
allow any zoom changes. You can also adjust Colors in this mode, but
you don't really get the true feel of the image in tis mode.
Noise
Level
This is the main setting of the Wavelet Noise Reduction algorithm.
Higher level will remove more noise, but also may remove some fine
details from image making it look unnatural smooth. Therefore it is
important to set the level only to the amount needed to remove noise.
Remove
Block Noise
This
will remove a blue or red noise chunks often seen in high
ISO
images in dark areas. Also this removes JPEG artifacts.
Advanced
Processing
Our
goal is to create image that will have removed noise but
still
retain its details and sharpness. This is the task of Advanced
processing. First setting is the Mode.
There are few modes:
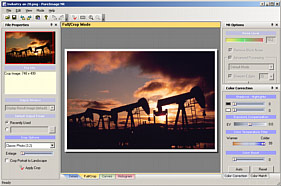
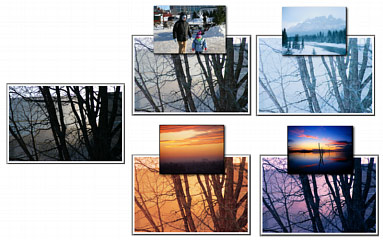
Cropping image is one of the
most common trick of professionals.
When
you take the image, the subject may not be always framed correctly. By
enlarging and cropping we can make the whole composition look better.
There are many rules for composition, but the simplest one is a rule of
thirds.You can overlay a thirds grid over the image in this mode.
The image is displayed in a Crop Format similar way that an enlarger in
photo-lab works. This us let see the whole composition as it will
appear on photo paper or screen. For example our camera takes 4:3
images, but we want to print them on 6 x 4 photo. Obviously some parts
would need to be always cropped.. You should choose the format
depending on your desired destination.
To zoom-in the image you can use the enlarge slider, mouse wheel or the
+/- buttons on toolbar. Similarly to the Details view, you can move the
crop position by clicking and dragging the image or the rectangle in
preview.
When you select the best crop of your image, press Apply Crop button.
This will return to the Details mode and crop the image. You can also
click the Details tab in which case you will be asked if you want to
apply the crop.
This mode can be also used to check the overall Color correction
impact. If you don't change the crop settings (Enlarge or position)
then you can freely switch between these modes without actually
cropping the image.
Note:
In Full/Crop mode the NR
is not applied to the displayed image on screen (It would
simply
take too long calculate NR on whole image just for preview and you
won't really see the correct impact because of the resized image.)
Color
Correction
There are few sliders to adjust the color and overall impact of the
image. Color correction changes will shows also in changes of
Curves and Histogram screen.
Shadows-Highlights
These two sliders will stretch the dynamic range of dull image separate
for each shadows or highlights. You can see the impact directly on the
image or in the Curves and Histogram screens. Moving Shadows will make
more of the shadows and mid-shadows deeper black, moving the Highlights
will make more of the highlights bright. The result will be more
dynamic image with deep shadows and bright highlights.
Exposure
Compensation
Under-exposed image will have lost details in its shadows and
overexposed image will have overblown highlights. A typical example is
taking picture of people against strong light. Without correct
compensation the faces will be dark because the camera set exposure on
the bright background. Our image will be under-exposed. We can use the
Exposure compensation (+) to bring up some of the lost details in
shadows back.
It is common that digital
cameras underexpose the images just very
little, only to avoid over-burning highlights.
Temperature
Filter.
On some cameras flash images tends to be bluish and also bright outdoor
images may have a slight blue cast. On the other hand, no-flash indoor
images with slow shutter will appear yellowish. The temperature
correction can add or remove the warmth.
Color
Boost
This will boost color of the images to make them look vivid. Unlike
normal Saturation, this process doesn't work on HSL space so there is
no danger of clipping during RGB to HSL conversion and back.
Color Match
Color Match uses special matching and optimizing algorithm that can
match colors and tone of the image to the image loaded as reference. In
addition you can save the color profile of reference image for later
use.
There is no restriction what can be the reference image. It can be any size or color. The matching and searching algorithm will make sure that the result image will look as much as the reference image in terms of color and tone while preserving smooth transitions between color. However a match between two totally unrelated images may not always produce best looking result especially if our destination image is in poor dynamic range or color.
You can choose to load the reference image from disc or use saved reference profile. In addition you can save any reference image to a new profile with the small save button.
You can check the translation function built by the color match in curves display.
Curves
This will display the translation color curves that are applied to the
image.
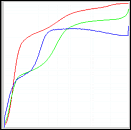
These parameters contribute to the curves:
Histogram
This will display a histogram of the output image.

All of the color Correction functions and Color Match will change the Histogram graph.