|
Types of objects |
  
|
|
Types of objects |
|
Real-DRAW Basics
Object Types
There are four types of objects in Real-DRAW: Path, Polynome, Text and Bitmap
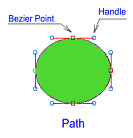
1. Path
This is the basic object. You actually create a path anytime you use one of the basic shape objects such as Rectangle, Circle or Star
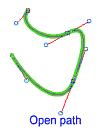
Path is created with a Bezier curves and it can be closed or open.
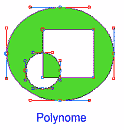
2. Polynome
Polynome is an object similar to Path. While Path is a continuous shape, Polynome doesn't have to be. A shape created from Polynome can have for example a hole inside. You can convert any Path or Text to a Polynome.
3. Text
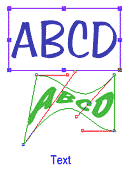
![]() The text can be edited any time. You can also apply a Path envelope to the text and then twist the object. All the effects apply to text as well as for any objects.
The text can be edited any time. You can also apply a Path envelope to the text and then twist the object. All the effects apply to text as well as for any objects.
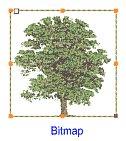
4. Bitmap Object
![]() Bitmap is a non-vector object, however, you can work with it as with any other object. You can apply any effect, such as bevel, or drop shadow, or you can paint directly into the bitmap, create transparency, and much more. You can also apply envelope to twist or distort the Bitmap.
Bitmap is a non-vector object, however, you can work with it as with any other object. You can apply any effect, such as bevel, or drop shadow, or you can paint directly into the bitmap, create transparency, and much more. You can also apply envelope to twist or distort the Bitmap.
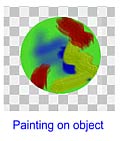
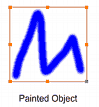
5. Painted Object
![]() Painted object is an Object created by painting with brushes on the canvas. Painted object behaves like any other object; you can apply any effects to it.
Painted object is an Object created by painting with brushes on the canvas. Painted object behaves like any other object; you can apply any effects to it.
Select an Object, Edit
![]() If you want to select, move or resize an object you use the Object Selector tool.
If you want to select, move or resize an object you use the Object Selector tool.
![]() If you want to change the shape by moving the Path points you use the Shape Tool.
If you want to change the shape by moving the Path points you use the Shape Tool.
![]() If you want to paint into the object use the Paint on Object Tool.
If you want to paint into the object use the Paint on Object Tool.
![]() Tip: You can switch between the Selector and Shape Tool with a double-click.
Tip: You can switch between the Selector and Shape Tool with a double-click.
When you press the Paint on Object tool, the view changes into painting view where you can see the object transparency and paint with various brushes. You can get back to the normal view by clicking the Object Selector, by un-clicking Paint on Object tool, or if you press the Esc key.
With the Object Selector tool, you can select an object by clicking on the visible part of the object.
You can resize the object by pulling on one of the 8 handles. The bottom right handle (in gray color) is for resizing in all directions, the other 7 handles always resize in their direction. (For example: the middle left and right handle will resize only in the horizontal direction.)
![]() Tip: Sometimes, if the object is very tiny, you may have a hard time selecting the object. You can just hold down the Ctrl key and click on the object again. This will select the object by its boundary.
Tip: Sometimes, if the object is very tiny, you may have a hard time selecting the object. You can just hold down the Ctrl key and click on the object again. This will select the object by its boundary.
If you want to select, move, or resize an object, which is covered by other objects, just click on its name in the Layers Bar. This will make it selected and you can now click on it on the workplace, drag it, or resize it.
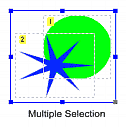
Select more objects at the same time
Often, you would like to select more objects at the same time and then move, resize, or apply a command.
To select two or more objects use one of these:
| • | Click on the empty part of the canvas - where there is no object - hold down the mouse button and drag a rectangle around the objects. Then release the button. You have to drag around the objects you want to select. Only the objects, which are inside the rectangle, will be selected. |
| • | Click on the object you want to select first: then hold down the SHIFT key and click on the second object. Repeat until all objects are selected. |
| • | Click on first object name in Layer Bar, then hold SHIFT and continue selecting the objects. |
To deselect all objects, click outside the selected area. To deselect only one object from the group of selected objects, hold down the SHIFT key and click on a previously selected object.
![]() Tip: During multiple selections, look at the bottom of the screen (the status bar). The text will identify the number of objects you have selected.
Tip: During multiple selections, look at the bottom of the screen (the status bar). The text will identify the number of objects you have selected.
The Objects on screen will have a small number in the top left corner - this is the order on which you selected the objects. It is important for some operations such as boolean Subtract.
Move and Resize Objects with Arrows
You can move/resize objects when you have the Object Selector tool selected.
You can move the object in pixel precision in almost any mode by pressing the Arrow keys on your keyboard. If you hold CTRL while you press the arrow key, you will move in increments defined by a Grid.
You can resize the object in pixel precision in almost any mode by pressing the SHIFT + Arrow keys on your keyboard. If you hold CTRL while you press the SHIFT + arrow key, you will resize in increments defined by a Grid.
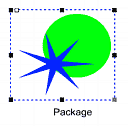
Groups And Packages
If you have a complex project, you can make selections easier by Grouping or Packaging related objects together.
Package: Package is a unique ability to divide a large project into segments where you can edit each segment (Package) in a different view window. Packaging has many benefits - the system needs less memory and you don't get lost in hundreds of objects. The package shows in your main document as a single object, which you can transform any way - resize, rotate, or add any effects to it, such a drop shadow or bevel. This means you have the ability to design the contents of a package in a large view. This is an important topic, please read more in a Package Section.
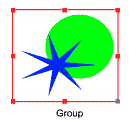
Groups: Groups are logical selections in the main document. You don't get fewer objects, you just move all objects with the group. Select two or more objects and press CTRL-G (or from the Menu: Object- Group). The group has a red border. You can move or resize grouped objects, and you can also change the parameters of whole group. To un-group a group, press CTRL-U (or from the menu: Object - Ungroup). You can also select one or more objects from an existing group without un-grouping, by expanding the group it in Layers. See more details in Layers.
Various Object Examples:
|
|
|
|
|
|
|
|
|
|
|
|
![]() Tip: Each object type has a different color of bounding rectangle in the Selection mode. The Path is blue, Polynome is Green, Text is violet, and Bitmap is orange. The multi-object selection has a dark blue border and a group is bright red.
Tip: Each object type has a different color of bounding rectangle in the Selection mode. The Path is blue, Polynome is Green, Text is violet, and Bitmap is orange. The multi-object selection has a dark blue border and a group is bright red.
Paths and Polynomes
Real-DRAW uses a simple path for any simple objects you start drawing - circle, square or curved line. Paths are made of Bezier curves only. Even a straight line in a square is made of Bezier curves and you can expand its control points to round the square.
The more complex object is Polynome. Polynome shape has not only Beziers curves but also lines and offset points which allows you to create "Islands" or "Holes" within the object. You can convert any time any Path to Polynome or it will be created automatically by software whenever it is needed (For example when using Combine command)
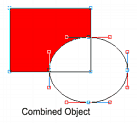
Combined object
This is a polynome created with combine command. It still retains all combined objects even they may be not visible. You can simplify such shape into normal Polynome with Create S ingle Shape Command.
You can also convert Painted object into Polynome.
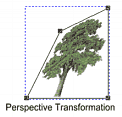
Perspective transformation can be applied to Packages and Bitmaps.