|
Brushes Tool Bar |
  
|
|
Brushes Tool Bar |
|
Real-DRAW Advanced
Brushes Tool Bar
During editing bitmaps you use only color properties, and a new Brush Tool Bar which will appear on your workplace.
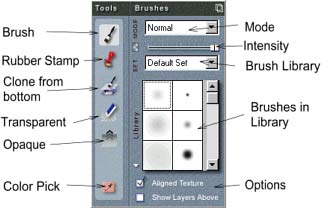
You can select color from Color & Texture, Color Space or Color Memory.
The color Space is especially useful for picking out different tones.
Another way is to Pick a color from anywhere in the image with the Color Pick tool.
The Color Pick on the Brush Tool Bar does the same thing as the one on the main Tool bar.
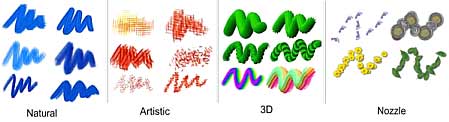
Brushes
You have many different predefined brushes in the Brush library. There are various Airbrushes, Artistic Brushes, 3D Brushes and Nozzles and you can create your own brushes and also new libraries.
Brush Mode
The Brush Mode determines how the Paint color affects the color in the Image.
Normal
The most commonly used brush mode, Paint color will simply paint over the image
Multiply
Multiplies the Image color and the Brush color. The result is darker. Painting with Black will produce black, painting with white will leave the Image colors unchanged. All colors in between will darken the image.
Difference
Subtracts the Image Color from the Brush color or Brush color from the Image color, whichever is brighter.
Screen
Works just the opposite to Multiply. The result is lighter. Painting with black will leave the Image unchanged, painting with white will produce white. All the colors in between will lighten the image.
Overlay
Overlay will colorize (mix) the Image with the Brush color. It uses either Multiply or Screen which depend on the brightness of the Image color in the area that you are modifying. This is a fun way to colorize an image. If you are looking for a more optically realistic colorizing method, use the Colorize brush from the Retouch Collection.
Darken
The resulting color is Brush Color or Image Color - whichever is darker. Painting with white will have no effect since the pixels from the Image will be always darker. In other words, the image color will dictate the resulting color if the brush color is lighter than the image color.
Lighten
Similar to darken, but the resulting color will be the lighter of the two (brush or image). Painting with black will have no effect and Image pixels will always be lighter, so the resulting color will be the one within the Image.
Hard Light
This works similarly to Overlay, it Multiplies or Screens the color, but the decision between modes is dependent on the the Brush color; while in Overlay it is dependent on the Image color. If the Brush color is lighter than 50% gray, the image will be Screened. If the Brush color is darker than 50% gray , the image will be multiplied.
Soft Light
This darkens or lightens colors, depending on the the Brush color. If the Brush color is lighter than 50% gray, the image will be lightened. If the Brush color is darker than 50% gray , the image will be darkened. While Hard Light can be pure black or white, Soft Light can't produce pure black or white, it will just darken or lighten.
If Lighter
The Brush Color will be applied only to areas where the Brush Color is lighter than the Image Color. Therefore this will paint only in areas darker than the Brush color.
If Darker
The Brush color will be applied only to areas where the Brush Color is darker than the Image Color. In other words, this will paint over areas lighter than the Brush color.
![]() Note: The mode settings will also work for Image Nozzles and Artistic brushes.
Note: The mode settings will also work for Image Nozzles and Artistic brushes.
Brush Intensity (Opacity)
The Intensity (Opacity) slider controls the Brush Opacity. An Opacity setting of 0% is completely transparent, and an Opacity setting of 100% is opaque. With a combination of Opacity and modes, you can control various aspects of the mode, allowing almost infinite effects.