|
Painting on a Vector Object |
  
|
|
Painting on a Vector Object |
|
Real-DRAW Advanced
![]() Painting on a Vector Object, Bitmap Layer
Painting on a Vector Object, Bitmap Layer
This is another unique specialty of Real-DRAW: You can paint on top of any Vector object where the strokes will be masked by the object shape.

To start painting on any object, select it first, and then press the Paint on Object button. ![]()
If your object was a bitmap, then you go to bitmap editing as described before.
What you paint will become a Bitmap layer of a vector object. The bitmap layer follows the size and shape of object. That means that if you change the shape of the object or resize it, the bitmap layer will adjust accordingly.
Note: If you rotate the object, you don't rotate the bitmap layer (Same as with the Object texture).
If for any reason you need to rotate the bitmap layer, you can use the Texture Size and Rotation tool.
![]() Erase
Erase
To erase a stroke, click on Erase/Transparent button and paint over the strokes. This will paint a transparency over the strokes in Bitmap layer, thus making the original color and texture of the object visible.
![]() Remove Bitmap Layer
Remove Bitmap Layer
If you ever need to remove the Bitmap Layer from the object, you don't have to paint over it with an eraser, as it's enough to click the "Remove Bitmap Layer button". This button, when used outside the bitmap edit mode, will remove the Bitmap Layer and also any additional Paint-On Transparency (see below).
But if you use this button, while IN the bitmap editing mode, it will remove only the bitmap layer, while the Paint-On Transparency (if any) will stay unchanged.
How to use it?
The simplest way is to paint various shadows or lines over the object, which may become an interesting addition to bevel. You can create brand new effects simply:

Above, we painted green, blue and yellow lines across the text with the airbrush and then added a flowers with the Image Nozzle.
But there is much more you can do
The feature, Paint on Object, is actually one of the most important features for airbrush drawing, and you may not be able find any similar software that makes it so easy.
If you use a normal (real life) airbrush, you know that the basic way to draw is to paint with an air gun through masks. In real airbrush painting you cut a mask (for example a circle) out of a transparent adhesive sheet and stick it on a paper. Then with the airbrush gun you paint over it. When you remove the adhesive mask you have a perfect circle with sharp edges, yet it is painted. Then you can cut another mask, put it over and try some other colors and shapes ...
This is also the idea for Airbrush editing in Real-DRAW, where your mask is the vector object. Real-Draw goes much further though. Unlike in real life, you can reshape the object (mask) afterwards, and then you can move the object up or down the layers.
You can also erase what you painted, and paint something under the object as well. There is also a very easy cloning method you can use to "blend" two objects together. It is quite simple but very powerful. If you are artistically inclined, you can easily create a painted like art form, which is both realistic, yet painted.
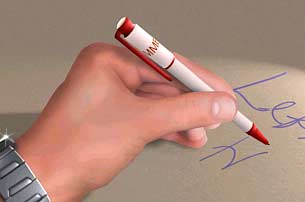
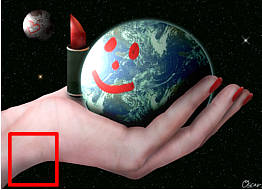
The image above was painted using this method. While the pen is a pure vector object without any paint, the hand is made up of vector objects with painted layers. Each finger is basically a separate vector object.
|
|
Another even more detailed image created using a combination of an airbrush plus a Surface Skin on a simple vector object.
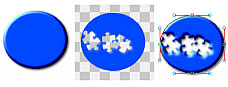
Show layer Above
This feature while applicable to all bitmap editing, is especially useful if you draw painted art. When you have opened an object for bitmap editing or painting, you can make all the upper layers, that intersect the object visible. This allows you for example to paint shadows exactly on the right spot - under raised objects.
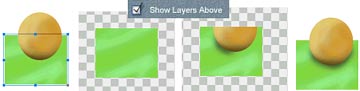
In this, surrealistic example of, let's say an orange on grass, we have 2 objects; a circle and a square. We have already painted some shadows and highlights on the circle (so it looks like a painted sphere), and also a few strokes on the green rectangle. Now we would like to paint a shadow on the rectangle from the sphere. We select the rectangle and click the Paint on Object ![]() button. In the Bitmap editing mode we check the Show layers Above, check box. The sphere appears in the places where it intersects the rectangle we are editing. Now we can paint with a dark airbrush on the rectangle, exactly in the places where we need the shadow. Don't forget that you can change the intensity of a brush by sliding the Intensity/Opacity slider for a softer effect or by using a pressure sensitive stylus.
button. In the Bitmap editing mode we check the Show layers Above, check box. The sphere appears in the places where it intersects the rectangle we are editing. Now we can paint with a dark airbrush on the rectangle, exactly in the places where we need the shadow. Don't forget that you can change the intensity of a brush by sliding the Intensity/Opacity slider for a softer effect or by using a pressure sensitive stylus.
With this knowledge, you can start making your own painted art, and if you are a novice, you will probably learn a great deal about colors, mixing, as well as light, and shadows as you progress. Just one piece of advice - everything in this type of art, is a game of shadows and lights.
There are various other very powerful tools to help you - Clone from bottom layer and Blueprint method as described later.
![]() Paint-On Transparency
Paint-On Transparency
As an addition to the normal transparency and Painting on a vector object, you can use the Paint-On Transparency option.
To Select this option you have to click on the small arrow on Paint on Object tool to reveal sub-selection toolbar.

This works similarly to the Painting on Object, however it will paint a transparency to the vector object instead of painting on the object bitmap layer.
The Paint-On transparencyis also in the menu: Object - Paint Transparency, and it is enabled for vector objects.
Imagine a complex object, where you want just a specific part transparent and none of the linear or radial transparency does the job - here is a perfect time to use Paint-On Transparency. Select the object, Click on the Paint-On Transparency button ![]() and you will get to the familiar bitmap editing. However, this time it doesn't matter what color you choose - it will always paint transparency.
and you will get to the familiar bitmap editing. However, this time it doesn't matter what color you choose - it will always paint transparency.
![]() Eraser can be used to remove the painted-on transparency (paint opaque).
Eraser can be used to remove the painted-on transparency (paint opaque).
To remove the whole Transparency Layer from the object, while in Paint-On Transparency mode, press the Remove Bitmap Layer button ![]() .
.
Using the Remove Bitmap Layer button, while NOT in Paint-On Transparency mode, will clear the Transparency and Bitmap Layer.
Tip: Paint-On Transparency works with the Bevel option in the same way as normal transparency, and of course you can use Nozzles, or any of the brushes.
Don't get confused by the Paint-On transparency feature - you will understand its potential when you use, and experiment with it.