|
Advanced Bitmap Edit Mode Options |
  
|
|
Advanced Bitmap Edit Mode Options |
|
Real-DRAW Advanced
Advanced Bitmap Edit Mode Options
There are plenty of options dealing with bitmap size that may be confusing at first, but the good thing is you are not normally require to change them.
The basic idea is that Real-Draw tries to hold on the original bitmap data as long as it can in order to use the best quality. This may not always be what you want and so there are few options how to modify the default behaviour.
Resized Edit
![]() +SHIFT
+SHIFT
It may happen, that you need to paint something very fine onto an object, but the brushes are too wide. A Resized edit is the cure. What you need to do is to hold SHIFT key while clicking on the Paint on Object Tool.
What will happen is that the object will temporarily resize to fit the edit view. This isn't a zoom. The object is physically resized, and then, when you exit the view mode it will return to its original size, with everything you painted on it. In this way you can paint more than pixel precise strokes, even hairlines which are still smooth.
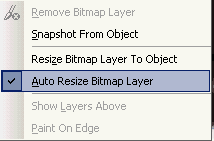
On the menu: Object-Bitmap Layer, there are a few additional advanced options which apply to Bitmap editing.
Auto Resize Bitmap Layer (Doesn't apply to Draft by Reference)
If you resize the bitmap and then try to edit it, Real-DRAW will automatically "apply changes". Normally Real-DRAW holds the original size of the bitmap until you "Apply Changes" or save the project.
You can change this behavior, by un-checking the Auto resize Bitmap Layer from the menu: Object - Bitmap Layer. If auto resize isn't used and you resize the bitmap, then when you go to the edit mode you will work on the original size bitmap. The size before, last "Apply Changes".
If you rotate the bitmap and then try to edit it, you will edit on its before rotation state.
Resize Bitmap Layer to Object
With rotation, changing shape and other changes on the object, the size of the Object changes. The Bitmap Layer will be always be dynamically resized to the size of object. If you don't use the above option, then in many cases you will edit the object in a different size than it appears to be.
This may be desired or not, so you have the tool to force the bitmap layer to become the same size as object.
Snapshot From the Object
Snapshot From the Object will copy the image, showing how the object looks (with bevel, and all the effects) into its bitmap layer. This may for example be used, if for any reason you need to know how the beveled object looks during the bitmap editing.
Paint on Edge
If you switch the Paint on Edge, to on, you will only be able to paint on the edges of objects, with specified Widths (the width slider will appear on the top tool bar). This is useful if you need to matte the edge of an object for example, when painting a very thin joint, shadow/highlights, between two objects.
![]() Tip: If you look at a fine painting or photograph, you will see that the edges often don't go simply from the shadow to the object color. Some times they go in a very thin layer,
Tip: If you look at a fine painting or photograph, you will see that the edges often don't go simply from the shadow to the object color. Some times they go in a very thin layer, ![]() from shadow first, an then to a highlight, and then after that to the object color. Other times it is quite the opposite. The gradient is however always hairline thin. You can paint a similar edge, by using the Paint on Edge technique. You first select a color; set a larger Width, and then paint lightly on the edge. You then set a smaller width and select another color. Paint over the edge again, and if you did it right, you will have created a hairline edge. Of course you can put more layers, or paint several more times to create the desired effect.
from shadow first, an then to a highlight, and then after that to the object color. Other times it is quite the opposite. The gradient is however always hairline thin. You can paint a similar edge, by using the Paint on Edge technique. You first select a color; set a larger Width, and then paint lightly on the edge. You then set a smaller width and select another color. Paint over the edge again, and if you did it right, you will have created a hairline edge. Of course you can put more layers, or paint several more times to create the desired effect.