|
Blueprint |
  
|
|
Blueprint |
|
Real-DRAW Advanced
Blueprint, Onion Skin
Blueprint is an image, positioned on the background of your project behind all the other objects. Blueprint has a few unique properties. It is visible all of the time (Onion Skin), and it could be used as a source for cloning. You can also use the Blueprint image as an original, from which you can draw an image.
You access the Blueprint from menu: Project - Blueprint.
Load Blueprint
First you need to load an image as a blueprint. Remember that the Blueprint isn't an object, so while you can change its position, you can't resize it. It is however very easy to convert the bitmap object to a blueprint, and then convert the blueprint back to a bitmap object again
You can load a Blueprint image from File, or from Object.
Load from file - similar to the bitmap import, and you will have the option to resize and crop the image before you load it. The Blueprint image will be centered on the canvas.
Load from Object - another easy way to load Blueprint from any bitmap object already existing on the canvas. In this case, the blueprint will stay on exactly the same spot as the Object is.
![]() Let's load an image with the Image import button.
Let's load an image with the Image import button.
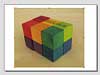
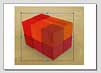
Above is an image we took with a digital camera, because we wanted to draw something similar. We resized the object to the desired size, left it selected, and then from the menu: Project-Blueprint we selected Load From Object. This caused two new buttons to be enabled:
![]()
The first is Show on Back and the second is Onion Skin on Top.
Now, we can delete the image object as we don't need it anymore. Even if you delete the object its image will be still in the very same position - that's the Blueprint.
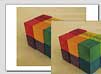
Now we can use the blueprint to guide us while we create a shape with the ![]() Path Tool.
Path Tool.
Now this isn't anything special, since we could have done it before, with the bitmap. But now we would like to draw some more elements but we can't see them because the new object is covering our Blueprint. We could play with the transparency, but this would become annoying if we added more objects. Fortunately this is easy to fix. Jjust press the second Blueprint button - Onion Skin on Top.
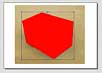
While in Onion Skin mode, the Blueprint can always be visible, by overlaying on top of all the objects.
We can easily create other paths with the guidance of the blueprint, and after that is done, it'll be time to remove the Blueprint, since we won't need it anymore. We use the Remove function from menu: Project-Blueprint-Remove.

We now have a pretty decent drawing which was done very easily.
![]() Note: If you want to keep the the Blueprint and continue later, you can. The Blueprint will be saved with the project and if you currently don't need it, just switch off both buttons Show on Back and Onion Skin on Top.
Note: If you want to keep the the Blueprint and continue later, you can. The Blueprint will be saved with the project and if you currently don't need it, just switch off both buttons Show on Back and Onion Skin on Top.
Now you can repeat this process with other images, and add another objects if you want.
Clone from Blueprint
![]()
Another great feature of Real-DRAW is that you can use the Blueprint feature as a Clone source during bitmap editing. More info is available in Cloning.
Other Options
In the Blueprint menu we have a few other options:
Position - allows you to change the position of the Blueprint by moving in any direction.
Center - centers the blueprint on the canvas.
Resize Canvas - Resizes the canvas to the size of the Blueprint.
Convert to Object - At anytime, you can go back and create a Bitmap Object from Blueprint, and can, for example, Convert the Blueprint to an Object, resize it, or change its position, and then use Load from Object to update the Blueprint.