|
HTML Slicer |
  
|
|
HTML Slicer |
|
HTML Slicer
![]()
Menu: Files-HTML Slicer
HTML Slicer is the most important tool to create Web Pages.
If you look on most professional web pages you will notice that they consist of a large number of elements rather than one large image. Each element on the page is stored in a separate file. The HTML language doesn't allow for precision positioning of elements. However designers use a HTML table where they are able position elements in table cells positioned where they require. Therefore we call the job of creating such table HTML slicing - we slice the big image into a slices of various sizes which will be placed into HTML table and will be reconstructed by browser to appear as a whole image.
Why do image slicing at all?
| • | We can make some graphic elements an individual links. "Slicing" approach is much better and more preferred than using image maps. (Better compatibility, accessibility, editability) |
| • | We can create rollover effect for some navigational elements. For example a button on a bar will highlight when user moves cursor over it. |
| • | We can leave some parts of the big image and add a HTML Text instead. Important for frequent page changes. |
| • | We can leave some parts of the image out, where the background of the page will show through. This saves downloading time. |
Image slicing is one of the major tool of professional web designers. Without good slicer it is very hard to create such HTML table by hand.
Real-Draw has advanced HTML slicer - it will let you to slice the graphics exactly the way you require and it will optimize all other slices the way a professional web designer will do. In fact you will be surprised that you can draw cells of any size and exactly where you desire without any big limitations.
To open HTML Slicer click on the Slicer button, or choose HTML Slicer from menu Files.

HTML Slicer will open resizable window where you can draw slices (Cells) and adjust the cell properties such as HTML link or Rollover effect. You can also specify and enter a text or HTML commands to a slice.
![]() Note:We will call each slice a Cell because ultimately the slices will be placed in a HTML table cells. Each cell is a rectangular in shape and can have any dimensions. Cells obviously can't overlap and they will form a HTML table when exporting.
Note:We will call each slice a Cell because ultimately the slices will be placed in a HTML table cells. Each cell is a rectangular in shape and can have any dimensions. Cells obviously can't overlap and they will form a HTML table when exporting.
You don't have to draw all cells, only the cells in which you are interested in. The rest will be automatically added. There are therefore two types of Cells:
| • | Active Cell. This is a cell we are interested in and this is also the cell we draw on top of our image. Active cell are shaded in green and they can have other properties such as HTML link, alternative text, rollover, HTML Text or HTML language. The Active cell will stay the way we draw it, HTML Slicer is not allowed to touch them. Active cell can be either Navigational, Empty or a HTML Text. |
| o | Navigational Link - this is a cell which has Link set to internet page such as http://www.mediachance.com or a local page such as index.html. User can click on such cell to navigate to other pages or sites |
| o | Empty Link - this is a cell which has empty Link. This cell will be exported as non-active and it will behave the same way as a Passive Cell (see below), except the HTML slicer will preserve its size. |
| o | HTML Text - this is a cell which has HTML text or HTML commands instead of the image. The image can be alternatively exported as a background of the cell. |
| • | Passive Cell. This is a cell we are not primary interested in. It is a part of the image but it has no link and it can't be navigational. We, therefore don't really care about its size. Passive cells are created automatically as you draw Active Cells to comply with HTML standard in creating tables - and they are optimized for size encapsulating as big area as they can. Passive Cells are shown transparent and HTML Slicer is allowed to change them when it needs to as you drawing or resizing Active Cells. |
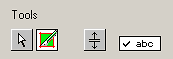
To draw an Active Cell select the Slice Tool (second button from left) in the Tools.
![]() Note: This tool will be selected by default when you open the HTML Slicer.
Note: This tool will be selected by default when you open the HTML Slicer.
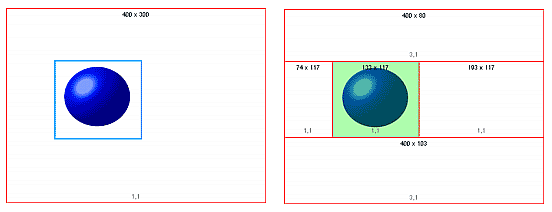
Here we started to draw a cell around our object. As soon as we finish drawing our Active Cell all other Passive cells will be calculated and fitted. On the right image you can see our Active Cell (green) and 4 other automatically generated passive Cells.
![]() Note: Images for both Active and passive Cells are exported. Only cell having HTML Text will not export image by default - but we can ask HTML slicer to do it.
Note: Images for both Active and passive Cells are exported. Only cell having HTML Text will not export image by default - but we can ask HTML slicer to do it.
As you will be progressing with drawing other cells the Passive Cells change accordingly but all Active cells wild hold their size and position. In our example we can just finish right here because we were interested only to create one cell around our object.
However if we need different configuration of cells, not the one which was done automatically, we can just draw another Active Cell - even if we don't plan to add any link to it.
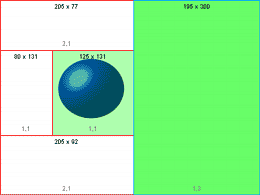
We created a bigger area on the right of our object by drawing another Active Cell. However we don't plan to add any link to it - we can use the created place to add text or other HTML components.
Enter text and HTML language
The Active Cell can be either a Link (Navigational or Empty) or a HTML Text. To switch the cell to HTML Text, simply select a cell and click HTML Text Option.
![]()
After we switch the cell to HTML Text we can directly type text in the cell.
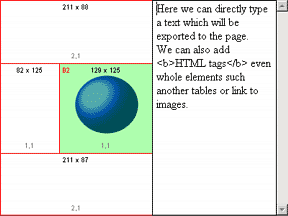
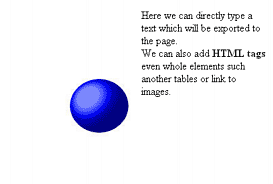
We can also type any HTML Tags (including Java script) or simply copy whole web page source. Here is the result in Browser:
Use Slice Image as the Cell Background
When we set the cell to be HTML Text the image behind will be not exported. Instead a web page background will show through. This is preferred method, it is always best to read the text on a clean solid color page. However we can let HTML Slicer to export also the
![]()
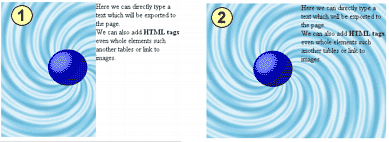
For this example we added a textured rectangle on the full background.(We simply used GenetX texture and apply Interactive HSL Color Correction.)
On the Image 1 we didn't let HTML Slicer to export the Image for the cell background. The Image 2 has exported the slice image behind the text.
![]() Note: The Cell background option in HTML table is supported in all recent browsers. It has been supported from version 3.0 of Internet Explorer and from 4.01 of Netscape Navigator.
Note: The Cell background option in HTML table is supported in all recent browsers. It has been supported from version 3.0 of Internet Explorer and from 4.01 of Netscape Navigator.
Anyway, remember there are still some number of people who use old browsers - in such cases the background of the cell will not appear (as in Image 1 above)
Also not many people like to read text over textured background, especially if you use heavy texture.
All HTML Slicer data such as Slice positions, links or HTML Text will be also stored in with project file.
Embedded Images in the HTML Text (Advanced)
This optional feature require some knowledge of HTML syntax language.
Since the HTML Text allows you to insert also any HTML Tags you may want to insert an images in your text. While the normal way would be to open the document in your web editor such as Adobe GoLive or Macromedia Dreamweaver and do the additional formatting there, you can still insert the images from the Real-Draw document directly into the HTML text by yourself. Such additional image is not part of the sliced table, but completely different image which supplements the text. This very page you are reading could be such example, there is a text and images to accompany the text.
Normally if you write HTML commands by hand (not many people do) for image you enter something like this:
<img src="images/myimage.jpg">
This of course require that such image myimage.jpg already exists. However you can let Real-Draw generate such images. It is very simple. Draw any object or Package in document and name it %IMGSRCxxxx (Double click on the Object in Layers to enter new name)
![]() Note: The % is indeed a part of the new name!
Note: The % is indeed a part of the new name!
The xxxx means you can additional suffix such as number to distinguish between various supplementary images.
Then (assuming you named your image or Package %IMGSRC1) in your HTML Text you simply write:
<img src="%IMGSRC1">
This will export the supplementary image and replace the text during export for the real link.
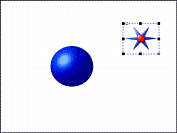
Here is the modified example. We created a simple Package of two objects. We created it quite large, then Package it and result resized to desired size.
|
|
|
We created a simple Package of two objects. |
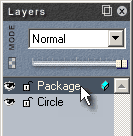
Now open Layers and double click on the Package |
This will open the Object label Dialog. Enter the %IMGSRC1 there |
Now we can move the object anywhere where it is not visible in normal table. We moved it to the right part of the image as on the picture above because there is going to be the HTML Text cell which will cover it. However you can move it completely outside of the canvas if you want. The idea is to have it somewhere in the document so the export can reach it, but the position is not important.
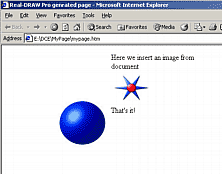
Now in the HTML Slicer write in the HTML Text cell your text and where you need the image type <img src="%IMGSRC1">
![]() Note: If you want the next text after image to be on next line not following the image simply add <br> after the image command. This is how we did it in our example.
Note: If you want the next text after image to be on next line not following the image simply add <br> after the image command. This is how we did it in our example.
Here is the result in the browser:
|
That means you can have all graphics in one Real-DRAW document which may help you in cases when you often change the graphics. |
Because editing HTML by hand isn't most enjoyable experience, you may actually format the whole text cell in your web editor and then copy the source to the cell. This will give you a compact version of your page without need to all the time go to your web editor if you change just the graphics.
Tools
There are just three tools from left to right:
Selection Tool - for selecting Active cells in order to add a HTML link or change other parameters.
Slicer Tool - the tool for drawing cells, it can be also used to select existing cell.
Resize Tool - resize the cell
Show Details in image
This option button ( abc) will let you to show details for each cell right on the image.
The details are:
Cell dimension on the top side (205x77)
Cell Span on the bottom edge (2,1). The cell span is a setting for HTML tables.
Show Slices in document.
![]()
Back in document we can show the slices as guides. This will show only the Active cells.
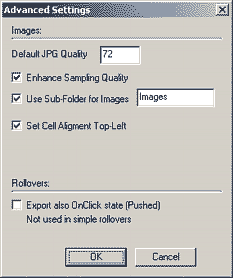
Advanced Settings
|
Default JPG Quality - any new cell will have this quality set as default. Enhance Sampling Quality - makes the images more sharp - especially Red colors which often looks jagged in JPG files. Images a re bit bigger, but it is worth. Use Sub-Folder for Images - you can let create image in any subfolder - or directly in the root of the web page document. Set Cell Alignment Top-Left - default HTML table has vertically centered alignment of cells. This may not be good if you plan to add text or images and you would need to change that - this setting will take care of that. Export also OnClick state (Down Frame). This will export that frame from buttons even if it is not used in rollovers. You may want to use the graphic for other purposes (for example as a default image in some pages) |