|
Layers |
  
|
|
Layers |
|
Layers
The layers are an essential part of object oriented graphics programs. Even if you don't use them they are there! Each object you put on the canvas is on its own layer and you can see it because top objects cover the bottom ones.
You can move the objects between layers, bringing the object back or forward, moving the object to the bottom or to the very top.
You can access these options from menu Object-Arrange or more conveniently with the tool bar at the bottom of Real-DRAW.
Or with the buttons on the Layer dialog itself
![]()
The first two arrows select the previous or next object. Great if you can't select an object from behind another one.
The other 4 buttons that move the object in layers are
| • | On the top of all |
| • | On the bottom |
| • | Move one layer up |
| • | Move one layer down |
However, you can do much more with the layers. To display the Layers window Menu: View-Layers
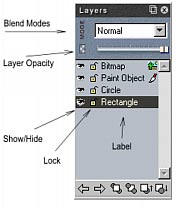
Below is a view of the Layers window.
|
The Layers window is resizable so you can adjust its size to the screen.
Each object on a layer is represented by two icons and a Label with an optional type icon.
The Object on the top is also the top most object on the canvas. |
Hide
The first Eye icon shows or hides the object. This is great if you want to make a few changes, and you want to export the image with or without these changes.
Lock
The second Lock icon locks or unlocks an object on the screen. Locked objects can't be selected and moved by a mouse. The mouse see no object and it will select any object that is behind it. This is great if you don't want to accidentally select any objects that you are not going to edit.
However, you can still select a locked object in the Layers window and move it by arrow keys pixel by pixel, or change its properties.
![]() Tip: You can lock a particular direction of movement, or lock the movement and still allow the object to be selectable - see the Sizes bar for more information.
Tip: You can lock a particular direction of movement, or lock the movement and still allow the object to be selectable - see the Sizes bar for more information.
Group
If you group a number of objects with the Group command, (Ctrl-G) all of the objects in the group will be locked but, grouped objects can still be selected with the mouse, and moved or resized. A group will appear in the Layers as a single item called Group with the plus sign.
|
|
|
You can expand the Group by clicking on the Plus sign. Then you will see listed all items in the group and you can select any item inside the group to change its parameters or move it without Un-Grouping.
You can also delete object from group this way or even Un-Group just the item from group. To Un-Group just the item from group you need to doubleclick on the item and from the Label Object remove the checkbox on Lock.
You can move the Group (if it is collapsed) or multiple Selections, only on the top or bottom of all other objects, although you can still move a single object in between objects of the group or any other objects.
If you apply parameters to the collapsed group then (simillar to selection) each object will inherit the new parameters. That is if you apply for example drop shadow to the group or selection, each object will have its own drop shadow. If you need to add a parameter globally to the group of some objects but not to each object separately then Packaging is the way.
Label
If you double-click on the item in the Layers window, you will be able to change the Label. This way you can keep track of the objects in large documents.
The optional type bitmap (on the very right) will be assigned depending on the label.
Please note the difference between Transparency and Layer Opacity. Layer opacity is a global opacity setting on the whole object and unlike the Transparency it doesn't change the bevel.
Layer Opacity
Layer Opacity works like a global opacity on the object layer. Moving the slider to the left will make the layer more transparent.
Blend Modes
The Blend Mode is how an object is combined with the objects, (background) underneath it. You choose the Blend Modes from the combo box on top of the transparency bar, and then adjust the transparency with the Transparency Mix.
Blending modes are useful tools in experienced hands for image/object composing.
Normal
|
A default and most used blend mode. It simply blends the objects with a transparency set by the Transparency Mix. |
Multiply
|
Multiplies the background and the object color. The resulting color is always darker. Multiplying any color with black produces black. Multiplying any color with white leaves the color unchanged. The effect is similar to looking at two overlapping slides. |
Difference
|
Subtracts either the Object color from the background or the background color from the Object color, depending on which is brighter. |
Screen
|
Multiplies the inverse of the objects and background. The resulting color is always lighter than the background or object. Screening with black leaves the color unchanged. Screening with white produces white. The effect is similar to projecting two slides on the same screen. |
Overlay
|
Combines Multiply and Screen modes - depending on the background color. The background color is not replaced, but is mixed with the Object color. |
Darken
|
The resulting color is background or Object - whichever is darker. |
Lighten
|
The resulting color is background or Object - whichever is lighter. |
Hard Light
|
Multiplies or screens the colors, depending on the Object color. That's the difference from Overlay. If the Object color is lighter than 50% gray, the image is lightened (screened). If the Object color is darker than 50% gray, the image is darkened (multiplied). |
Soft Light
|
Darkens or lightens the colors, depending on the Object color. The effect is similar to shining a diffused light on the image. If the Object color is lighter than 50% gray, the image is lightened and if the Object color is darker than 50% gray, the image is darkened. |
If Lighter
|
The Object Color will appear on the areas where the Object is lighter than the Background. |
If Darker
|
The Object will appear on the areas where the Object is darker than the background . |
Negative
|
Creates a negative of the background.
|
Tint
|
The object is more visible on a dark background than on bright background. It will disappear on white! |
Colorize
|
It will take the color from the object but will use the intensity from the background. |
You may use the Blend Modes for composing bitmaps or objects, and when creating new interesting artistic effects.
Don't worry if you don't understand the blending modes. You can skip the science and simply try various options.
![]() Tip: Try to use bevels with various modes!
Tip: Try to use bevels with various modes!