To add text, click the Text tool button on the left toolbar:
![]() Add Text, Rectangle or Simple Frame
Add Text, Rectangle or Simple Frame
To add text, click the Text tool button on the left toolbar:
![]()
Click in the Menu canvas area and a Text Entry windows appears. Here, not only can you edit the text, you can apply attributes such as Font, Size, Bold, Italic and set justification as Left, Center or Right.
Once you add text, you can resize it or position anywhere on the screen. To edit the text, double-click on it.
To add a rectangle or a frame, click on the rectangle or frame buttons and draw the rectangle on screen. Rectangles and frames are mostly used for the highlighting of text. For example, you may use a rectangle to draw an underline which you will learn later how to set-up visible only if the link is selected. Similarly you may use frame to highlight a thumbnail image.

![]() Selecting an Object
Selecting an Object
To select an object, simply click on it. This will select an object which is on the top. If you have a pile of objects and you would like to select the bottom one, then first click away from the object so nothing is selected. Then, hold CTRL and click on the objects. The bottom-most object will then be selected.
To select an object below the currently selected object, hold ALT and click on the pile of objects. By repeating this you will loop through each of the object on pile.
![]() Color and Drop Shadow
Color and Drop Shadow
You can change color of these basic elements with the Fill Color on the Color tab of Properties. Below is a Drop Shadow setting. You will notice that everything you add or draw will have the drop shadow on by default, but you can switch Drop Shadow off at anytime. The Drop Shadow makes the text stand out. If you look at the image above you will see that it makes the image looks more readable by adding a sense of dimension to it.
The Drop Shadow itself can have also it's own color. By default, this color is black. The sliders below are for setting the shadow offset (how far away) and the shadow intensity.
The top selector is for selecting the type of shadow, It has values: No Shadow, Normal, Strong, Sun, Hard and Fat
You can use these settings also for a few additional effects:
To create Glow: move the offset slider to left and set some other than black color as a drop shadow. Set type to Strong.
To create Outline: move the offset to left, the intensity to right and select Hard.
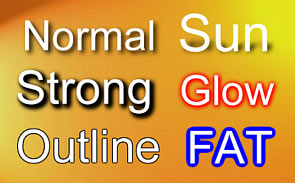
Note: The Strong type is particularly good for dark backgrounds.
You can apply these effects on any object in menu including video stills. The effect will be not part of the subpicture (highlighted mask)
![]() Buttons, Frames and Bullets
Buttons, Frames and Bullets
Being limited to only text and rectangles on a Menu wouldn't be much joy. To extend the artistic qualities of a Menu, DVD-lab provides you an Objects bin in the Assets window where many buttons, frames and bullets are available for your use. Each of these Objects were produced so that they blend perfectly into any background.

You can design your own buttons in software such as Real-DRAW pro - where these default buttons were originally designed.
![]() Buttons and Bullets
Buttons and Bullets
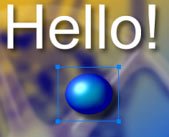
To add a button to a Menu canvas is easy - just drag the button from Assets bin and drop it anywhere on the menu.
![]() Colors and Drop Shadow
Colors and Drop Shadow
As with the text and rectangle you are allow to change color and drop shadow.
As you drag the button to the canvas, it's color will be set to Automatic (shown as white), this will show the button colors as the button was originally designed. You can re-color the button by selecting the button object and then choosing a color in Fill Color. You also have a choice to reset the color to it's original color by checking the Automatic checkbox.
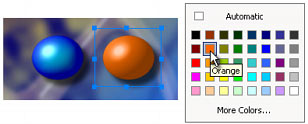
If you choose Black color the button will be de-saturated (Black & White). This method also works also on Video Stills.
![]() Transparency and Layer Effects
Transparency and Layer Effects
![]()
Each object on a Menu can have it's transparency value set to blend with other objects. You can set the transparency value of an object by selecting that object and moving the Transparency slider in Color Properties.
![]()
![]() Layer Blend Effects
Layer Blend Effects
This option changes the way a current object (layer) blends with the objects (layers) below. There are 14 typical effects available: (Normal, Multiply, Difference, Screen, Overlay, Darken, Lighten, etc.)
For more see Blend Modes in Appendix.
Note: When you switch from Normal to any other Blend mode, the Drop Shadow will be set to None. This is the most probable use for the blend modes. If you decide that you do want the drop shadow, you can turn it back on via Properties / Drop Shadow.
![]() Frames
Frames
Frames are essentially same as button objects, except that when you drop a frame on existing object, the frame will be resized to surround it.
You can always resize a frame or move it, but this method will save you some time. Another feature of frames is that it will also pick-up a link from the object behind it.
![]() Object Order
Object Order
As you are adding objects they are placed on top of each other in what we call "Layers".
On the top toolbar you have the left-most four buttons which can move the object within the layers:
![]()
You can move an object to top most, bottom-most, up one layer, down one layer by first selecting that object and then clicking on the buttons shown here that represents what you want it to do. The two right-most buttons are for centering the object on page horizontally and vertically.
![]() Layers
Layers
You can also select object by simply opening the Layers Properties. (Lyrs)
By right-clicking on the Object in Layers, you can also set few things such as Links or Copy.
There are few icons showing status of the object. For example the Eye icon corresponds to the Button Visibility:
Other icons: ![]() = Auto Action,
= Auto Action, ![]() = Object has link,
= Object has link, ![]() = Object is locked
= Object is locked
![]() Paste Attributes
Paste Attributes
This is a way to format two or more objects the same way, to have their formatting attributes be consistent. First, select the object to copy attributes from, then Copy (CTRL+C) that object as the source to clipboard. Then use paste Attributes on other selected objects from right click menu.
You have options for various settings as to which attributes you would like to be pasted over the new object from the source (in clipboard) including size, color or link information.
![]() Multiple Selection
Multiple Selection
You can select multiple objects by holding CTRL and clicking on the objects or by drawing a selection rectangle around all the objects to be selected.
This allows you to move or resize the objects together. It also allows you to change the color properties to all selected objects together.
![]() Align options
Align options
When you make multiple object selections, then right-clicking on the Menu canvas will present the Align sub-menu.
This allows you to align the objects in various ways.
![]() 3D Rotation Tool
3D Rotation Tool
![]()
Any Menu object can be rotated. DVD-lab allows you to not only normally rotate the object, but move it in a virtual 3D space. This is a great way to add some interesting looks to your Menus by tilting, rotating and panning the text, buttons or video stills.
![]()
You can rotate around one axis at a time by holding the keys:
CTRL - rotate around X only
SHIFT - rotate around Y only
ALT - rotate around Z only (same as normal 2D rotation)
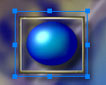
Note: remember that active buttons on DVD can be only rectangles. If you rotate a button, the active button space will be the maximum rectangle around the button. This will change the distance how close together you can put two buttons. It doesn't affect non-linked objects. See the picture below which shows the new active area:
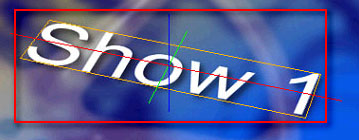
Note 2: When you select the object, the bounding rectangle with the resizing handles will remain in the original object position for simplicity.