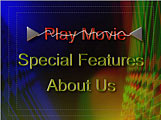
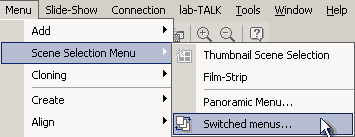
Menu - Scene Selection menu - Switched menus
In previous chapter about cloning we mentioned some more advanced techniques of creating interaction that involve multiple menus.
Switch effect
We started to call this type of menu "Switched" because this is essentially what is happening. Instead of modifying, adding or removing some objects on a menu - which is common in multimedia applications but unfortunately not possible on DVD, we simply quickly switch to the menu that has the object already modified, added or removed. The switching from one menu to other is fairy quick so user will believe that the menu actually changed. (Although players may vary). With this trick plus mixing it cleverly with some normal highlighting type of action we can create many different types of menus:
Here are the same visual ideas.
|
|
|
|
Switched menu trick allows us to do almost anything possible, if we have enough time for it.
Mixed Technique
It was not exactly intended to make menus this way when the specs of DVD were created. So it has a downside. There wasn't any requirement for players to be able to switch from one menu to another as fast as possible. While it isn't long by any means, the time lag may be an issue. For example when user press an arrow button he expect that the selection jumps immediately to next button. With switched menus (and Auto Action) this doesn't happen right away. There may be some 0.5 sec. before the menu changes. Impatient user doesn't see any action for this brief period after he press the button. That may foul him in belief that the remote didn't send signal so he may quickly press the button again and ultimately end up two buttons down.
It is therefore good to mix both techniques - the old highlighting which gives the immediate feedback and the switched menu that allows us to do visual tricks.
Menu Cloning
A Menu Cloning is especially great option for building Switched menu of any kinds, because the exact position of objects across various menus plays vital role in the trick.
Switched Menu Wizard
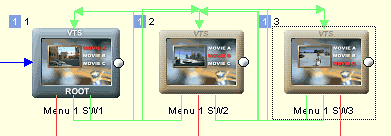
In all switched menus the number of menus depends on the number of buttons (behind each button is a menu usually called by Auto Action).
The Switched menu Wizard will create this kind of Auto-Action menus when pressing arrow button on remote will immediately call the auto action of the button that switch to the other menu.
The wizard will create each new menu by cloning it and place all the links to correct places so the moving arrow button will switch menus and pressing Enter will follow the destination link.
Before you start the wizard you have to create your menu with all the links to destination places (like Movies, other menus etc..). The wizard will build switched menus based on the linked buttons.
When this is done, call the wizard.
A Wizard will show the short explanation for people who don't read this and allow few options.
Here are the default settings:
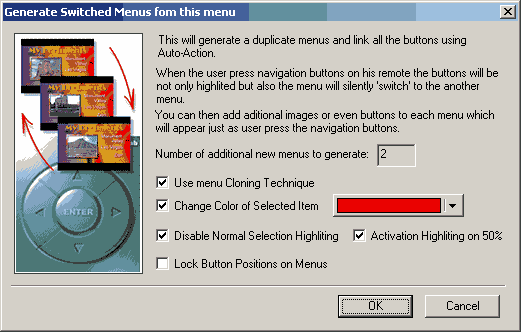
Use menu Cloning Technique - this doesn't just duplicate the main menu, but sets a cloning relationship. That means if you change one thing on one menu, all other menus will be updated. That's a great helper.
Change Color of Selected Item - On each created menu one item is selected - this is the item where pressing Enter will go to the button destination. You can instruct to change color of this item if you don't want to use the old fashioned highlighting overlay as in normal menu.
Disable Normal Selection highlighting - Disable the overlay highlighting (Selected). When you want the selected item to change color, it assumes that you don't want to use the old fashioned overlay highlighting.
Activation Highlighting on 50% - It is usually good to have activation highlighting set because it visually shortens the time between menus being switched.. You may set the Activate color in the Color map to the same color as you use in Change Color of Selected Item. (This has to be done prior to entering the wizard). This option will set the Activation highlighting to 50% of transparency, hiding bit the fact that this is an overlay.
Lock Button Position - not needed if you use menu Cloning since all buttons will be synchronized.
When we click OK, a Clone Menu option will appear (if Use menu Cloning Technique was used)

You can see that some Cloning options that would interfere with what the wizard intends to do are disabled - the Color cloning is switched off because we enabled Change Color of Selected Item and the Link Cloning is obviously off because each button needs a different link.
We will leave it as it is. Two new menus will be created and all links will be placed accordingly.
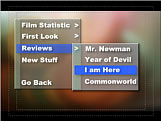
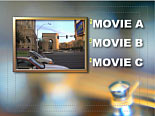
Now, our goal is to display different image for each selected button. Sort of like a Still preview of movie.
So we will replace the still image for menu SW2 and SW3. (You can replace a video still by dragging a new video still from preview window over the old one - replacing bitmap data has no effect on cloning, see more in Cloning chapter)
That's all.
A typical playback sequence of this type Auto-Action Switched menu is as following:
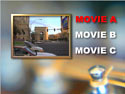 |
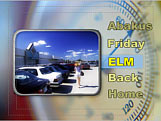
User see the first menu. "How nice, how nice..." he says.... |
|
He press the Down arrow button on remote to get to MOVIE B because according to him "the MOVIE A is a chick flick." |
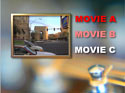 |
Because there is auto-action set on the next button, an Action Color will immediately appear over the next button and the menu will go to switch. It may take on some player up to 0.5 sec. until the switch appear, therefore we used the Action color red and 50% transparent (Color Map), because it shows immediate action. Because we have the selected item painted in red - we could disable the Selection color . |
 |
The menu switched and user see selected next item. Also the image on left changed. "Now let's see some action!" He says with one hand on remote and other in popcorn bag... |
|
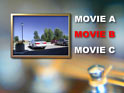
He then press Enter on the remote |
 |
A menu will immediately react by displaying Selection color over the button. We can be creative, the selected button on each menu may be in different Button Hi-lite Group than the rest, allowing us to have different color for the Action highlighting when user actually press Enter.(as we have here) |
 |
A movie plays.
Next time you will over-hear the user saying to his friends that DVD obviously must allow the same creative freedom as any multimedia application. "I have seen it doing things! .." he says |
Once you understand the simple logic behind switched menus you will discover many other usages.
Here above we used Auto-Action to switch the menus which gave us the possibility to change image while user move from button to button. We also replace the normal Selected overlay with nice smooth red text but cleverly used Activated overlay to gave user the quick feedback.
That's just one simple sample, it can go much more complex from here.
![]() Note: While this allows us to create many great visual tricks, we shouldn't forget that the main goal of our work is the usability, not a showcase. What good is a special effect menu if it only confuses user (who watch the DVD mostly because of the main feature and doesn't really care to what great length we had to go to make the menu switching, buzzing and popping). A standard way of making menus - especially when combining with motion is still the most rewarding.
Note: While this allows us to create many great visual tricks, we shouldn't forget that the main goal of our work is the usability, not a showcase. What good is a special effect menu if it only confuses user (who watch the DVD mostly because of the main feature and doesn't really care to what great length we had to go to make the menu switching, buzzing and popping). A standard way of making menus - especially when combining with motion is still the most rewarding.