Aspect Ratio
DVD Menu Studio supports 4:3 and 16:9 aspect ratio.
Because the TV uses rectangular pixels and PC monitor square pixels there was always a problem to design menus which looks the same on computer and on TV. Not any more in DVD Menu Studio.
DVD Menu Studio lets you focus on Aspect ratio rather on a pixel size. That is you simply choose the ratio, design and export will do the rest.
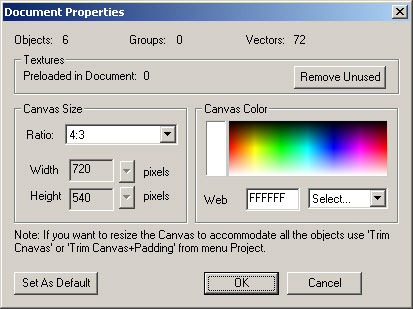
To set the aspect ratio, use menu : Project-Size and Color
You can also set other sizes as Custom.
4:3 and 16:9
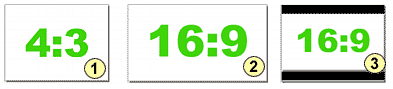
4:3 is the aspect ratio of a normal TV (Image 1). 16:9 is the aspect ratio of a widescreen TV (Image 2). A 16:9 feature will be letterboxed on 4:3 TV (Image 3)
4:3
So far the safest way is to use 4:3 menus. Many hollywood movies even they are in 16:9 widescreen format still have 4:3 menus.
16:9
If the main feature on DVD is in 16:9 format you may want to do matching menu in 16:9.
Potential problems of 16:9 menus
The possible problem using 16:9 menus is on a 4:3 TV's. DVD will use the same 16:9 menu background for all systems 4:3 or 16:9. However the DVD player expect to find a subpicture which is already letterboxed to display it over 16:9 background on 4:3 TV. Here is the potential problem, not all authoring software allows you to enter more than one subpicture streams for menu. Some authoring software will do the letterboxing and pan-scan automatically during mastering, some (like Scenarist) will allow you to enter more than one subpicture and some may simply ignore this. Then the user watching this on his 4:3 TV may find the highlighted menus be strangely offset from the related background. You haven't seen such DVD? Even Hollywood sometimes does this.
The bottom line is : Unless you are sure your authoring solution can handle 16:9 menus properly, the best way is to design majority of menus in 4:3. If you are not sure, just do some tests. Make your project 16:9, create 16:9 menu, import it, record it on DVD-RW and watch on 4:3 TV.
 Note: If you use Scenarist as the Export in DVD Menu Studio, the letterboxed subpicture will be also created. In real life it is enough to have 16:9 and 4:3 letterboxed subpictures for menus becuase very few people would set their DVD player to 4:3 Pan-Scan (Not even mentioned that it seldom works). However if you require also Pan & Scan subpicture, you can export the same design again using Generic Export. Here you will be able to specify to export a BMP file also as PS.
Color
The default background color is black. You can change it in the menu : Project-Size and Color but remember a bright background may look nice on computer but will look strange on TV.
Safe Area
The default background color is black. You can change it in the menu : Project-Size and Color but remember a bright background may look nice on computer but will look strange on TV.
You will notice the two rectangles shown over the canvas. This is called Safe Areas.
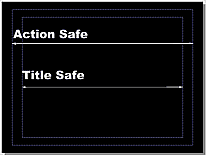
The normal tube TV's are usually set to overscan, that means you can't see the edges and you loose up to 20% from image you see on computer screen.
Make sure that all important informations such as text and buttons are within the Title Safe area.
You can switch on/off the safe areas with the Safe Area button. ![]()