DVD Menu Studio - Basics
Manual
Please note that this manual is divided into two sections.
- First section is about the DVD Menu Studio and a menu creation process.
It describes all the necessary steps in order to create working menu for various authoring applications
- Second part goes into the details about various drawing functions of the software.
 Note: This software core is based on a Real-DRAW Pro, the powerful vector, bitmap 2D and 3D editor.
This is why the second part will address the software as being Real-DRAW Pro. We can search and replace the text "Real-DRAW Pro" with "DVD Menu Studio" in this manual, but since the core is the same, I would have to do this every time a new addition was made to either of the software.
DVD Menu basics
Subpicture
This word will be often mentioned because it is the essential part of the menu.
A subpicture in DVD is a special frame which can be overlaid on top of the video image by DVD player. A typical subpicture is a Subtitle.
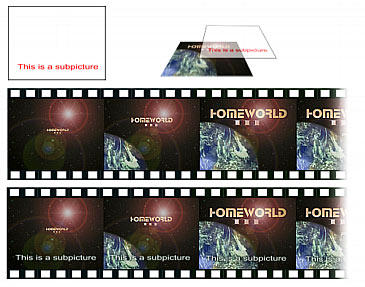
The Subpicture Frame can have maximum 4 colors, typically Red, Blue, Black and White which can be then mapped into other colors on the composite image. That means even if our Subpicture is red it can be mapped and displayed as white, yellow or other color. Also the subpicture can have 16 possible transparency levels.
Categories
The DVD menu can be divided into few categories:
- Still menu with subpicture
- Motion menu with subpicture
- Still show
Still Menu with Subpicture
It is created by a still background and a subpicture. The subpicture is then shown on place of Button and it can be mapped into any color from palette and can have also a transparency set.
This is the most common menu and this is where DVD Menu Studio put its emphasis.
 |
 |
 |
| Background |
Subpicture |
Composite |
While the subpicture is Red on White, the composite shows a green overlay. This is because of the ability to do Color Mapping. The white was set to have full transparency and the red was mapped into the green color.
Motion Menu with Subpicture
Same as above, but the still image is simply replaced by a short video. On DVD both Still and Motion menus are the same - the still is encoded into a mpeg "video" anyway during the authoring. That's why many authoring software allows simply replace the background image with a video clip.
|
|
 |
| Still Background |
Subpicture |
Replace Still with the video clip |
There is not much different way to make Motion menu than Still menu. A designer has to prepare the short video clip in a video editing software such as Adobe Premiere, then export a representative frame as a still picture. The menu is created then the same way as Still menu using this static frame as a background. In authoring software you simply replace the background by the actual video clip.
Some authoring packages allows you to also directly drag a movie title to the menu to create a moving thumbnail - this is often used in a home videos.
Still Show
Still Show is a series of "Backgrounds" with no subpicture over them. The Button Hot-spots are then invisible and set as auto-navigate. That is if viewer press the navigation arrows the screen will simply jump into another background.
 |
 |
 |
| Background 1 |
Background 2 |
Background 3 |
This allows you to do a lot of neat tricks such as in our case we added a small lens flare to each button.
However there is a short delay between switching the background frames on DVD. This may not seem as a big deal, however in real life this short delay often confuses users because they see no interaction for the brief time. This is a main reason why this type of menus are not that popular. Authoring tools often left this type of menu to designers. Some authoring software such as Impression DVD-Pro will generate all the necessary links for you if you supply the correct file (which DVD Menu Studio can easily generate)
Note: The most common menu is the first Still menu with Subpicture optionally with ability to replace the background with a movie clip.
Technical issues
Creating menus in other applications than DVD Menu Studio was never so simple. It required a lot of steps to assure the result will be displayed correctly.
DVD Menu Studio hides all the technical issues of menu creation from the designer so he can now focus on the design itself. It formats the menu properly for the systems and does all necessary steps to assure the best possible result.
1. Aspect ratio. First typical issue designer encounter is the aspect ratio. The Computer screen has square pixels while TV has rectangular. So if you design in the correct DVD specs 720x480 it will become stretched on TV
 |
 |
| Circle designed in 720x480 |
Circle shown on 4:3 TV |
DVD Menu Studio will free you from this problem - You design in 4:3 or 16:9 aspect ratio and then during export you choose the system (NTSC or PAL) and the files are then formatted correctly so they will appear the same way as they were designed. That means what you see on the computer screen is what you get on the TV.
2. Antialiasing. Another step which has to be done is to assure that the subpicture is really 4 colors only. That means the subpicture can't have any anti-aliasing. DVD Menu Studio assures that this is true and removes the anti-aliasing automatically during designing and then again during export.
3. NTSC Safe Color. To prevent blooming and oversaturating on NTSC TV systems the image should be converted to NTSC Safe Colors. DVD Menu Studio has this option during export.
4. Correct File Formatting. This is often the hardest part. Each software works differently and expect different type of file or what is in the file. They vary in terms of layers, layer names, visibility etc. It sometimes looks like the DVD creators expect to have a little degree from rocket science. This is often the most common problem - you design the menu as the documents require, do many steps and then load it in the application - and something is wrong.
DVD Menu Studio will put all this away. The export inside does all the steps necessary for each application. It does exactly what the application requires making the transition painless.