


Button menu
While Subpicture is the standard in all DVD menus some authoring systems lets you to make a Still show menu where the interaction is not made by showing subpicture, but rather jumping from frame to frame. Also some authoring applications such as DVDit can't have Subpicture imported but it will create the subpicture from the button automatically.
|
|
|
| Background 1 | Background 2 | Background 3 |
 Note: This has a disadvantage. Such menu has a slight pause from time user click on navigation buttons to the time it jumps to the right frame.
In the Button menu the Subpicture is not used. That doesn't mean you can't have it there. In fact you can design your menu to be both - Subpicture and Button.
If you want you can hide the subpictures so they don't distract you from work. They will still exist on the image but will be not shown.
 |
 |
When you select any Normal object there are 2 buttons visible on the top menu near the subpicture selector.
![]()
The first button will set the object to be a Single Frame Button, the second button will Add a second frame to the object (Multi-Frame button). A Button Object properties will be also shown. You can show/hide the Button Properties anytime by clicking on the ![]() button in the very top menu.
button in the very top menu.
What is a frame?
A button can have up to 3 frames. The Normal frame is always present - any object has always a normal frame. This is what you normally see.
However a button can have also 2 other frames - Over frame (or Selected) this is what is shown if the button is selected and a Down frame (or Activated) this is what is shown if the button is activated.

Normal ![]() , Over
, Over ![]() and Down
and Down![]()
For DVD menu we use just two frames maximum - Normal ![]() and Over (Selected)
and Over (Selected)![]() frame. The third Down frame is not used in the Still show menu .
frame. The third Down frame is not used in the Still show menu .
Single-Frame Button Object
 |
By clicking on the lock near the Normal Frame in the Button Object Properties or by Clicking at the Single Frame Button in the menu the selected object will be set to be a Single Frame Button mode. | 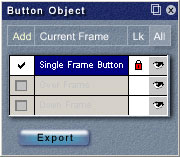 |
What that means?
We simply set that this object is a Button object so we don't want it to become a part of the background. We however don't want/need to set any other frame, just have Normal frame.
Where is this used?
This is heavily used for menu for DVDit authoring package. Here we don't need any other frame because DVDit will automatically add subpicture to the button objects. But we need to separate the object from background.
Also it can be used for Impression DVD-Pro subpicture menu. By enabling Single Frame button on object below subpicture this will be also exported to Impression. The result will be a movable hotspot with the underlaying button.
Example:
1. First hide Subpictures and select the text, which is still a normal object

2. Apply the Single Frame Button
That is it. Nothing changed in the object itself except the Button Object properties will be shown with the red lock and the object will have a new icon in the layer list:
Now you can do this for all three texts and export it for DVDit.
Multi-Frame Button Object
 |
By clicking on the check box in the second row in the Button Object Properties or by Clicking at the Multi-Frame Button in the menu the selected object will be set to be a Multi-Frame Button mode. |  |
What that means?
We add a second frame to the button. This frame of the object can have different properties. For example we can change Color of a text, or move it to different place.
Where is this used?
This is used for creating True Color menu for Impression DVD-Pro. Also you can use it for Generic export as series of images if you want to build a Still show menu in your application.
How to change what Frame of button I am editing?
To change which state (frame) you are editing just click on the particular row.
Example:
1. First hide Subpictures and select the text, which is a normal object. If it is currently a Single Frame you have uncheck the lock in the Button Object properties.
2. Apply the Multi-Frame Button
The Button Object properties will show a new frame created. You can now select it so you are editing that new frame.

We can for example change the color to green and also change the shadow to be a Sun Shadow:

If you click on the Normal Frame row, the button will return to the normal state (white text and normal shadow)
This is how you do it for all Button objects.
Frame position
The frames can have different positions - you may want to move the Over frame of the button a few pixels down and to the left to simulate the action. However normally if you move the object in any Frame all frames are moved together. If you want to offset the Over or Down Frame from the other frames move it with holding CTRL key.
How to switch frame of all objects
These are helper buttons and switch all multi-frame objects to the appropriate state.

Simply click on appropriate eye button to switch all objects in document to this state.