Color Mapping
The 4 subpicture colors Red, Blue, Black and White are not the same color that will be displayed by DVD player.
These are colors defined in the subpicture image, but DVD player can change them to different colors. Also each of the 4 colors can have a different transparency level.
To define this relationship between the subpicture color and the real color/transparency displayed by DVD player you can use Color Mapping.
Color Mapping can be found on the Preview window and also on the particular Export option (where it makes sense).
First you have to have some subpictures defined, then lick the Preview button to see the Preview window.
 Note: The color mapping is not necessary in Button type (True color) menu.
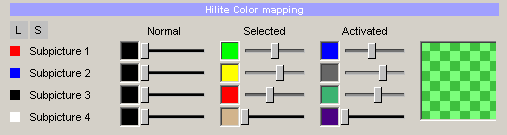
The layout of Color Mapping is quite simple.
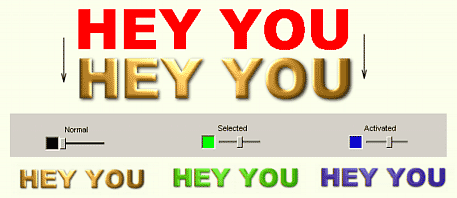
You have 4 rows, each represents one subpicture color Red, Blue, Black and White. Then there are 3 columns Normal, Selected and Activated. These are the mapping for the state of the button.
Each color/state is represented by a Color selector and a Transparency slider:
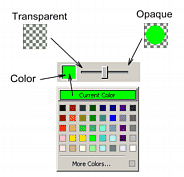
By clicking on the Color square a color selection appears. You can choose any color you like.
How it all works?
For now lets focus on just one row - the Red subpicture color.
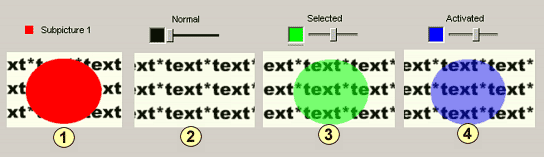
The Image 1 is what we designed in the DVD Menu Studio. We used a text as a background and then added circle in Subpicture 1 editing mode.
The Image 2 is the normal mode previewed on DVD. The color of the normal mode is set to black, but that doesn't matter because the Transparency slider is set to fully transparent (left). The normal mode means the button is not selected. We can of course put some color and opacity to show it, but in most cases the normal state is fully transparent so the background can be seen. The background has the button in full colors which is then covered (partially) when the button is Selected or Activated
The Image 3 is the Selected state, this is what is displayed as a selection when user press navigation arrows on remote. We choose a green color and about half the transparency.
The Image 4 is an Activated state. This is state which appear when user press Enter on his remote control.
Exactly the same goes for other subpicture colors - blue, black and white.
Note: The White color is often a background color - which is then set as fully transparent.
The application is simple, here is the same as above, but this time we have a nice text in the background and we put exactly the same text as a Copy to Subpicture 1

On the image below this is illustrated by the arrows. In reality the red text and the background text overlap because they are exactly one over another, but for this image they are shifted to see them both.
This is the most common usage of the menu subpicture.