|
Color Lab |
  
|
|
Color Lab |
|
Color Lab is an easy to use, yet complex color enhancing and correcting filter using more advanced method than the typical RGB correction.
The goal of Color Lab is to produce Vivid, color-corrected, punchy images without over-processing the data. This is very powerful tool. It instantly produces results that are normally much harder to do with any combination of regular RGB tools.
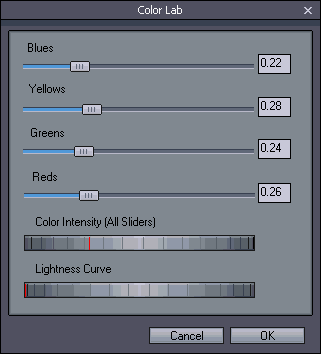
The main difference from any other tools is that instead of only Red, Green and Blue pixels we now work with 4 colors adding Yellow to the group . This allows for more natural color correction.
Color Lab works in relative mode where we start from zero without any effect. Moving corresponding slider will enhance its color.
That means if we want to attenuate some color group instead of enhancing it we have to move all other slider up.
Usage:
The best way is to first adjust the dial Color Intensity (All sliders) which will move all the color sliders and making the image uniformly more vivid. Then we can adjust various color groups in small amounts to color correct the image.
Color Intensity (All sliders)
Move all the sliders up, making the image more vivid across whole spectrum. This dial doesn't have any other own function except controlling the sliders.
Lightness curve
Adjust the Luminosity curve. It has similar effect to adjusting contrast, but unlike RGB contrast, the Lightness curve is applied only to the luminosity making it feel much more natural.
Tip:
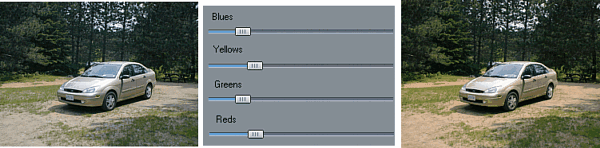
Quick Haze removal (Nature photos)
Increase all sliders with the Color Intensity, then tone down the Blues:
This creates instant vivid natural lanscape images.