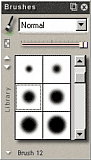
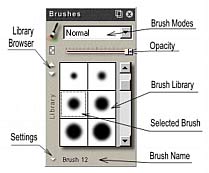
The Brush bar is used with all brushes. Each Tool (or set of tools) have its own predefined brushes and they will appear on the Brush bar.
.
|
|
There are also other options on Brush Bar: The Brush Mode, Opacity of the brush, Brush Library and settings.
This Brush Mode determines how the Paint color affects the color on the Image.
Normal
The most common one, Paint color will just paint over the image.
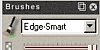
Edge-Smart
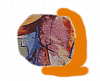
This is a special and very useful PhotoSEAM mode which allows you to paint along the color edges. The Edge-Smart mode will find a nearest edge and determine on which side you want to paint and don't paint over the other side.
You can easy paint around some troublesome object without painting over the object.
See example:
 |
 |
 |
| We paint this "potato" with normal brush and some texture. | Now we select a different color and the Edge-Smart brush. | We paint from the outside of the object, close to the edge. The brush will trace the edge - it won't go into the object if we keep it "mostly" outside. |
You just need to stay with most of the brush on the side where you want to paint.
After you trace the edges, you can switch to normal brush and finish the less difficult places.
Tip: You can change Opacity and paint with Edge-Smart few times around some hard to determine edges - for example hair, etc.. With a little of training this brush can be a big help.
 |
 |
 |
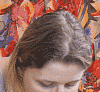
Here is an example of what Edge-Smart can do. We painted with Edge-Smart around the Head, then change Opacity to 75 % and paint again with Edge-Smart around some troublesome area to finish details. The result is perfect fit - see the detailed image. |
Multiply
Multiplies the Image color and the Brush color. The result is darker. Painting with Black will produce black, painting with white will leave the Image colors unchanged. All colors in between will darken the image.
Difference
Subtract the Image Color from the Brush color or Brush color from the Image color, whichever is brighter.
Screen
Works the opposite way of Multiply. The result is lighter. Painting with black will leave the Image unchanged, painting with white will produce white. All the colors in between will lighten the image.
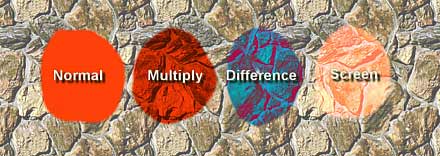
Here is the sample of basic modes. All were painted with Red color and 100% opacity.
Overlay
Overlay will colorize (mix) the Image with the Brush color. What it does, is it using Multiply or Screen depending on the brightness of the Image color. This is a fun way how to colorize image. If you are looking for more optical realistic colorizing, use the Colorize brush from the Retouch Collection.
Darken
The result color is Brush Color or Image Color - whichever is darker. Painting with white will have no effects because the pixels from Image will be always darker - so they will be the result color.
Lighten
Similar as darken but the color is chosen from whichever is lighter. Painting with black will have no result - Image pixels will be lighter - so the result color will be the one on Image.,
Hard Light
This works almost as Overlay, it Multiplies or Screen the color, but the decision depends on the Brush color, while in Overlay it depends on the Image color. If the Brush color is lighter than 50% gray, the image will be Screened. If the Brush color is darker than 50% gray , the image will be multiplied.
Soft Light
This darken or lighten colors, depending on the Brush color. If the Brush color is lighter than 50% gray, the image will be lightened. If the Brush color is darker than 50% gray , the image will be darkened. While Hard Light can be pure black or white, Soft Light can't produce pure black or white, it will just darken or lighten.
If Lighter
The Brush Color will be applied only on areas where the Brush Color is lighter than the Image Color. In other words this will paint in areas darker than Brush color.
If Darker
The Brush color will be applied only on areas where the Brush Color is darker than the Image Color. In other words, this will paint over areas lighter than Brush color..
Note: The modes will work with all brushes, for example with Image Nozzles or Rubber Stamp.
The opacity slider controls the Brush opacity. Opacity 0% is completely transparent, Opacity 100% is opaque.
Combination of Opacity and modes you can control various aspects of the mode.
![]()
The Opacity works with all brushes, also with Retouch or Effects. While painting color it controls the opacity of the color, when painting with Retouch or Effects it controls the intensity of the particular effect. Painting with Contrast Brush with Opacity 50% will enhance contrast less than with Opacity 100%. Etc....
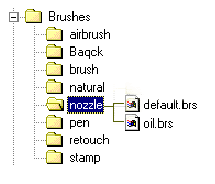
Brush Library is the selection of brushes for each Brush tool. For example Image Nozzle will display Image Nozzle Brushes etc..The Collections of Tools such as Retouch or Special Effects all shares the same set of brushes. There are other Libraries hidden behind each tool. To change the library you use Library Browser.
Library Browser
What you see for each tool are not all brushes available. You have small arrows near the left side of Brush Library. They Browse trough other libraries. With this you can add many libraries of brushes specific for each tool. For example you may have an Image Nozzle libraries divided into Flowers, Rocks, etc....
 |
 |
 |
| Default Nozzles in Image Nozzle Tool. | Click on the small arrow on the left side of the Library. | Another Image Nozzle library will appear! |
Each tool has its own brush libraries in separate Sub-directories in Brushes directory One of the library is named default.brs. If you download new libraries (for example the popular Nozzles) you just need to copy it to the proper directory and that's all. With Library Browser arrows you will be able to change it.
Settings (Brush Library)
Settings allows you to load/save a new Library set, Import/Export single brush. Delete brush from the Library Set or edit the Brush properties. You enter the Brush Library menu by clicking at the small arrow on the bottom of the Brush Bar.
See Brush Settings for more info.