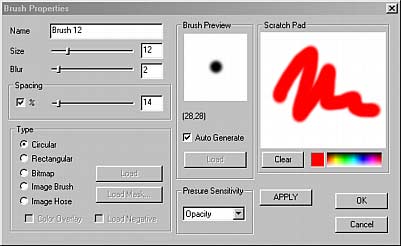
It is important to understand how Brushes work. You could add your new brushes and with the different options you can create many interesting variations.
In case you want to adjust brushes or add a new brush you will do it from this Brush Properties dialog box. To get to the Brush properties, select any brush from Brush bar and click the small arrow on the bottom of the Brush Bar. From the Brush Library menu select Edit. If you want to create a new brush, click Add.

Name
The name of the brush - could be anything.
Size
In case of Circular or Rectangular brushes this is the size of the Brush.
Blur
In case of Circular or Rectangular brushes this is the Blur of the brush - the blur creates a smooth edges - for example Air Brushes have generally large Blur Value.
Spacing
The Spacing is the distance between brush marks in the stroke. The value is a percentage of the brush Size. The different spacing is best visible on Non-circular brushes:
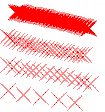
Enable or Disable Spacing - Most of the Brushes in order to work as they suppose to do should have Spacing Enabled (a check mark next to the Spacing slider) otherwise the steps will depend on the speed as you drag the mouse. In many Brushes this will result in separating the whole stroke into dots as you move faster. However in some exotic brushes this could be a welcome effect.
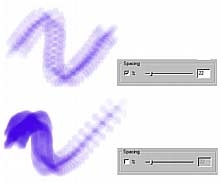
The first Brush uses Spacing, the Second has spacing not enabled (no Check mark) so the spacing depend on the speed of the stroke. When we move slowly, also the brush is more dense.
There are generally 2 kind of brushes - a generated brush - such as Circular or Rectangular and a brush created with different bitmaps and masks.
Circular or Rectangular
These are basic brushes, you can set size, blur and spacing.
Bitmap
Bitmap brush uses a bitmap for the brush mask. The bitmap brush doesn't take the color information from the bitmap, it uses only the intensity to make the brush mask. Generally for Bitmap brush you use black and white image.
The Black is transparent and the white will be opaque - and it will paint the selected color.
Example of Bitmap Brush
 |
 |
||
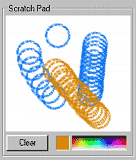
| This is what we designed. A white circle on black background. We need to save it on disk. | Now we select the Bitmap as a Type and load the image with Load Mask. You can check Negative if you want to load the mask in negative. | The brush Preview shows the black and white image of the result brush. Now let's try it on the scratch pad. | We can try different colors and Spacing on the scratch pad. This is how our first Bitmap brush looks like. Now this is not very useful brush, most of the brushes shouldn't be donut shaped. |
Image Brush
This is an extension of Bitmap Brush. While Bitmap brush takes only the mask for the brush, the Image Brush takes mask and also a texture - or image. So we need to create 2 files, one is a mask and other one is the image itself. Note: PhotoSEAM can recognize transparent PNG files with alpha channel and take the alpha as a mask. In this case you don't have to create 2 files, you just load the 32 bit PNG with Load button.
Example of Image Brush.
 |
 |
 |
 |
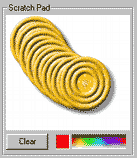 |
| This is our image for the brush. We used black background, because we would like to have a black drop shadow. | This is the mask for the brush. You can see the mask of drop shadow on the bottom right part. | Now we select the Image Brush type and load first the image with Load button and then the mask with Load Mask. | This is how the combination of image and mask looks in the preview window. | Let's try our first Image Brush in the scratch pad. Notice that it doesn't matter what color you select, it always paint as in image. |
This is a great way how to add interesting brushes. But what about if we would like to change color? For that image Brush has a Color overlay option.
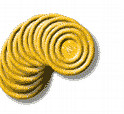
Color Overlay allows to select any color even for Image Brush. See Example
 |
 |
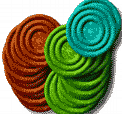 |
| Without Color overlay | Select Color overlay | Now we can paint in any color ! |
Tip: How to create images and masks for Image Brushes? You can use many tools, for example CompactDraw from http://www.mediachance.com
Watch for next version of CompactDraw which will enable exporting masks and also 32-bit transparent PNG.
Image Hose
The image brush is very powerful, but how about adding a few different images and masks into one brush? Here is an image Hose type of brush!
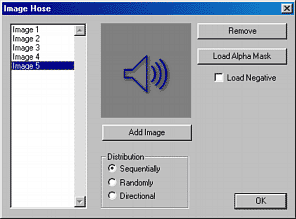
With Image Hose you have to click Settings to go to more advanced options
 .
.
This is basically the same idea as with Image Brush, but here we have the list of images. You can load the image with Add Image and the mask with Load Alpha Mask.
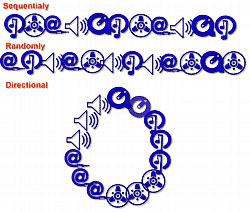
Distribution of the images
Sequentially - the images will be "sprayed" in order as they are in the list box.
Randomly - the images will be randomly chosen
Directional - the image will be chosen from the angle you paint. For example if we have 5 images then 360 degrees divided by 5 is 72. That means as we paint different image every 72 degrees.
Note: The 0 degrees (and image 1) is horizontally to the right side, then it continue clockwise.
Example of different distribution
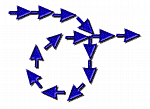
The Directional distribution is great for Brushes which should follow your path as you draw. For example arrows, here we created just 8 images of arrow each in 45 degrees different angle. Drop that calculator.. 45 x 8 is 360 degrees.
The Image Hose type of Brush has also the Color overlay option.
Note: all Brushes in Image Nozzle tool library are Image Hoses type of Brushes.
Presure Sensitivity.
This works if you have a Pressure Sensitive Tablet. There are few options how the brush will behave regarding of the pressure information (how hard you press with your stylus).
None
No Pressure will be applied - this would be usefull for Image Nozzles for example.
Pressure
This will change how hard you press on the brush - this is a good choice for Natural and Artistic brushes, because it simulates the real situation.
Opacity
This will change the opacity of brush according the pressure on the stylus. Good choice for Airbrush - like brushes
Press. & Opacity
A combination of Pressure and opacity
Speed
This doesn't work with the pressure on stylus but it takes into account the speed of which you draw the stroke. If you draw slowly, the stroke will be more dense as if you draw fast. The minimum density is set by Spacing parameter and in order for Speed to work, the Spacing must be enabled.
This one actually works also without Pressure sensitive Tablet..
The rest are various combinations of the above.
Brush preview
You can let Photo-Tiler generate the preview for you or if you want something different (for example for Nozzles you want to show the path) you can paint anything and save it. In the Brush properties switch off the Auto generate and then Load the saved image here - from now this wil be the preview image. Secret: Instead of loading you can even paste image from clipboard into the preview by pressing Alt-P