
There are generally 2 ways how you can start making your own textures.
The Tile Preparation screen is for choosing a part of the source image which will became tiled. The result doesn't have to be perfectly seamless yet, you will create raw tile and finish it later with many of the PhotoSEAM tools.
To load a "source" image into Tile Preparation.:
Press Open button and select the image from where you would like to create texture.
The Tile preparation screen will appear:
The Tile Preparation screen has 2 steps.
Step 1:
The basic source and tile settings.
You can move the source image by clicking on the image window (1) and moving.
Here you can resize the source image with Source Size, Sharpen the image and set the basic tile size.
By clicking and moving the image in the window you can select the area of image from where you would like to create texture.
Source Size
If you using a digital camera it is many times important to size the original image down to get the detail you would like to have.
After you change the size you will see the result in the window. When you like the size, press Apply (it will flash). You can go any time back by pressing Reset button
Sharpen
After you resize the image down you can use some sharpening to enhance details.
Tile Size
This is the desired approximate tile size. You can adjust it in global view in step 2.
Use Whole Image
This will skip the rest of tile creation and the image will be loaded in full size or size defined in "Source Size"
This is great if you would like to adjust the source image colors, contrast or add effect to it first, before you create the tile.
You can always apply the same effects on the tile itself, however sometimes it is easier to apply a special effect on whole image.
Step 2
After you press Next you get to the Step 2 - Fine tuning Here you see the whole image already tiled and you can adjust the desired options. Anything you do here will be displayed tiled so you can adjust the raw texture
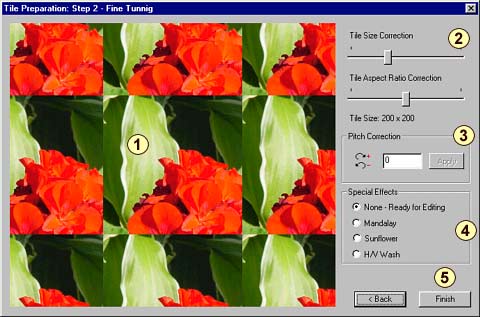
As in the Step 1 you can click on the image (1) and move the source image. You will see the result on tiles. Remember if you get out of the source image the part of the tile will start repeating the last visible line. This is the signal that you should move back. If you are not sure where on the image you are, just press ,Back button to see the whole image.
Tile Size Correction (2)
To change the tile size you can use Tile Size Correction and Tile Aspect Ratio Correction. These sliders are for fine tuning of the final tile size. If you want to significantly change the tile size you can go back to Step 1 with the Back button.
Pitch Correction (3)
In some cases if the source has vertical or horizontal lines you need to rotate the original source image a little if your source is not properly aligned. (For example making a brick wall)
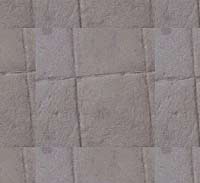 |
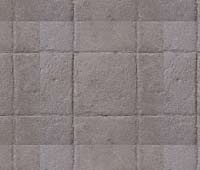 |
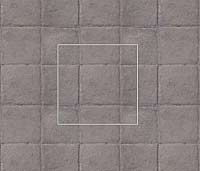 |
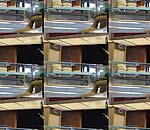
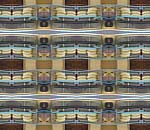
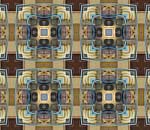
| Your source doesn't have the lines aligned, you need to rotate the source a little. | The angle of 5.2 was exactly what this source image needed. You should adjust the tile size to be globally equal. Don't worry that the borders are not seamless yet.... | This is 10 seconds later after we pressed Finish button and then used Cross-Border Clone tool in the editor. The texture is perfectly seamless. |
Special Effects (4)
Normally if you want to create a realistic texture you use the " Normal - ready for editing" option. With this you can fix the seamless borders later in the editor by using various tools like Cross-Border Clone or Rubber Stamp.
However if you want to make more esoteric looking textures you can use some of the other effects. With all the other effects the tile will become seamless right away so you can use any source image for it.
 |
 |
 |
 |
| Normal The tile is not seamless yet and you should use the editing and retouching tools later. |
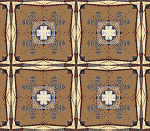
Mandalay This is already seamless four corners texture. |
Sunflower Esoteric image created from 8 parts rotated around center. Always creates rectangular tile. |
H/V Wash This creates overlay effects so the tile will become seamless. The actual tile will be 2 times smaller than Normal. |
Note:
Mandalay and Sunflower creates patchwork like textures which are far from the original image.
The H/V Wash can be easily used for some flat textures like sand or paper with good results.
If you planning to use Cross-Border Clone you should chose only the Normal method.
Tip:
Because you can move the source image by clicking on the image window it creates amazing effects to watch with Mandalay or Sunflower effects. Just in case you have nothing to do and like some fun.
Finish
Obviously this is where you get to the editor and you can try other editing tools on this raw texture.
With the Tile Preparation your goal is not to make perfectly seamless texture right away, but to select the right image part.