|
Masking Bitmap |
  
|
|
Masking Bitmap |
|
Real-DRAW Basics
Bitmap Object - Masking
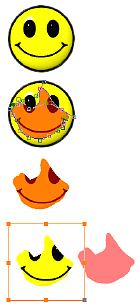
Masking Bitmap is a very similar process to cropping, except the bitmap object doesn't change size; only the bitmap transparency will be created. Again the result is a Bitmap Object.
There are two types:
| • | Mask From Object |
| • | Mask From Object - Inverted |
The masking bitmap is a great way to make an unwanted part of the bitmap transparent.
You can make the masking object semi-transparent so you can see through it.
|
1. Draw any object (we will call it a mask) on the bitmap and make the mask semi-transparent by adjusting the Transparency slider so you can see the bitmap behind it. 2. You can reshape the mask with a shape tool to match your desired shape. If you want to keep the mask for later, you can now copy it to clipboard and later paste it back to document. 3. Select both objects and use Mask-From Object The Masking function, unlike the Crop function, doesn't alter the bitmap, but just changes its transparency. You can later edit the transparency with Bitmap Editing. You can reset the Masking by using Reset All from the menu Bitmap or clicking the |
Inverse masking
|
The same as masking, except the unwanted area is behind the mask object, not around it. Use: Mask-From Object Inverted |
![]() Note: Masking Bitmap, as well as Cropping to Object, will ignore the transparency of the mask as set in the Transparency properties. However, if the mask has a transparency created in the Color & Texture, with the option, Transparent, selected then this will be applied to the result bitmap as well.
Note: Masking Bitmap, as well as Cropping to Object, will ignore the transparency of the mask as set in the Transparency properties. However, if the mask has a transparency created in the Color & Texture, with the option, Transparent, selected then this will be applied to the result bitmap as well.