|
Color Space |
  
|
|
Color Space |
|
Real-DRAW Basics
More about colors: GenetX, Color Space, Memory, Color shift.
![]() Behind the small button under F and B color are hidden millions of complex procedural textures. The reason for the name GenetX is because each procedure is defined by DNA code and by changing the numbers in the DNA, we can create mutations of the textures. The next page will explore the GenetX window.
Behind the small button under F and B color are hidden millions of complex procedural textures. The reason for the name GenetX is because each procedure is defined by DNA code and by changing the numbers in the DNA, we can create mutations of the textures. The next page will explore the GenetX window.
When an object uses GenetX color procedures, the button will change its color to : ![]() This will tell you that the F color is used as the GenetX procedural color, which doesn't have to be solid. With the other options (Texture Mix, Screen or 3D) we can create new completely original textures.
This will tell you that the F color is used as the GenetX procedural color, which doesn't have to be solid. With the other options (Texture Mix, Screen or 3D) we can create new completely original textures.
|
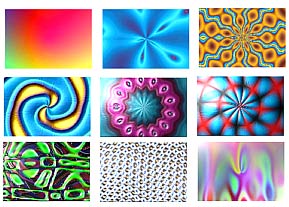
Here are a few examples of an object created using the GenetX texture with a combination of various settings and lights. There is a virtually unlimited number of combinations and mutations, and you could spend whole days just exploring this vast area. Read more in the GenetX section. |
If the object is a bitmap, then this button will change to: ![]() . This means that instead of F color, the colors (the image) from the bitmap will be used. Clicking on this button will reveal the bitmap effects window with many standard and exotic bitmap effects available. (Sharpen, Boost, Alias, Boss...) All the other options will have the same effects.
. This means that instead of F color, the colors (the image) from the bitmap will be used. Clicking on this button will reveal the bitmap effects window with many standard and exotic bitmap effects available. (Sharpen, Boost, Alias, Boss...) All the other options will have the same effects.
See next page for instruction on working with the GenetX.
Color Space and Color Memory
To select a foreground color with better accuracy, and to be able to get many shades, you can use the Color Space bar. To be able to preserve any color, foreground or Background, you can use Color Memory.
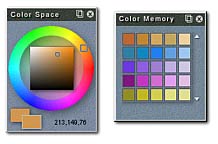
Working with the color memory is easy - to recall a color, you just click on any color square with the left mouse button for foreground or the right mouse button for background color. To store a color you need to hold CTRL while clicking on a square. Basically you can find an empty square, by scrolling down the color memory, or replacing an already assigned one. Holding CTRL and left clicking will store the current foreground color and right clickinf will store the current background color.
This is one of the very powerful tools provided for illustrators.
If you are making an original illustration, you can design the objects of the illustration in such a way that they will always mix F color with the texture in some ratio. More F than texture.
 Later, if you want to change the color tone of the whole picture, you just select all the desired objects, and from menu: Object select Shift Color. This will shift the F color of all selected objects toward the desired new color. The illustration will change its color tone depending on the ratio of color/texture mix. See the example image, where we designed a phone with a blue housing. The illustration itself has more than 80 objects. We grouped the 19 blue housing objects into one group (CTRL-G). Now we can change the color of the housing by selecting the group and using the Shift Color command, where we select the color from blue towards red.
Of course there are also many other ways to do the same. For example you can Package the objects and use Color Correction.