Simple Autorun Menu
This is very simple project. Something like Your First Autorun
in 5 minutes.
Imagine this- you are going to create autorun menu for a company
called Image Traveller.
The Product - Adventure Traveler is some program which you already
have developed.
- It has installation done using InstallShield and it will sit on the CD in
the directory \AT10\setup.exe
- For the program is very important the end user will have DirectX installed
- so we have to have another option - to install DirectX which will be on
the same CD in the directory \directx\dxsetup.exe
- We would like to have also some readme.txt on the disk - this could explain
something about installation etc...
- And on the end - user can be also able to conect to company web site to
get new updates...
Lets do it.
First run MMB. :-)
Settings
We would like to have the size of autorun 470 x 300. Why? Your boss told
you so..
So lets go to Set the Project Settings.
GO to Menu Project and select General Settings. or click this button  |
|
We will set the size Width 470 and Height 300. Into the Window Title we put
Adventure Traveller.
We don't want to have the window Caption, we would like to have a bit different
look than standard window so we un-check Standard window and We check Client
Border. The settings should look like this:
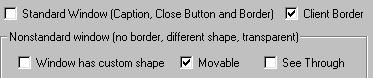
That's fine, press OK.
Caption and Close Button
Since we will not have the window caption, we will create one by our own.
On the toolbar on the left click the Rectangle button (Fill Rectangle) and draw
the rectangle over the top of the frame - where the caption bar should be. The
rectangle is red, doubleclick on it and select black color from the Fill. Now
the workplace should look like on the picture right:
Well turning Standard window off we don't have the close button ! Lets make
one. On the top toolbar find the Wizard. and click on it. It will open small menu with some predefined objects. We select
'Insert Close Button' and it will add a small close button on our workspace
to the left side. Move the button to the right part of our black caption.
and click on it. It will open small menu with some predefined objects. We select
'Insert Close Button' and it will add a small close button on our workspace
to the left side. Move the button to the right part of our black caption.
Caption Text: Click on the text tool on the left.  Place the text on the black rectangle. You see nothing - the text is black.
Double-click on it if you remember where you drop it or look at the Object list
in right and double-click on the Text item.
Place the text on the black rectangle. You see nothing - the text is black.
Double-click on it if you remember where you drop it or look at the Object list
in right and double-click on the Text item.
Set the Color in only one enabled Color combo-box to White.
Now click on Font and select font - I used Arial 11, Bold - because I am sure
everyone will have arial on his computer. Close the properties and now you should
see the text.
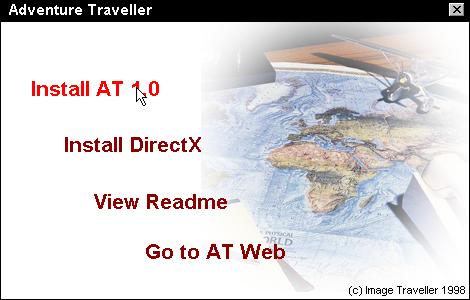
Feature Image
We chose some nice picture from our 65000 clipart collection. We make it
in Photoshop 270x270  pixels
and apply some effects. The image is here in full size.
pixels
and apply some effects. The image is here in full size.
From the tool on the left find the Bitmap tool. Click on it and position the image on the middle of your workspace. From the
Open file dialog box select the image file. Open it and then move it to the
right side of the workspace.
Click on it and position the image on the middle of your workspace. From the
Open file dialog box select the image file. Open it and then move it to the
right side of the workspace.
We have 50% done !
The Action Text
Now the funniest part. Click again the Text Tool
and place the text on the workspace. Double click on it to  open
Properties. In the edit place type Install AT 1.0
open
Properties. In the edit place type Install AT 1.0
This will be Active Object so check 'Enable Actions'. If you do so you will
se the all 3 color combo boxes are enabled. I select the Normal - red, The Mouse
Over - bright Red and the Click - leave Red. (but you can make your own color
combination) I also set the font to Arial, 16, Bold. Close the Properties. Now
make 3 other Text Objects like that, or just simply copy (Ctrl C) and Paste
(Ctrl V). The others are Install DirectX, View Readme and Go
To AT Web.
Now we have to assign to each Text Object the Action.
double-click on the Install AT 1.0 to open the properties. Look at the
4 big buttons on the bottom. For us is interesting the Left one 'External Commands
and Page Actions' Click on it.
You are on the EC&PA dialog box. From the top combo-box select Run Program
and in the Command write <SrcDir>\AT10\setup.exe (Remember the requirements
from the top of this page?)
Now do the same for the Install DirectX but Command will be: <SrcDir>\directx\dxsetup.exe
What is <SrcDir> ? The path to the player. You cannot write D:\directx\dxsetup.exe
because you might have CD on D: but other people don't. The <SrcDir> will
take care of that.
For the View Readme you select again Run Program but in the command
you write just <SrcDir>\readme.txt
This should launch the proper viewer (notepad.exe) assigned with the txt extension
on user system.
For the Go To AT Web we select Browse Web this time and in the Command
we write http://www.mediachance.com (just to have some existing web page).
That's it.
Now go to Project - Check & Distribute, Select Standard player and check
Stand Alone and 'Locate' it to your temp Master CD place on disk for example
C:\MasterCD. Then manually copy the readme.txt there, the directory AT10 (D:\MasterCD\AT10\...)
with all your setup files and the 'directx' directory with DirectX setup.
And Burn CD!!! (But test it before !)
You can see the full picture here.