Multimedia
Extension
![]() Multimedia extension is the way how to create a multiface buttons for multimedia
authoring programs or other purposes (web rollovers etc...). MM Extension
doesn't change the normal Export. It makes sense only in Multimedia Export
(Files- Multimedia Export)
Multimedia extension is the way how to create a multiface buttons for multimedia
authoring programs or other purposes (web rollovers etc...). MM Extension
doesn't change the normal Export. It makes sense only in Multimedia Export
(Files- Multimedia Export)
![]() By multiface
buttons we understand a button which has three states: Normal, Highlighted
and Pushed. These buttons are positioned one on top of another. Multimedia
authoring tool (Such as Multimedia Builder) uses these images to show interactivity
on the multimedia presentation. The Normal button is displayed in no
activity. If user hover over the button with mouse, then the second Highlighted
image will be displayed telling user he is on an Active button. If user press
the button then the third Pushed image will be displayed. Such kind
of objects are very common for all authoring systems.
By multiface
buttons we understand a button which has three states: Normal, Highlighted
and Pushed. These buttons are positioned one on top of another. Multimedia
authoring tool (Such as Multimedia Builder) uses these images to show interactivity
on the multimedia presentation. The Normal button is displayed in no
activity. If user hover over the button with mouse, then the second Highlighted
image will be displayed telling user he is on an Active button. If user press
the button then the third Pushed image will be displayed. Such kind
of objects are very common for all authoring systems.
CompactDraw allows you to design such buttons . And for Multimedia
Builder users the best news is it also allows you to export the whole
project as a mbd file. For other users CompactDraw can export the projects
as a number of separate graphic images with the text description.
To work with the Multimedia Extension you have to open its window first. (Menu View-Multimedia Extension). Each object on the canvas can have the extensions enabled. If you click on any object you will see it has only Normal state selected.
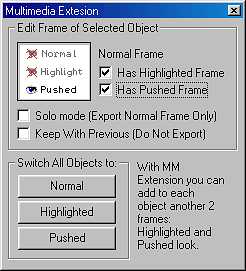 |
To enable multimedia extension for selected
object you have to select one of the option: You have to select Has Highlighted or Pushed frame check-box. In most cases you would like to select both - creating that 3-state button. The state selector on the white background (upper left part of the ME window) can tell you which state you currently editing. From the image at left you can see we are editing Pushed Frame. |
To change which state (frame) you are editing just click on the appropriate item in the State-selector. The Eye icon will be highlighted (eye open) and the object will switch to the state.
Things to remember:
The frames can have different position - you may want to put the pushed
frame of the button a few pixels down and left to simulate the pushing action.
It means if you are editing in Highlighted or Pushed state and you move
the object - you move it only in this frame - in the other frames the object
will remain at the same position.
However this doesn't apply to the Normal frame. If you are editing
the Normal frame of the object and you move the object - you will also move
the Highlighted and Pushed frame as well.
The rule is when you change the Highlighted or Pushed frame always return
to the Normal Frame.
For Multimedia Builder users: The 3-state
object will be exported as a Bitmap button. Because its surrounding depends
on the position against the background the position of the button will be
locked.
(So you can't select it and drag it with mouse)
Solo Mode
Sometimes you don't really want to have a button but you want to have a
separate object anyway. Maybe you just want to create a special image which
will pop-up in your mm application by some script or action. (Like some
warning or a window) You don't want to have these images active and you
don't need any other states.
The solo mode is just for that. It disables the Highlighted and Pushed frame
and you are working with the object like with any other normal objects.
However the Solo Mode checkbook is recognized during Multimedia Export and
creating an separate object.
For Multimedia Builder (MMB) users:
This will create a separate Bitmap object with an alpha transparency (for
drop shadows etc...) which could be freely hidden or moved in your MMB application.
Note: The CompactDraw and MMB handles the transparency a little different,
in MMB the transparency looks a little 'more transparent'. This makes the
drop shadows look less pronounced.
Keep With Previous
This will tell the Multimedia Export filter - Don not export this object
as a separate object, instead stick it with other exported objects.
Imagine you design a button with all 3 frames and then you put a black text
on it. If you leave the text with Normal frame only and you export the project,
you will get one button which has on all three states a black text. Now
if you make the text also multiframed (for example white on Highlighted
and red on Pushed) normally will Multimedia Export export it as a two separate
objects (in MMB you will get two buttons one on the top of other)
This is not what you want - you want to have only one object - a button
with text which has different color on Highlighted and Pushed state. So
you want to keep the text with the button - make a virtual group.
After you select this option - Keep with previous the MM export will
not create a separate object for it and in MMB you will get only one button
where each state has the appropriate text color.
It doesn't matter how many objects you put with this flag, nor the button
must be exactly previous object in the layers.
Switch All Objects to
These are helper buttons - they switch all multi-frame objects to the appropriate
state. For example you want to switch all objects to normal state. And if
you have many Keep With Previous objects you can actually see the whole
effects by switching the Normal/Highlighted/Pushed state.
The Multimedia is not that hard to master. However you must
be careful and always know which frame you are editing.
Definitely it is a great helper, because you can design the whole graphics
interface and in case of Multimedia Builder you will get directly a working
project.