Balance Tab |
The Auto balance will correct the Contrast and Brightness Balance of image. The Auto Balance depends on a Shutter Speed.
The normal setting looks like this:
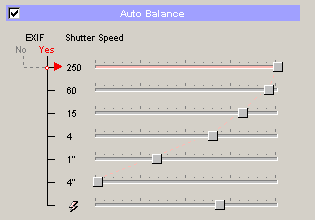
From the image above is obvious that more Auto Balance will be applied to images taken with a faster shutter speeds. This doesn't necessary mean that a slower speeds have already better balance. The whole idea is that when a camera uses slower speeds (1/15 and slower) that means the light conditions were poor and the whole image will be rather dark. With low light also much more noise will be visible. To prevent Auto Balance from picking up a noise or adding too much contrast to dark images the amount of autobalance is lowered for slower speeds.
The flash setting has a separate (bottom) slider.
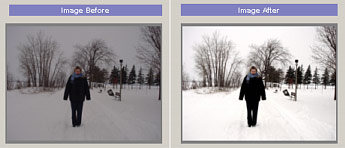
![]() You can preview few images with different shutter speeds and different light conditions and tweak the sliders a bit to whatever you like most. However the basic shape of the graph will probably stay the same.
You can preview few images with different shutter speeds and different light conditions and tweak the sliders a bit to whatever you like most. However the basic shape of the graph will probably stay the same.
Also known as Gamma setting. This basically tells how linear is the transitions from shadows to highlights. The Gamma of digital camera is probably different than the one of your CRT computer monitor. If you plan to view the images on monitor you can adjust the Midtones slider (to right from middle). Or you can adjust it anyway, if you feel the images are better this way. Just don't over do it.
The normal values would be just a very small step from the middle, around 145 (128 is in middle)
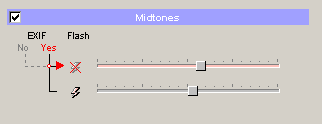
It is common that Flash images may not use the same Gamma fix. That's why the Midtones has two sliders for images with flash and without.
Before you adjust Midtones on all your images, you may want to try to do few samples and print them on your Ink-Jet. You may find that for printing on your printer a different adjustment may be necessary - try also put the midtones slider toward left from center, on some ink-jets with weak ink this may give you nicer result.
Because many new Ink-Jets will try to reproduce image to one what user see on the normal monitor, the default setting (a bit toward right) may probably work quite well for screen and for printer.
![]() Make sure your monitor brightness is set to a reasonable normal value so you are not just adjusting images to look good on your badly adjusted monitor. Try to see if any calibration is available.
Make sure your monitor brightness is set to a reasonable normal value so you are not just adjusting images to look good on your badly adjusted monitor. Try to see if any calibration is available.

The monitor's brightness and contrast controls should be adjusted so that the full range of the image above is visible. The darkest step visible should be just barely visible against the surrounding black frame.
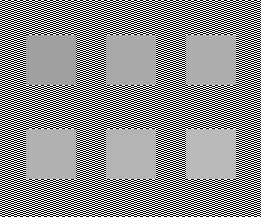
Step back from your monitor and squint your eyes. One of the gray area should be nearly the same shade as the surrounding checked area. For most of the PC CRT monitors it will be the square on the right side in a top row. If not, you probably need to adjust your monitor settings.