Size & Quality Tab |
You can let DCE to resize the result images. A good option if you want to upload it to web page or your online photo album.
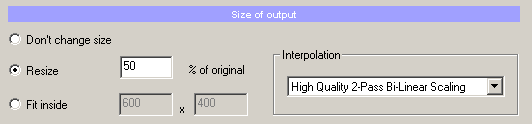
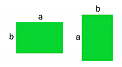
The most common would be to use % of original. You can simply set what percent of original will be the result and all images portrait or landscape will have the same feel. (Portrait will be big as landscape, just turned on side)
The other setting is Fit inside.
Here you will specify the maximum size to which the image must fit without overlapping (the ratio of image will be of course kept the same).
For example if we specify 600x400, both Portrait and Landscape images will be fit inside that size. Tis will make the portrait images physically smaller.

Most of the images will be saved back as JPG. JPG format is a lose format and it needs to know the quality in which we are saving. There is no loseless option so even Quality 100 will be lose, but the file size will be much larger than for example Quality 88. And there will be no big visual difference between them.
So the task is not to put highest quality, but to use a Quality which produces reasonably big images which still looks very good.
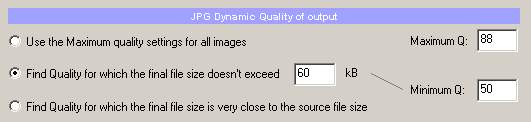
Use the Maximum quality settings for all images
The simplest way is to set the same quality for all output images, for example 88 may be a good choice. You obviously can't go wrong with this setting, unless you specify too low Maximum Quality.
Find Quality for which the final size doesn't exceed...
The second setting is useful if the quality isn't your main concern rather than the output file size is. Such scenario is typical for web developers where you need to limit the file size even if the quality has to go down. It works good with the Resize option.
You simply need to enter the file size in kB which shouldn't be exceeded.
Depending on the file size you put here and the image size some image files may be smaller than the desired size in kB (which is a good thing). For example if you resizing image to 320x200 and put 150kB then most if not all images will be smaller than 150 kB and so they will use the MaximumQ.
If you on other hand put the desired file size too small then the image will use the Minimum Q and in fact the file size will be still bigger than desired. The Minimum Q is an assurance that the image won't get too low in quality if it can't meet the file size criteria at all. Images below Q 50 are hardly viewable for any web user so the 50 is the minimum you should consider.
The art is to find a reasonable file size for the image pixels size you are producing. But it isn't that hard. A train web designer will know it probably by hard but you can get idea very fast. Take any representative image and export it in the desired size with constant quality let's say 72 (The first option). Then go to explorer and see what is the size. It will give you an idea what file size you should expect to get.
Find Quality for which the final size is very close the source file size
When you use a constant quality for all images you may suddenly realize that some image files are actually bigger than the original. This is simply because the output Quality was set higher than was the quality of original JPG. It makes no sense because putting higher quality than original will not improve the image, it will just make the file size unnecessary larger.
So the last option is for such cases where you don't have any good idea what the quality should be for your result. This way you will simply keep it in the same class as the quality of source image. The result file size will be very close to the original file size (it will be actually bigger a bit to compensate for the image changes you made).
This option is disabled when you resizing for obvious reasons - you can't keep the file size similar if the image size is not.
Other thing you should know is that if you use Enhanced subsampling on your result images the numerical value of the result Quality will not be the same as a numerical value of the original quality.
What does it mean? For example you know that the source image was saved from some program (PhotoShop) in quality 92 and you want to keep the result about the same file size. You have Enhanced sub-sampling enabled. The Quality DCE will find will be lower, for example 74. If you don't use Enhanced Subsampling, the quality DCE find would be quite close to the 92.
The Enhanced Subsampling is however recommended because it produces better and cleaner color details even if the quality is lower than similar image without Enhanced subsampling.
JPEG Extended Options

Enable Enhanced subsampling
will take more care for subtle color details but it will make your file larger. It is recommended but not necessary if the file size is your concern.
It improves red colors and makes the JPEG artifacts less visible.
Keep EXIF in output files
In most cases you would like to keep the EXIF data also in output files. The data takes additional file size however, so if the result is for a web you may uncheck it. However for most cases it is recommended to keep the EXIF in output files.