|
Tone Mapping |
  
|
|
Tone Mapping |
|
Once you created HDR file, you already have an image that has expanded dynamic range.
One problem with HDR has always been in viewing the images. CRTs, LCDs, prints, and other methods of displaying images only have a limited dynamic range. Thus various methods of "converting" HDR images into a viewable format have been developed, generally called "tone mapping".
It is important to realize that there are many different algorithms to tone-map a HDR image and there are many scientific papers and also few books written on the subject. There is no single "correct" way to do it. The goal is to take the hight dynamic data and "compress" it into low dynamic image in such way that the result will show details in both dark and light areas (where normally the details are clipped).
For our purpose the result has to be also more pleasing than a truthful representation of the scene. The top tone-mappings algorithms tends to create a wow factor while the bottom algorithms are more for a natural looking output.
You can also take the HDR and tone map it in any other tone mapping software if you like the different results.
Preview
There are three preview buttons. The Quick button is the automatic preview. Any time we change a parameter the image will be recalculated using the Quick settings.
![]()
2x Fine Preview will recalculate the image in more finer details. This will be about 4 times slower calculation than the Quick mode, but it may give you idea about noise and image feel. After the 2x Fine calculation is done a 2 times bigger window will open with a large preview. You can close this window by simply clicking inside the image or closing it with x button.
Note: The Fine preview window is 1100x740
If you have enough space on monitor (for example with dual monitors) you can actually keep this larger 2x Fine preview window open and create another Fine preview window using different settings. This way you can compare two or more images in a much higher detail. Then you can close the 2x Fine preview windows as above.
The full preview process the image with the maximum quality settings and depending on the image size, this could take considerable time. The image will be saved in temporary location and opened using default associated program in windows. It is very similar to the full export using Process button and it will take about the same time.
Process
Processing image is the final stage. Mapping the full image and writing it to the disc. You can choose many of the common 8-bit formats such as JPG, BMP, PSD or PNG. You can also export the final image as 16-bit TIFF file that you can use for further processing.
![]()
16-bit output
The tone-mapping process itself always works with floating data up to the final export, therefore 16-bit per color image will simply retain more of the subtle information than the 8-bit image. However you cannot fully appreciate the 16-bit per color image on a common 8-bit per color monitor (some LCD monitors are in fact even less: 6-bit per color). The 16-bit export is a good option if you want to further edit the result in image editing application that can work with 16-bit per color image (Adobe Photoshop for example).
Note: The 16-bit TIFF file will be rather large, even close to 100MB.
After the image is written, you will still remain in the Tone Mapping dialog which allows you to process and save another image with perhaps different mapping method or different settings. You will stay in the Tone mapping dialog until you press Close.
Live Preview
Live preview (new in v. 4) will allow real-time preview of the image. As soon as you start moving the sliders you will see a draft feedback in the preview window.
![]()
To switch the Live preview to ON (RED) or OFF (Gray) click on the Live button in the settings area.
Memory Dots
You can store current Method and its Settings into the Memory Dots so you can recall them later or to quickly compare different settings.
Only the Method and its settings are stored, not Color, Hue or Gamma values.
![]()
You can store settings to an empty or already existing memory dot.
To store current Settings to a Dot: Right Click
To recall settings from a Dot: Left Click
To remove the settings from a Dot: CTRL + Right Click
Loading/Saving Method and Color
To Save the Current Method and all Color adjustments for future to disc, press the S button. To load it back press L button.
![]()
The current Method and all Color settings is saved into a file that you can recall later.
Reset
You can reset settings to default using the Reset button
![]()
You can also reset each slider to its default value by clicking on the default mark.
![]()
Dragging Samples for Comparison
To compare different settings at the same time you can click on the preview window and drag out a Sample view. You can arrange these Samples around the Tone mapping window and if you want to return to that particular settings just click inside the Sample view.
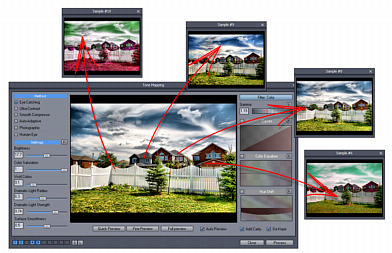
The Samples remember all the settings including Color and Hue curves, Gamma, Filter or any additional settings and allow us to quickly return to them with one click.
Resize
Resize button will allow to resize the original data from which the output will be created.
![]()
The obvious benefit is the speed increase when calculating the full image. Many times we need output of a certain size for example for web page and it is simply unproductive to tonemap a 10 megapixel image then resize it down.

Here is example of resizing 4368x2898 into more manageable 50% size before tone-mapping.
3D Filter Sky and Skin
(Eye Catching & Ultra-Contrast)
This filter will change the parameters of the tone mapping to preserve the smoothness of a particular feature. (Sky or Skin)
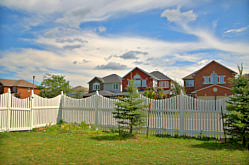
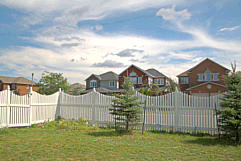
For example if you have a clean blue sky without clouds, high Dramatic Light Strength mapping will increase the noise and add some unwanted halo effect.
Pressing Sky Filter will adjust the tone-mapping algorithm to preserve the smoothness of a clean sky even with extremely high Dramatic Light Strength without changing the effect on other parts..
You can control the amount of the Sky Smoothness with the slider right above the buttons (Surface Smoothness slider will change into Sky Smoothness after pressing Sky button)
![]()
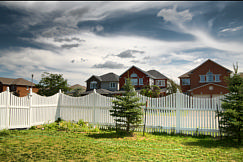
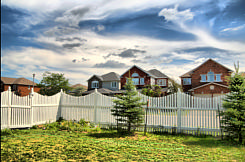
For the filter to work best the Sky Smoothness slider should be high. This filter works most obviously on a high values of Dramatic Light Strength and when the sky is smooth and clean (overcast sky create nice dramatic effect that is best captured with the 3D filter in OFF).
The same what was said about Sky filter can be said about the Skin Filter. This time, however the Skin filter will try to preserve the smoothness of a skin tones which is suitable for close up portraits.
Advanced Settings
(Halo-Matix)
Advanced Tone-mapping parameters can be used in the Halo-Matix method by pressing the Adv. button.
Methods
We selected seven methods that represent a wide range of results from vivid painting-like images to more subtle smooth output. They all are optimized for speed.
The first three methods are the main (Local Operator) methods and one of them can be used for almost any situation.
The first three methods use local operator that adjust the pixels in dependence to their surrounding. This will produce a vivid, contrast image thanks to its high dynamic range color separation. The results will often have more painting-like feel and certain wow factor. They work best on typical HDR images with lots of details and varying high contrast changes such as landscape, skies etc..
The first two operators will not perform well for images with a large smooth surfaces or very subtle gradients where they could enhance a picture noise. The third operator is more suitable for such cases.
The 4th is a combination of Local and Global operator to produce vivid, but still smooth images.
The last three are global operators with a fast local tone mapping that mostly adjust the image as a whole. The result is smooth, photographic images. They perform well in any situation if the goal is to produce a realistic image especially for further image processing.
Eye Catching
This settings create a vivid images that enhance contrast and color separation. The default settings are set to minimize noise but still produce high impact images. It is also the most tweakable method with the many settings, including Light Paint, Light Mask and 3D filters.
Brightness - Adjust the brightness of the image.
Color Saturation - adjusting the saturation of colors. Thanks to the local operator the default saturation of 1.0 already produces a lot of color separation, so the basic adjustment for this settings is to mostly tone the saturation down for a bit less color.
Vivid Colors - controls the color separation of primary colors - in short the result will be a brilliant basic colors such as green or red. This is different than Saturation that simply saturate all colors.
Dramatic Light Radius - controls the actual light and contrast distribution and it can significantly change the way the image feels.
Dramatic Light Strength - the amount of the dramatic light effect
Surface Smoothness - extreme values of Dramatic Light can create banding or a grain noise that can be attenuated by this process in places with smooth surfaces such as blue sky without clouds, flat walls etc. This slider will suppress the creation of this artefacts, but it also little softens the effect.
This Method is suitable for images with enough contrast and details such as landscapes, skies with clouds etc. It is not as suitable for scenes with many flat surfaces or smooth gradients. If your camera/lens has vignetting this process may increase its effect.
A typical process would be:
- Start form default values (press R button right of the blue Settings label)
- Set Gamma value to 1.0
- Adjust Brightness of the image
- Move Dramatic Light Strength a little bit up (to about 0.5) to temporarily emphasize the effect
- Change value of the Dramatic Light Radius in smaller steps to see the different fill-in effect. Each value can give a different feel to the image
- Lower the Dramatic Light Strength back to more reasonable values
- If a banding or added noise is still visible in flat and smooth areas, increase the Surface Smoothness until you are comfortable with the tradeoff between the effect and noise.
Note: Surface Smoothness has certain counter effect to Dramatic Light Radius and Strength. Therefore it is difficult adjust these parameters with Surface Smoothness increased too much above 0.5. If you want to adjust the effect of Dramatic Light, do it while Surface Smoothness is lowered to 0.5 or lower. When you are satisfied with the effect and you see some banding or grain noise in smooth surfaces, you can start increasing the Surface Smoothness.
Ultra-Contrast
More dynamic process than the previous method with more grainy, contrast result, but also more saturated colors. It could be adjusted to the point where the image looks more like a graphics.
Instead of Saturation parameter we have Natural/Saturated slider. This is named like that because the saturation itself is not actually adjusted. When the slider is in right position (1.0) the image is processed using a process that saturates images but it also better suppress grain noise in flat areas. In the left position (0.0) the image is processed using similar process that0 however produce more natural looking image, reminiscent of a grainy contrast photography, with a grain noise in flat areas. Choosing values in between will mix the processes.
This Method is suitable for images with enough contrast such as landscapes, skies etc. It can significantly add grain noise in a smooth areas. You cam try to suppress the grain and banding with the Surface Smoothness, but it will also lower the overall contrast.
Sometimes, during the preview this method may show number of crossing lines in a very bright areas:

This is an artefact of preview scaling that is amplified by the grain process and it is a good indicator that there is not enough dynamic data in that particular area. It will disappear completely during final export. Nevertheless the area will still be over-exposed as result of not having enough dynamic range.
Halo-Matix
This is the most complex operator having many different settings. This allows you to create a whole range of results from smooth realistic images to over-baked graphics (such are often viewed as a "trademark" of bad HDR photography).
Because of the larger number of parameters it is advised to start making changes in small steps.
The Halo in the name suggest what is the main "feature" of this operator separating the dark and light areas with a halo. The Halo, however could be set as either visible with low radius or virtually invisible with large radius, making completely different types of output.
The default settings for this operator are set to produce very smooth output so it can be used for clean smooth surfaces rather than complex textures.
Brightness, Color Saturation and Vivid Colors - works same way as in the Eye-Catching method.
Halo Radius - controls the Halo radius. A small radius will produce visible Halo around objects while large radius will create undetectable halo which is more suited for realistic images.The middle value of 10 is usually best compromise.
Light Strength - the strength of the effect, regardless of other settings.
Fill Light - adds fill light to dark areas. The slider can be also used to darken the image since the sweet spot of least effect is somewhere in 2/3 of the slider (depends on the Levels). Below that the image will darken.
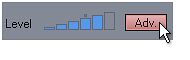
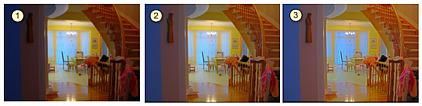
Level
This new parameter controls the level of the HDR effect. Setting it to left smallest bar will produce the most realistic looking images and setting it to the biggest right bar will produce the over-baked effect.
![]()
Here is the effect of Levels on the realism: left 2 bars produced realistic looking image, right 4 bars creates "HDR-like" effect.This could be further defined with Halo Radius and Fill Light.
Advanced Settings
The Halo-Matix operator has also advanced setting for further refinement of the result image. You open the advanced setting by clicking on the Adv. button near the Level option.
This opens a new pane on right side with few more controls.
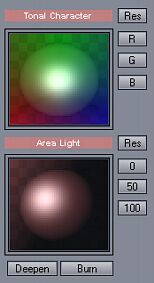
Those controls are best described by looking at the image feedback.
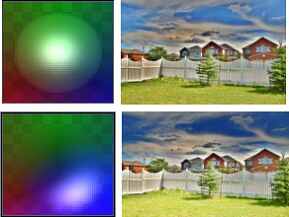
Tonal Character
This will allow us to choose the mix of colors that will drive the tonal character of the image. The image will not change the actual colors, but parts of the prefered colors will deepen more than others. This is subtle, but can completely change the feel of the image.
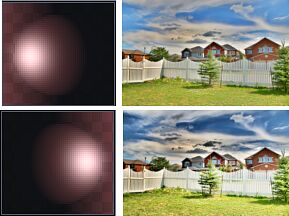
Area Light
This will increase light on some areas of the image, making the image look more "punchy". Moving the orb from left to right will increase the effect and moving it horizontally will change the light distribution.
Deepen
This button will deepen the dark tonal areas. When active, the button glows red. Depressing the button will switch off the effect.
Burn
This button will increase the contrast of the image by further darkening dark areas and lightening light areas. It could produce very vivid, poster looking images with very little gradients. When active, the button glows red. Depressing the button will switch off the effect.
Clip
This special control adjust the Black and White clipping and linearity of the curve. The button 0 Clip will reset it.
Tip: One of the side-effect of the Halo-Matix operator is that it increases saturation of the images sometimes to a "painful" levels. It is important to realize this as over-saturation of images has similar effect to over-compression in music. It makes it punchy and screaming, but at the same time it looses the character of the piece and makes it indistinguishable from any other over-saturated or over-compressed arts.
The Color Saturation slider is there for a reason and even moving it to zero position will still leave plenty of normal looking saturation.
There is a very wide range of results the Halo-Matix operator can create but it is also important to remember that most new users have the tendency to push their images into the well-beyond over-processed area in a false hope that it will make their images look better.
Smooth Compressor
The previous two methods produce an eye catching images, but they can also increase banding noise in smooth flat areas. This may become too visible in indoor images (on walls) or on sky with no clouds.
The Smooth Compressor method helps you to create balanced and noise free (no added noise) images.
The parameters are:
Brightness - sets the overall brightness of the image
Lighten Shadows - lighten (dodge) shadow areas. Moving the slider too much to the right may create a negative effect of "glowing" shadows
Darken Highlights - darkens (burn) bright areas. This has usually more subtle effect
Saturation - saturation of the color
Radius - sets the radius of the filter, larger radius create a more visible halo.
Note: As you move the Lighten slider, the image tries to keep its overall brightness constant (by darkening the whole image). That means after certain point when too many places are lightened up, the image may actually become darker than before.
A typical process would be:
(1) Initially set both Darken Highlights and Lighten Shadow to zero and adjust the Brightness so there are no overblown highlights in the image and it has enough details in light areas. At this moment the image may look dark.
(2) Add Lighten Shadows to balance the image by dodging the dark areas.
(3) After that you may try to add Darken Highlights to burn the light areas (this has less severe effect than the Lighten Shadows slider)
This process usually takes longer to calculate than any of the other methods.
Auto-Adaptive
A fast, adaptive tone mapping operator that produce smooth, natural results without over saturating or enhancing too much of contrast. The process automatically adapts to different images and there is just one color parameter - Vivid Colors.
Instead of Dramatic Light settings as in the first two operators we have much smoother Light Radius and Strength. Changing Radius will change the overall feel and partially also contrast of the image. The Strength obviously affects the impact of the effect.
Result image is a good candidate for further image processing that produce well balanced image with a lots details in shadow and highlights.
Photographic
More advance smooth global tone operator with settings for Brightness, Color Saturation, Vivid colors and Color Sharpness. The result is more close to a traditional photography with a lots of detail over whole tonal range.
Human Eye
Operator that balances the image contrasts and produce smooth looking image. You can adjust Brightness, Color Saturation and Vivid Colors. Additional parameters are Light Radius and Light Strength.