|
Light Mask |
  
|
|
Light Mask |
|
Light Mask is a special advanced settings for Eye Catching method to allow for Fine Tuning of the final image. You can access it by pressing the small right arrow in the Eye-Catching mode which will open a short menu:

The idea of Light Mask is to apply different strength of tone mapping to different tones of the image by following the graph settings.
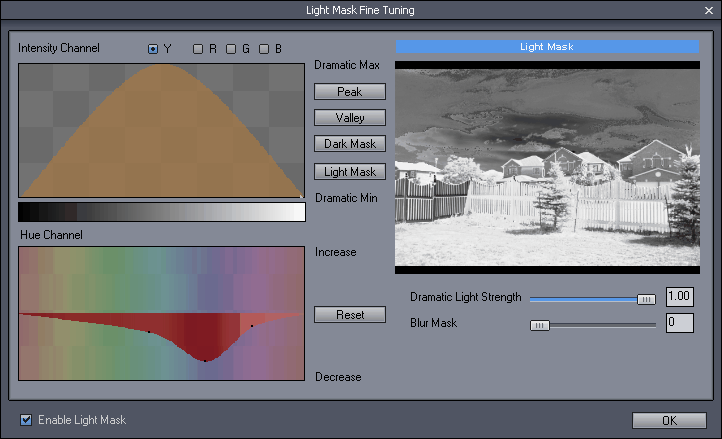
In the graph above we apply full strength of the Dynamic Light (as specified by the Dramatic Light Strength slider) in the center of tonal range, while applying minimal Strength for dark and Light tones.
On the hue graph we also decreased the strength of the blue colors.
We can move the points of the graph or create a whole new curve that will change how the feel of final image.
As you move the sliders or graph you can watch the changes in the preview window on the Tone Mapping dialog.
The Dramatic Light Strength slider is the same slider as on main dialog and it sets the maximum effect. The graph can be then used to attenuate this maximum effect (by moving the points down) where the dark tones are on the left and light tones of the image are on the right.
Additionally we can blur this mask. This has subtle effect and it determine how small details will be affected by the graph. If we blur the mask then small areas will be affected same way as surrounding areas.
The intensity light mask can be driven by the Intensity channel (Y) or a component channels R,G,B which again has different effect.
The Peak, Valley, Dark and Light Mask buttons are quick presets that will set the curve to initial state.
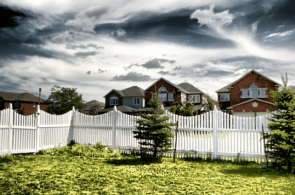
Note: Best usage for Light Mask is to suppress effect on some tones of the image, while keeping other tones strong. For example Sky. It is therefore a good idea to start from very strong Dramatic Light Strength
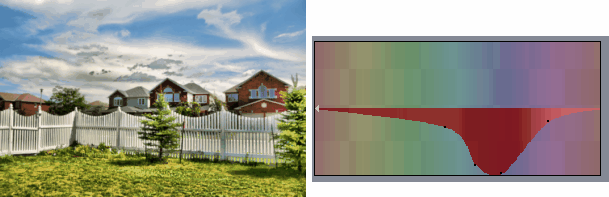
Here is example of the image with the Dramatic Light Strength to maximum and no Light Mask
With Light Mask we can for example soften the effect on the sky:
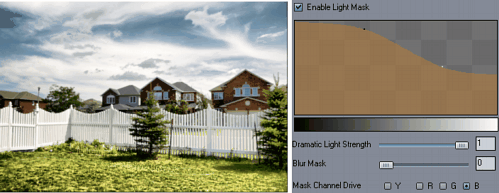
For that we use B channel (the sky is most represented in blue channel) then use the Light Mask button as a good start of our graph and then add and move the points to shape the curve to the desired effect. As you see from the graph the dark tones (from the Blue channel) will remain at maximum, then going to the middle in light shades which will reduce the effect there.
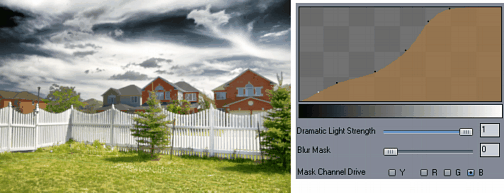
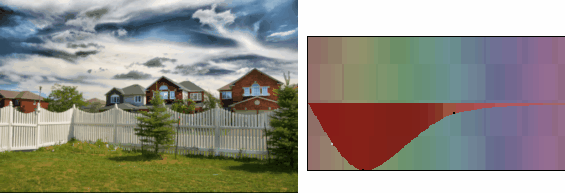
Doing it the opposite way (starting from Dark Mask preset) the image will feel different. We still used the blue channel, but this time let the darks in blue channel have little or no effect while the light tones have full effect. By creating small dips in the middle of the curve we could adjust the presence of the buildings (that are mostly in the middle tone range).
Some examples of hue graph effect:
Making blue "flat"
Making green flat:
Note: The Hue graph is neutral when the horizontal line is in center. Moving points below center will decrease the Dramatic light for that particular Hue. Moving it up will increase the Dramatic light for the hue up to the value set by the Dramatic Light slider.
This is a very strong tool for fine tuning the image, but it require some time to experiment.