|
Unsharp Mask |
  
|
|
Unsharp Mask |
|
Menu: Filters-Sharpen-Unsharp Mask
Sharpening is a basic tool - when you resize image the next step is often to sharpen it. Most of the beginners would simply hit the Sharpen or Sharpen More menus. However there is much better sharpening tool, yet with quite unfortunate name - Unsharp Mask.
This name come form the time of classical photography. A negative was contact-printed on a film with a glass separating the negative and film which produced a blurred or Unsharp positive. This was then sandwich with the original negative and printed on photo paper. The result was sharper image.
The Unsharp Mask (or USM) in digital photography does similar thing. It first blurs the image (mask) and then subtract that mask from original. The result is optically sharper image (edges are with higher contrast). In fact USM is preferred method of sharpening because it is less Noise sensitive than regular sharpening. Also thanks to the Gaussian Blur used to create the mask it is more "natural" looking than normal sharpening
It is important to view image at 100% zoom - this is how the Unsharp Mask filter will be set by default.
You can click on the small preview image which will toggle it to the state before the applied effect. This is simple way to view the changes before and after. You can also click on the image, hold mouse button and drag the image to find the region of interest.
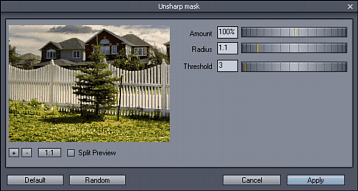
Controls:
Amount:
How much of the effect is applied. Usually around 90-100% for normal sharpening with small radius.
Radius
Radius of the blur on mask. This result in how far the edge detection goes around the pixel which is being processed. Small radius (around 0.5-2) is used for normal sharpening.
Fine details needs a smaller radius.
Threshold
A tolerance of how much the pixels have to differ before the effect is applied to them. 0-effect is applied to all pixels.
This is a good setting to prevent smooth areas from sharpening. Usually applied about 3-4. For human faces try even higher than 5.
Good values to start from:
For Objects: Amount 100%, Radius 1.0, Threshold:3
For Portraits: Amount 50%, radius 0.5, Threshold: 5
The best advice is to try different setting however for normal sharpening the rule is small radius and bigger amount.
Large radius
A normal sharpening requires small radius, usually below 1.0. Why do we have the radius slider go all the way to almost 100?
By using large radius and small amount you can do "haze removal" which will globally improve contrast of image in a certain way, yet it will not sharpen the details. Try for example Amount 25% Radius: 60 and Threshold: 4
For even larger radius you can use next tool:
USM large radius
Menu: Filters-Sharpen-USM large radius
Since genuine USM with larger radius takes more processing power we added second tool USM Large Radius which is especially fast. Everything what apply to the USM apply here as well, however you can adjust the radius in much larger amounts.
The USM gets a lot of attention between professionals because of its universality, relative speed and simplicity. In fact there is no better sharpening than USM and many "special" and "secret" sharpening processes use USM as its base.
Some people experiments with multi-pass USM. That is they do USM few times in a row with different settings. One of the (maybe too exaggerated) example can be
1. Pass Amount 20% Radius 100
2. Pass Amount 20% Radius 20
3. Pass Amount 30% Radius 4
4. Pass Amount 90% Radius 0.6
You can easily create Action for this.
Intelli-Sharpen
This is based on USM, where threshold is calculated dynamically. The USM sharpening in Intelli-Sharpen is applied only around the objects edges and ignore large, even noisy areas. This is very fine sharpening and has much lower overall effect than USM. It takes longer to apply but it could be helpful if the image has large solid areas such as sky.