![]()
This is one of the unique tools in PhotoSEAM.
If you are creating textures from digital images this tool actually could be one of the most used. You will see that the genius of this tool is in its simplicity.
Most of the professional seamless textures were done this way
But it is important to know how this tool works.
Note: This tool works only on images loaded from disk and it can't be used on a new images created from scratch. The reason are obvious if you read below.
How it works
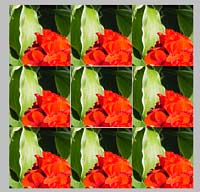
1. When you load a new image you get first to the Tile Preparation dialog. Lets summarize what we see there:

2. After you Finish the Tile preparation you will get a raw tile texture in the main document area.
3. However the image area which is outside tile is not lost. And that's the whole idea behind Cross-Border Clone. You can actually Clone these non visible area back to the tile - you continue with the image. However now everything you do is repeated to be seamless !
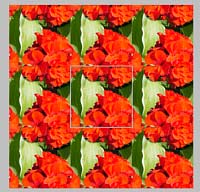
Here we were able to paint back the rest of the flower form the original image (marked as area 2 in the Tile Preparation screen capture)
This is certainly the best and easiest way how to create seamless textures . By painting around the tile borders you can cover the boundaries of the tile - the best way by using the original image.
Notes:
The only thing you have to keep in mind is that the tile must be created from a bigger image, so the Cross-Border tool has access to the additional areas. This is also the explanation why it can't be used on an images from scratch - you don't have the additional areas.
You can use hard or soft brushes to make certain effects and to create perfectly seamless texture.
The other/additional way how to remove the borders is by using the Rubber Stamp.