|
Editing paths |
  
|
|
Editing paths |
|
Real-DRAW Basics
Editing paths
Each Path lying on the path point has two detached control handles. You can shape the curve between two points by moving these handles. If you don't see the handles, (for example on a square), this means that the handles are aligned with the main Path point. To drag the handles out of the point, hold CTRL and then drag the point. To drag symmetrical handles, hold down the SHIFT when dragging the handles.
Hold Ctrl and drag a point to reveal the handles.
Hold down Shift and drag the handle to make the point symmetrical.
To delete a point, press Del.
![]() Note: You can only delete "points". If you delete the handle, the handle will be aligned with the non-deleted point.
Note: You can only delete "points". If you delete the handle, the handle will be aligned with the non-deleted point.
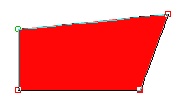
Open and Closed path
The Path or Polynome can be open or closed. When you draw any of the basic shapes, the path is closed. Closed path means the object is filled, whereas, open path shows only an outline. If you click on the open path object, you will see the “Line Width slider” appear on the upper tool bar.
You can apply any effects, colors, or textures on an open path, as well as on a closed one. To change the width of the outlined path, adjust the “Line Width Slider” (On the top tool bar)
To Break the path:
Draw a basic shape, for example, a circle.
Click the Shape tool ![]()
From Menu: Object select Break Path.
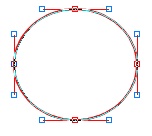
Now, with the shape tool, you can separate the shape at the zero point.
Note: Click on any point and look at the status bar at the bottom of the screen. You should see something like: Path Point 2. The break point is always at the point 0 and the last point. Also when you select an object with the Selection tool you will see a small square at the point 0 (or start of the path)
To close the path: From menu: Object select Close Path.
You can change the width of an open path anytime with the ![]() slider at the top tool bar. This appears only if your selected object is an open path.
slider at the top tool bar. This appears only if your selected object is an open path.
Break Apart
Menu: Object-Break Apart
We can easily separate complex Polynomes (such as text or clipart into basic shapes and then apply different formatting for each new shape.
Here we separated Text into its simple shapes from which the Polynome is build.
Limited Poly Nodes
Menu: Object-Limited poly Nodes
A polynome could be a complex object where displaying all nodes will result in a overcrowded canvas during editing. You may not be even sure where to click.
You can switch ON the Limited Poly Nodes that will display only the main control nodes and then extended nodes only in the neighborhood of the selected control node, creating far less crowded view.
![]()
This apply only to Polynome Object. A simple objects like standard shapes will always display all the nodes regardless of this setting (there are usually only few nodes anyway).
Note: This setting doesn't change the object in any way, it is only a visual helper.