|
Color & Texture |
  
|
|
Color & Texture |
|
Real-DRAW Basics
Color & Texture
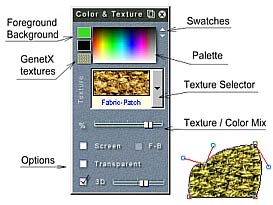
This most important property group defines the color and texture of an object. This dialog is responsible for the fill of the object and the material texture.
|
Color: You can select the base color of the object in the upper part of the dialog bar. Click with the left mouse button on the Color Palette to select a primary (foreground or F) color. With the right mouse button you can select a secondary (background or B) color, which is used for linear or radial fill, or for screening the texture. Tip: By clicking on the well with the F or B color, you can edit the RGB values of the color or select an exact color from the expanded Palette. By clicking on the F or B color with the right mouse button, the two colors F and B will be switched. |
Texture: Select any texture you like.
Color/Texture Mix: A very important control. It adjusts the ratio between the color and the texture. If the control is to the left, 100% of the color will go to the object, if the slider is to the right, 100% of texture will go to the object. The position in between will mix the color with the texture. See the image above: we have selected the primary F color red and the texture is green. With the slider at about 60 %, the object will be brown but it will still have visible texture.
Advanced Settings and Options
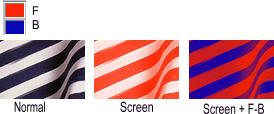
Screen: There will be no mixing of color. Instead the texture will be screened on the color. In this case the color of the object will always be F in color (in our case red) and the slider will regulate the amount of texture.
F-B: Works only with the Screen option. The Screen option mixes the color with the selected texture, which results in an image from F to white (depending on texture selection). The F-B option will mix the F color with the B color
|
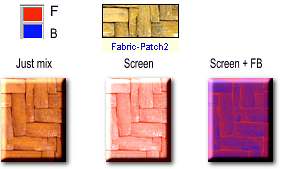
In the the picture on the left you can see how different settings changed the image. We used F color Red and B color Blue. The Texture was Fabric-Patch2, as you can see on the top right image. The first object was created by just mixing the F color with the texture. On the second image we used the option Screen. In that case, the F color is used for the whole image, and by using the Mix slider you can adjust only the texture intensity. The last image was created via the option Screen, and F-B. Now the whole image uses F and B color only, depending on the texture selection. |
|
Here is another texture using a 100% texture setting. This time there is no mixing with the solid color. With the Screen option you can completely change the color of the texture and with the GenetX option (see below), you can create a completely new image. |
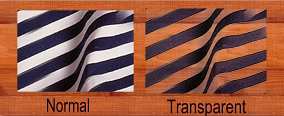
Transparent: This makes the white color of the object transparent and the black opaque. All colors in between will get the appropriate transparency value. Since you can mix between solid color and Texture you can control the transparency by using the Color-Texture Mix as well.
|
The leftmost image is a rectangle with 100% texture of the fabric. The image to its right has the Transparent color option set. Note: The transparency will be used with other effects also - for example; Bevel is sensitive to transparency. |
|
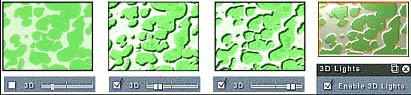
Using 3D bumps is a great way to make a texture non-flat. The slider on the 3D control changes the bumps from inwards to outwards. In the middle- there are no texture bumps visible. 3D bumps also works great with 3D lights |
![]() Tip: You can also make the texture of a Bitmap Object appear 3D. It is very simple, select a Bitmap Object, select any texture and move the Texture/Color Mix to the left so no or very little texture will be applied to the bitmap. Did you know you could apply a texture to the bitmap? Now select the 3D option and you are done. Even more fun starts when you apply lights or play with transparency.
Tip: You can also make the texture of a Bitmap Object appear 3D. It is very simple, select a Bitmap Object, select any texture and move the Texture/Color Mix to the left so no or very little texture will be applied to the bitmap. Did you know you could apply a texture to the bitmap? Now select the 3D option and you are done. Even more fun starts when you apply lights or play with transparency.
3D option will use the texture for the effect called bump mapping. This could be grat for various effects. However in some cases you need to create bump map which differ from the texture. In that case look into 3D Lights Bump Mapping option.
Color Wash
There are 3 types of Color Wash. They are the first 3 textures in the Texture selector.
Linear wash, Radial Wash and Burst. For color wash you have to use foreground and background color. Remember that to choose background color from the palette you have to use right mouse button.

The Burst, unlike linear or radial, will actually follow the shape of the object.
Gradients
Real-Draw uses a special area gradient to create very complex flat gradients.