|
3D Lights & Material |
  
|
|
3D Lights & Material |
|
Real-DRAW Advanced
3D Lights & Material
![]() One of the most innovative features of Real-DRAW is the ability to use an unlimited number of lights on any object. (Including Bitmaps) and to adjust the object reflectivity properties.
One of the most innovative features of Real-DRAW is the ability to use an unlimited number of lights on any object. (Including Bitmaps) and to adjust the object reflectivity properties.
The 3D lights simulate the lights found in real life very closely. You can create amazing lifelike textures and object by using one, or a few lights.
Note: Normally each object uses its own 2D light source for bevels.
As soon as you enable light on the object the object will start to behave more like a 3D object in real life and less like a 2D drawing. You can adjust the material properties of the object (the reflectivity), and ambient intensity, and adjust any light source. Using lights is especially effective if you use any bevel on the object.
|
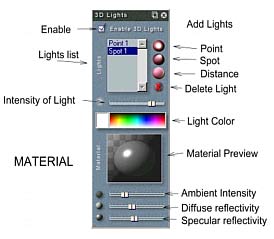
The 3D lights property bar is divided into 2 sections: Lights and Object Material Properties. The lights are properties of the object and they stay with the object. That means as you move the object, the lights move with it, so the effect you build doesn't change. Also if you copy the object properties, you copy the lights with it. Lights are an amazing addition to Real-DRAW's ability to generate life-like textures and objects. |
The object can have an unlimited number of lights. You add light by clicking on the small sphere on the right of the list. Each sphere represents a different type of light. The lights will be added to the list and the selected light will visually appear on the object, ready to adjust its position and parameters. You can select any other light for editing by selecting it from the list box.
Light Types
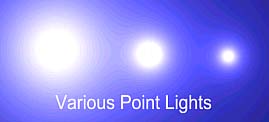
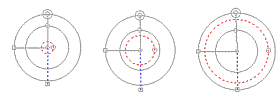
Point Light
Point light is the most dynamic light whilst being very simple to adjust; it has position and direction from the object. You may imagine this light as a light bulb or a reflector pointed straight at the object.
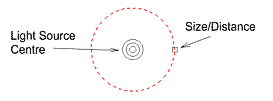
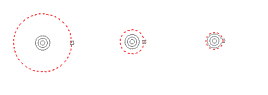
You can move the center of the light (by clicking and dragging) relative to the object and the Size/Distance point. The Size/Distance can be understood as the distance of the light source from the object - smaller radius, the light source is smaller (or more distant in the 3D world)
|
|
Spot Light
Spot Light is the most complex light - it has position, direction, cone angle and focus. You may imagine this light as a reflector which can light a cone on the object. You can also adjust the cone angle and then the shape of the light will change.

You move this light by the Focus Center. The Light Source is used to adjust the direction of the light cone around the focus center. The elevation and the Size/Distance can be used for adjusting the diffusion and intensity properties.
The Elevation can be used to shape the light cone (the closer it is to the focus center causes the lower elevation and the light to become more circular, depending also on the cone angle). The Size/Distance can be used to proportionally enlarge the light cone.
|
|
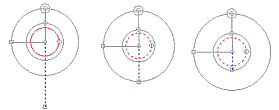
The Cone angle shapes the light most significantly. You can adjust the Cone angle by moving the handle on the black ring around the Focus Center. You may create light which is very wide by moving the cone angle handle closer to the Light Source, or create an almost circular light where the cone is rotated closer to the object by moving the cone handle towards the Focus Center.
|
|
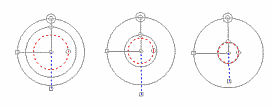
With the Focus you can adjust the focus of the light - how diffused or focused it is. The focus is the red ring around the Focus Center.
|
|
With this kind of light you can create various effects by adjusting all the parameters. Because there are so many parameters, it takes some time to master this light. It could also be used for creating a feel of shapes as explained on the next page.
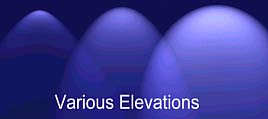
Distant light
The simplest light - it has only direction, no distance. This simulates light sources which are very distant (the Sun for example). The light rays from a very distant source will uniformly light a flat surface. That means if we don't have bevel on the object it doesn't matter from which side the light shines, it will always uniformly brighten the object by the same amount. If we add bevel then the light will brighten closer edge and darken the other.
The only adjustment with the mouse is the direction of the light (for example, top, left, right etc.)
This light is used to add a shine effect to beveled edges.
Tip: You can select the next light for editing, by right-clicking the mouse on the object.
Material
Once you enable lights to the object you can also adjust the properties of the object material. This is how the object reflects the lights. For example, metal surfaces reflect more Specular Light and less Diffuse Light. Plastic materials are quite the opposite.
Ambient Intensity
![]()
This controls the intensity of ambient light around the object. Ambient light has no direction and no position, it sets the dark point.
Diffuse Reflectivity
![]()
This controls how an object reflects diffuse light. Plastic materials reflect more diffuse light than metal.
Note that reflected light is the main carrier of color information. We see the color of an object because of the kind of light that the material reflects.
Specular Reflectivity
![]()
This controls how the material reflects the light peaks. Plastic materials reflect less specular light than metal. Specular reflection doesn't carry very much color information.
Here is an example of 2 materials. Both are exactly the same objects, with one Point light at top left. The left object simulates a plastic material and the right object looks more like a metallic one.
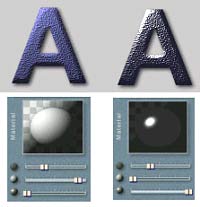
Note that we can add a light to the object not only to make it lighter but also to make it darker - it all depends on the material properties.
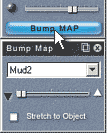
Pressing a button Bump Map located just below the Material Properties will open advanced option for Bump Mapping.
Bump Map allows you to add 3D depth to the surface texture, such as various scratches, metal artifacts etc. You have maybe already discovered the 3D option in Texture properties. This uses the texture itself for creating the bump map effect.
However with this "real" Bump Map you can apply different surface maps onto different textures for greater flexibility. You can for example apply scratchy Bump Map into object with smooth texture.
On example here, we apply "Dots" Bump Map into an object with "Fabric-Strape" texture.

There are just a few controls in Bump Map. First is the Map library - just select the bump map of choice.
The second is a Inward/Outward slider. The zero is in the middle where there is no effect. Sliding it left will make the bump map go into the surface - inward. Sliding right will appear as outward. In the "golf-ball" example above we used the slider left of the center.
Stretch to Object - this option will stretch the bump map into whole object so that means the pattern will not repeat and as you resize the object the map will resize with it. This could be good for some special effects or for small objects (so the large bump map will shrink to fit the small object)
 You can actually combine the 3D from textures and Bump Map to create a new complex surface. However since the mapping is applied at different stages the result can be sometimes hard to predict. Moving one slider will also affect the other option, and sometimes it will even cancel bump mapping all together. So it is recommended that you use either Bump map or 3D texture, not both. But experimentation is free :)
These are the basic properties of lights. Using 3D lights is an amazing way to create realistic effects and are probably the most interesting properties to explore.