|
Bevel Properties |
  
|
|
Bevel Properties |
|
Real-DRAW Basics
Bevel Properties
Bevel is the magic hat that will add a third dimension to your objects. Making Buttons or surfaces is just as easy as a click of the mouse button, but that's just the most basic thing you can do with bevels - they are great for AirBrush illustration and much more.
|
Select one of the desired Bevel types, and move the sliders to get various effects. With the radial Light Direction you can select the position of the sun shining on the object. The most common button selection is the upper left side. |
Note: In order to apply a bevel, the target object must be at least a certain size. If you need to apply a bevel to tiny objects, use the Flat bevel, rather than the Smooth bevel which has a more radical slope.
Tip: To make a button, set the source of the Light Direction to illuminate it from the upper left. To give the appearance of an inset or pressed button, move the source to illuminate from bottom right.
There are many cool types of bevel and additional bevel-category effects in Real-DRAW.
|
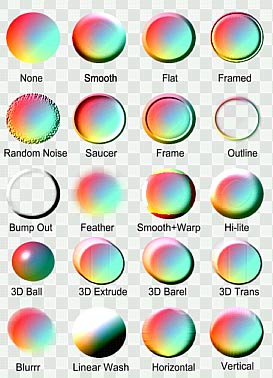
Each bevel produces a specific effect, as you can see in the picture on the left. Between them, there are quite a few different bevel effects. Outline : Creates an outline around the object edges. The outline doesn't keep the size of the object in the same dimensions - if you need to maintain the same size, use Break Path instead. Bump Out: A bevel that doesn't actually display the fill, only the smooth bevel. This is cool if you want to create small bump buttons on a large bitmap image. Feather: Feathers the edges Warp: Makes a bevel and warps the texture around the edges - nice on large objects. 3D ball: Always creates a 3D ball from any object 3D Extrude: Extrudes the object into 3D dimensions Linear Wash: Applies a black/white linear wash with an angle |
|
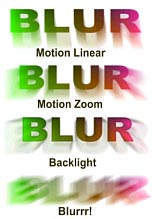
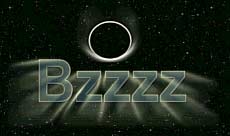
Motion, Backlight and Blurrr! You have a few other effects in a category Bevel - a blur type effects. Motion Linear and Motion Zoom - add a sense of motion (any direction) to the object or package, where the main object remains fairly recognizable. Backlight - is similar to Motion Zoom, but it generates an outline projection. Blurrr! - Blur the object in any direction |
Special Types
3D Ball
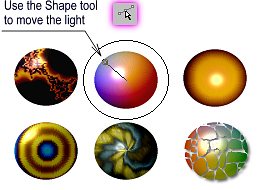
A very special effect - no matter what the originating object is, produces a perfect Rendered Ball. With the SHAPE tool you can adjust the direction of the light and create nice light reflections.
|
In the picture on the left we can see a few examples of 3D Ball using different settings of light, reflection and textures etc.. This effect overcomes the frustration of creating real 3D looking balls in 2D graphic software.
Some results might be quite stunning. Tip: Try using the Sky Texture as a background and below the ball in size, place a white circle as a sun. You will get a nice sunset. Oh yes, you can do the same with using just lights, but... |
3D Extrude, Barrel, Transparency
Using these effects to create 3D like objects from any vector, bitmap Package, or text object is a lot of fun. They work nicely with text objects and lights. You can change the angle from which you are looking at the object. The light always shines from top-left but you can switch it off (by moving intensity to 0) and use 3D lights from any direction. Also try to using texture.

Motion Linear, Zoom
This is a nice effect if you want to add a sense of motion to an object. You can adjust the length of the motion, the intensity and the direction. In a Zoom, type the motion is in perspective where the center is always at the border of object in a direction determined by the Direction control.
![]() Tip: By adding a different Outline color to the object you can adjust the blur color - the outline of the object more significantly affects the motion trail.
Tip: By adding a different Outline color to the object you can adjust the blur color - the outline of the object more significantly affects the motion trail.
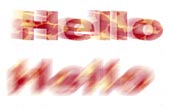
Backlight
This is a close brother of the Motion Zoom. The motion trail shows only the outline of object.
![]() Tip: With this effect, the color of the trail is obviously affected by the outline color of the object. You can create a dark object with a bright outline and the trail will become bright (as in the image above). This effect probably works best this way - on a dark background with bright outline.
Tip: With this effect, the color of the trail is obviously affected by the outline color of the object. You can create a dark object with a bright outline and the trail will become bright (as in the image above). This effect probably works best this way - on a dark background with bright outline.
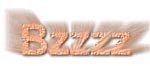
Blurrr:
By adjusting the Blur angle (direction of motion), width and the intensity, you can create various effects.
You can also get interesting effects if you combine Blurrr with Lights !
![]() Note: For Blur, Extrude and Motion Effects - the object will appear in a projection (smaller size) to accommodate the effect in the object boundaries. The curves of the object will remain in the original position. If you attempt to edit such an object with the SHAPE tool, the points of the curves will go back to their original (before effect) position, obviously not aligned with the object projection. That's not an error.
Note: For Blur, Extrude and Motion Effects - the object will appear in a projection (smaller size) to accommodate the effect in the object boundaries. The curves of the object will remain in the original position. If you attempt to edit such an object with the SHAPE tool, the points of the curves will go back to their original (before effect) position, obviously not aligned with the object projection. That's not an error.
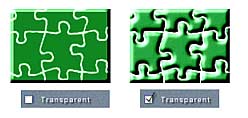
The bevel also depends on the transparency settings. If you don't have any transparency set then the bevel will be applied to the object edge.
|
The object on the left has the Transparency switched off. The bevel applies only to the object border. The object on the right has the Transparency On and the bevel applies also to the transparency mask. With the bevel on transparency you can create the feel of a more complex object than there really is. |
The Bevel works on both the Transparency Properties and the Transparency option from The Color Properties.
Bevel and Lights
|
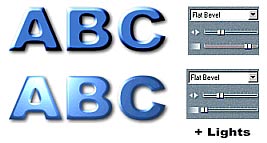
To show a simple bevel, you don't need lights (top image), the bevel itself will create a simple light source and you can adjust the direction with the Light Direction setting. For more advanced settings, you may apply one or more 3D lights (bottom image) to the object. It is usually better if you switch the light from bevel, off (so the lights don't mix up) - by simply moving the Bevel Intensity slider to the left. It is done by default when you add lights. |
Combine Effects
You can combine the bevel effects if you ever need to. Most of the time you won't need to, but you may want to create a bevel and then blur it for example. As explained in detail in the Packages section, you have the ability to add and combine various effects by using Packages. Simply said, apply the bevel effect on the object, package it, and then apply another bevel effect to the whole package.