CompactDraw
Basics
Bevel Properties
Bevel is the magic hat which will add the third dimension to your objects. Making Buttons or surfaces is just easy as a click of the mouse button. But that's just very basic you can do with bevels - they are great for Airbrush illustration and much more.
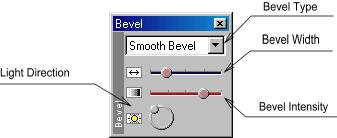 |
Select one of the desired Bevel type and move the sliders to get the effect. With the radial Light Direction you can select the position of the sun shining at the object. The most common for buttons is the upper left side. |
Note: in order to apply bevel the object must be on certain size. If you need to apply bevel on tiny objects, use Flat bevel rather than Smooth bevel (it has faster slope)
Tip: To make a button let the Light Direction from Left top. To make an appearance of a inset or pressed button put the light from bottom right.
There are 12 types of bevel in CompactDraw.
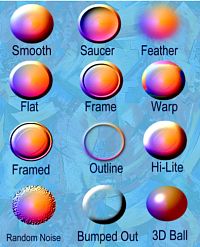 |
Each bevel produces a specific effect you can see on the picture
left. |
3D Ball
A very special effect - because whatever the object is it produces
a perfect Rendered Ball. With the SHAPE tool you can adjust the direction
of the light and create nice light reflection.
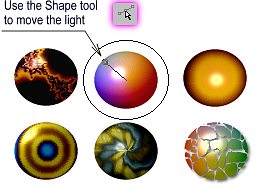 |
On the picture left we can see a few examples of 3D Ball using different settings of light and reflection, textures etc.. This effect overcome the frustration of creating real 3D looking
ball in 2D graphic software. |
 Tip:
try to use Sky Texture and blow the ball in size, place a white
circle as a sun. You will get a nice sunset.
Tip:
try to use Sky Texture and blow the ball in size, place a white
circle as a sun. You will get a nice sunset.
The bevel depends also on transparency. If you don't have the transparency then the bevel will be applied to the object edge.
|
Here is explanation how a bevel depends on transparency. On both
objects we have the same bevel settings. However the object on right
has also set the Transparent option on the Transparency
Bar. |
The Bevel works on both the Transparency Properties and the Transparent option from The Color Properties.
Bevel for Illustrations
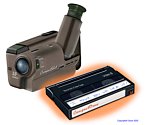 |
You may not realize yet, but bevels are great for much more than doing buttons. With bevels and the Light Direction you can make a beautiful airbrush like illustrations. See the camera on the left side.The most of the smooth edges are in fact two simple shapes with large smooth bevel and each has opposite Light Direction. Then you can use dark objects with feather to add shadows, however the basic shape is heavy on bevels! |
![]()
![]()