We have already learned how to create links and how to modify what part of a button that will be highlighted.
When you Simulate the Menu, you will see that all the links are highlighted with the same color and with some transparency. The Map tab on the "Menu Properties" is where you set these parameters.
![]() Note: The changes to Color Map can be seen directly in Simulation. That means you can stay in Simulation mode and change the parameters with immediate results.
Note: The changes to Color Map can be seen directly in Simulation. That means you can stay in Simulation mode and change the parameters with immediate results.
![]() Hi-lite Groups/Antialiasing
Hi-lite Groups/Antialiasing
Any active object can be in one of the three groups 1,2 or 3 (also called E1, E2 and P). By default all buttons are set to group 3.
Each of the Button Hi-lite groups can have different color properties.
![]() Antialiased Subpicture
Antialiased Subpicture
Three color groups can be used together to create an anti-aliased subpicture. DVD-lab will use the three groups of color to create a color fade on the edges. The edges will then appear smoother, but this will allow you to use only one color and transparency value for highlighting the buttons on the menu.
![]() Transparency and Color
Transparency and Color
In the example below the Frame with link is also set to group 3 so the third slider will affect it.
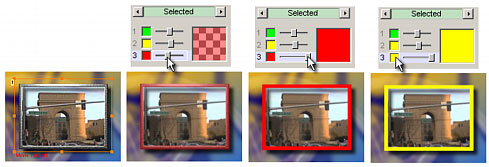
Notice the different settings for the highlighted image. The slider is the transparency of the highlighted picture (left - fully transparent, right - opaque).
To change the color, click on the color "well" to the left of the slider.
You will be given a palette of 16 colors to choose from.
A Button State
An active object can have 3 Highlight states: Normal, Selected and Activated.
Normal state is when the button is not selected. A most common setting is that in a Normal state the highlight picture is fully transparent.
Selected state is when the button is selected. This is where you do most of the changes, because this is the highlight state that user will see the most.
Activated state is when the user clicks on the button (press Enter on their remote). This state will briefly appear before the player navigates the link.
To change the color settings for each state, click on the left or right arrows near the State indicator:
Here are the default settings for each state and highlight group
Again note, that in the Normal State all groups are fully transparent. That means you don't see any highlighted picture if the button is not selected. However, in some cases such as for motion menus, you may use also the Normal state.
All this may seems to be a bit overwhelming but it is really quite easy to master.
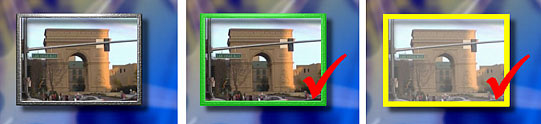
A small challenge
Here is an example of what you can do with the features we have just described. By combining all the accumulated knowledge of Frames, Visibility, Groups and Color Maps, you should be able to produce the buttons below (displayed as not-selected, selected and activated).
Palette
The palette is a common color set for the whole project. You can change the Palette in the menu Project - Project Properties.