A fun way to turn one image into ... well ... let's call it a "different image".
The basic idea behind this effect is that a certain range of color is replaced by a texture with few other effect settings. Please see the image below:
We started with a black and white image (for easier explanation) on the left side. We enabled 4 layers of texture corresponding to various color intensity. The right side is the result of that.
Of course we don't have to start from black and white image - we can start from any image!
The Tex-Mix interface
The Tex-Mix works on a menu that has either a background image and/or objects. It cannot "generate" an image from black canvas.
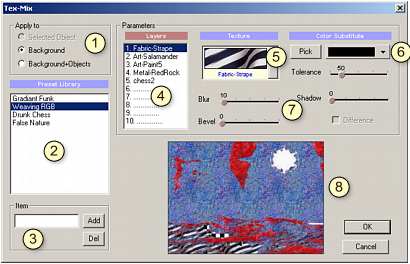
1 - Apply To
Similarly to Gen-EFX, the Tex-Mix can be applied to Selected Objects (such as images, buttons or video stills), a Background or Background + Object
Note: In order to apply effects to a text or any vector objects you need to convert them to bitmap first. .Menu-Effect-Convert to Bitmap.
2 - Preset Library
Here is a list of Presets. A preset is the combination of various texture layers and settings that can be applied to image.
3. Add new item variation to library
You can save the current texture layers as item to the preset library

You can also delete item from library by selecting the item and pressing Del button.
4. Layers
The Tex-Mix can be created using up to 10 texture layers. Each layer correspond to a texture, the color (6) that is replaced by this texture (5), the tolerance and few other parameters (7).
If you want to disable a layer, set it's texture (5) to "No Texture". By default the Tex-Mix starts with only a single layer turned on.
5. Texture
This is the list of available textures. (You can add your own seamless textures by copying the jpg files to /Textures folder and restarting DVD-lab PRO)
6. Color, Color Pick, Tolerance
The basic of this effect is that a certain color range on original image is replaced by the texture (5). We can set up to 10 different "pairs" here called layers (4). With Color Pick we can sample a color from the original image or in fact from any other image visible on the screen.
A Tolerance will set the range of the colors that will be replaced.
7. Effects
There are few other properties that we can set for each layer(4).
Blur - setting a blur to the edges of the replaced texture
Bevel - creating a bevel on the edges of replaced texture (this slider affect the intensity of the Bevel, while the Blur affects the width of the bevel)
Shadow - intensity of a shadow behind the texture layer
Difference - when checked it will fill the texture on that layer according to the color and tolerance but only in places where there is not yet any previous texture applied
8. Effect Preview
Preview of the Tex-Mix.
Have fun!