|
Introduction |
  
|
|
Introduction |
|
The HDR imaging and tone mapping brought last couple of years a new excitement into the digital photography. While HDR imaging has a very specific purpose for professional work (like CGI or image recognition), its various tone-mapping processes can be also used to turn an ordinary digital photo into a more dramatic and interesting work.
Our software was not build as scientific tool. We focused on the easy to understand, easy to use quick work-flow that can almost instantly produce interesting images. It should be an addition to your toolbox, for special purposes, not a pipe to run every single image you captured through it.
Eye vs. Digital Camera
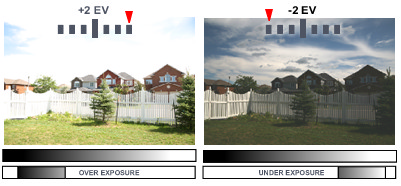
Our eyes are very adaptive and they are also more sensitive to intensity than color. It is estimated that our eye can see over a dynamic range of nearly 24 f-stops while a digital camera can capture a dynamic range around 6 to 9 f-stops at best.

This means that when we look at a beautiful scene with a high range of light we see much more detail. We can see details in the shadow as well as clouds in the sky. But for camera to correctly capture the scene with its limited dynamic range is far more difficult. We (or the camera auto metering) can overexpose the image to get details in the shadows or underexpose the image to get details in the bright sky but can't get both the same way our eye can.
HDR vs. LDR images
There is a significant difference between our dynamic vision (and what our brain thinks it see) and the cold fact of ordinary low dynamic range photography.
Example of normal scene:
A storm could produce beautiful clouds, but if we try to capture the scene with a digital camera, none of the images in any exposure will reproduce what we saw with our eyes. The middle image is the camera calculated exposure, right is overexposed +2EV and left is underexposed -2EV. None of the exposures are too exciting.
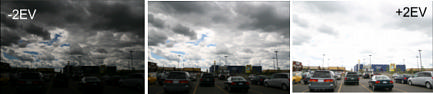
While we did take a reasonable photo of the clouds in the middle image and even more in the under-exposed image, any of the scene surroundings become too dark. With over-exposing the image we did bring the dark details out, but the clouds are now washed away and it no longer look as a storm. If we try to fix any of the image in image editing application we can dodge or burn only certain amount, because there is simply not enough details in any of the picture to cover the whole tonal range. With low dynamic range photography a complex scene is always a matter of compromise.
However if we can combine all the exposures into one image, we will suddenly have enough dynamic range to pull/push details from dark/highlights. The result is below.
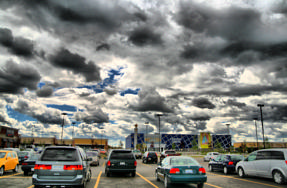
While the scene is still the same, it is just a parking lot with a storm sky, hardly a candidate for an art, the image is now far more interesting than any of the single exposures above.
There is of course much more to the photography than just snapping pictures and then process it through a software. We never want to suggest that any digital technique can be a replacement for artistic vision or a basic photographic knowledge. A bad technique will result in bad pictures, no matter how much time you spent tweaking pixels in any software.
Please note, in this tutorial we are going to show an ordinary images, not a professionally photographed scenes. In fact most of the images were taken by hand, not using tripod which actually allowed us to fully test our Pin Warping method. We believe this is more fair as not everyone is taking images of Mount Everest or Paris, at least not every day. It also teach us to more appreciate the images around us.