|
Actions and Macros |
  
|
|
Actions and Macros |
|
![]() Action Macro is a sequence of general command steps such as resizing, full scale color corrections or built-in filters. Instead of applying a sequence of actions one by one, you can record them into an Action Macro sequence that can be saved and reused later.
Action Macro is a sequence of general command steps such as resizing, full scale color corrections or built-in filters. Instead of applying a sequence of actions one by one, you can record them into an Action Macro sequence that can be saved and reused later.
To show Action Macros use the Action button on the main toolbar or in menu View - Actions
An example could be a simple macro for resizing image 50% and then sharpening the image. You can do it manually: 1. Menu: Image - Image Size; 2. Set 50%; 3. Filters - Sharpen
or if you plan to use it on more images, you can record this sequence into the macro and simply "play" the macro sequence on the image. This will save you a lot of clicking and adjusting.
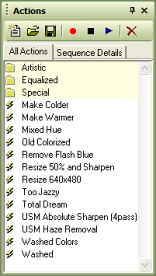
All Actions
Under this tab you can see a list of saved actions (also called action sequences). These are *.acc files saved in the Actions Folder. If you save any new action sequence into this folder it will appear here.
On the first image we can see we have selected the Resize 50% and Sharpen action sequence. Now we can press Play button or simply double click on it and it will apply the sequence on the current image.
Sequence Details
Each Action sequence can have one or more steps. We can see the sequence steps of the currently selected action by selecting the second tab or by clicking at the triangle on the left of the action.
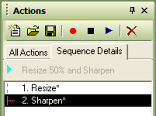
Here we see, our Resize 50% and Sharpen action has two steps: first is Resize, second is Sharpen. When you press the Play button, the sequence is always executed from the first step to the last step.
It doesn't matter if you “Play” the sequence from the All Actions or Sequence Details tab.
If you double-click on any step you will get into the actual numerical parameter settings. These are very similar but simplified settings you can see on a dialog box of a particular effect. Sometimes the step settings offer more adjustment than the parent action invoked from the menu. For example, a simple sharpen in menu Filter - Sharpen-Sharpen will sharpen the image without giving us a way to adjust the intensity of effect; however, the same recording in Actions will give us access to the sharpen coefficient.
![]() Record new Action Macro
Record new Action Macro
First select the All Actions tab and then press ![]() Record button. If you select the record button while in Sequence Details, then you will be given a choice to start recording a new action or continue adding more steps to the currently selected action.
Record button. If you select the record button while in Sequence Details, then you will be given a choice to start recording a new action or continue adding more steps to the currently selected action.
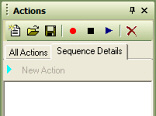
We would like to record new action. The sequence details list is empty.
Now whatever general adjustment you do to the image will be recorded until you press ![]() Stop button.
Stop button.
Note: These don't include extras, external filters, saving or loading, or painting with brushes. All commands in Image - Adjust, Image Size, Rotate can be recorded as well as all built-in filters (not any external).
To record a macro which would first resize to 50 % and then sharpen, we simply use commands from menu Image - Image Size, set 50 % and then use command from Filters-Sharpen-Sharpen.
Now we can press ![]() Stop button.
Stop button.
Resize - a special case
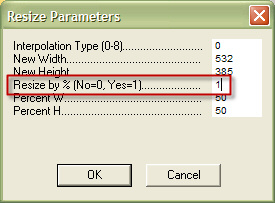
At this moment we need to modify the recorded data. When using the Image Resize command, we must tell the macro if we would like to resize by absolute coordinates (such as resize to width: 160 height: 200) or by relative (such as 50%). Double click on the first line Resize in the Sequence details to open the numeric representation. We need to change the value Resize by % (No=0, Yes=1) to 1 as in image below.
Press OK.
You can similarly adjust the intensity of sharpening in the Sharpen line if you wish to do so.
When you change any data directly in a sequence step, a small star * will appear next to the step name reminding you that data were changed from the recorded data.
You may use (play) this macro right away, but remember if it is not saved, it will be lost as soon as you select any other action macro. So the last step is to save this sequence. While still in Sequence Details, press the Save button. In order for the new action sequence to appear in All Actions, you need to save it in the Actions directory - this will be the default directory opened when you press Save button, so simply enter new name and save.
Whenever you change the data in any step, you need to resave the sequence. If you fail to do this, the changes will be lost as soon as you select other action sequence.
![]() Delete button
Delete button
This button has a double functionality. While in All Actions it will remove from disk the currently selected action sequence. While in Sequence Details it will remove the currently selected step. You will, of course, need to re-save the sequence if you do so.