|
Effect Properties |
  
|
|
Effect Properties |
|
Real-DRAW Basics
Effect Properties
If Bevel is the bread of the 3D effects, then Drop Shadow is the butter.
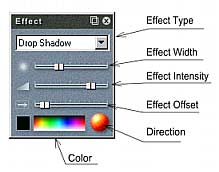
The Effect bars allows you to add external effects (going out of the objects) like Drop Shadow, Glow, Inset, Cutout and many Lens effects.
|
Select one of the desired Effect types and move the sliders to get the desired effect. With the radial Direction, you can select the position of the effects offset. In the case of Drop shadow, then that would be the direction of light. Choose an effect color to spice up the effect... also useful for Glows and Halos. |
|
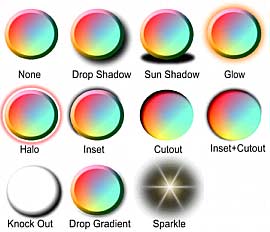
Shadows: Works best on a light background. Makes the object appear in space. The Drop Shadow is commonly used on all buttons and objects in Multimedia interfaces and Web Art graphics. Glow and Halo: Works best on darker or textured backgrounds. Commonly used on highlighted buttons in multimedia; however, it is a nice effect to distinguish an important dark text or object from a dark background. You can also get interesting effects by using a dark color as an effect color against a light background. Inset and Cutout: Works best on dark or textured backgrounds, gives the impression of an object partially inset into the background. The Cutout will give an impression of a hole inside the background. Don't use bevels if you are using Cutout - the bevel will overlap the Cutout. Sparkle: A favorite for adding a touch to reflective surfaces. Can be used on objects of any shape and will always produce a sparkle. |
|
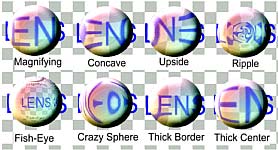
Lenses: Lenses simulates various lens types but of course they need some objects behind them.
With the Effect Width you can adjust the overall lens effect and with Effect Intensity, you mix between the lens color and the lens image. With Offset you can set the magnifying factor. Neither Direction control, or Color, affect these types of lens effects. |
|
Filter Lenses Filter Lenses are similar to normal Lenses, but instead of simulating glass lens, they simulate various filter effects. Defocus Filter Lens - Simulates normal and color defocus. |
|
Special Effects Lens Flare: Turns any object into a light source with lens flare. The flare is automatically calculated in the frame to reflect the real life scenario. Push-Back: A special "lens" which reorders the Layers behind it. |
Shadows
Using shadows is obvious - it creates the feel of a real object. There are several shadow types; Drop, Sun Knock Out and Drop Gradient.
The Knock Out doesn't show the object itself, but only the shadow. Where the object was, there is no shadow, just a transparent hole.
Drop Gradient is similar to the Drop Shadow but the shadow is gradient - it is thin (light) on the beginning of the shadow and thick (dark) on the end.
Sparkle
A cool after touch effect, works best on dark backgrounds.

Sparkle is one of the effects which doesn't care about the object shape. It only uses an object to determine the position and size of the sparkle - you can use a circle for example. The sparkle can be modified in various ways, and offers 3 basic choices.
| • | An inner halo which is always white |
| • | Rays with variable width, intensity and number |
| • | An outer halo which can have various colors |
The Effect Width will change the width of the rays. The Intensity will change the intensity of the rays - from 0 to full intensity. The Offset will change the number of rays - starting from 4. The direction will change the angle on which the first ray is drawn.
You can change the color of the outer halo. If it is black (default), the outer halo isn't visible, only the inner white halo is shown.
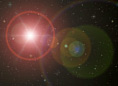
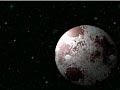
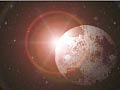
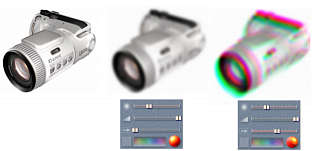
Lens Flare
Lens Flare is a special version of the sparkle effect. It works in generally the same (with the same settings) way, but it also casts a flare on the whole document from the light center, as would happen in real life using a normal photographic lens.
|
|
|
|
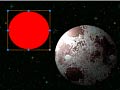
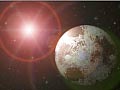
As in the images above we just added a simple object - a circle, and set the Effect properties to Lens Flare. The object becomes a light source (much like a Sparkle) and the lens flare will be calculated to fill the document. As with the normal Sparkle, you can simply change the size of the object or it's position and the flare will be recalculated.
If you would like to change the opacity of the effect you can use the Layers Opacity slider (not Transparency properties).
The slider on the Effect bars has the same properties as those of Sparkle - it changes the intensity, shape and number of sparkle rays.
The lens flare is used usually as a top layer, but you can of course move it within the layers as you like.
You may temporarily switch off displaying this effect with the Rendering Quality buttons.
![]() Note: This effect obviously works on a dark background. Many subtle colors are calculated with this effect so the best is if you have your video display set on 24 bit (True Color) or 32 bit colors.
Note: This effect obviously works on a dark background. Many subtle colors are calculated with this effect so the best is if you have your video display set on 24 bit (True Color) or 32 bit colors.
![]() Tip: While this looks very good, remember not to abuse this effect. It usually looks good on a "space"- like images, special letters etc. Don't try to put it on every image you create (unless you want to be known as a cheese artist).
Tip: While this looks very good, remember not to abuse this effect. It usually looks good on a "space"- like images, special letters etc. Don't try to put it on every image you create (unless you want to be known as a cheese artist).
Push-Back
This is a special lens which pushes the object behind it back into specified bottom layers. This is a very smart tool. Please see next chapter which is all about this unique tool.
Lenses and Lens Filters
A great way to create the feel of glass or other glass effects. Object, with the lens effect, will show everything which is behind it (below in the layer list) with the particular effect. Lenses take more time to compute and if you use many lenses, you may see the redrawing slowing down. This is because anytime you change something behind a lens, all the objects must be redrawn in order for lens to reflect the reality. It is then best if you switch the rendering lenses off during designing - see below.
Sometimes the lens may show a canvas border, or in case of zoom, sometimes the lens doesn't have enough information to show the full image. This isn't a big problem since the final exported image will be without these artifacts.
![]() Note: If you use the Crop tool to export, the lens will show only objects in the export range.
Note: If you use the Crop tool to export, the lens will show only objects in the export range.
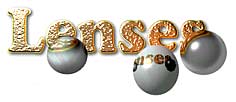
Lenses tends to be very realistic. If one of the objects behind the lens is also a lens you will get multiple lens reflections. Lens, can display only objects which are behind them, and not above them.
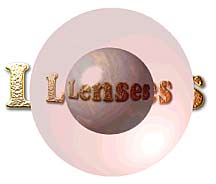
Thick Border and Thick Center lens are two special cases.
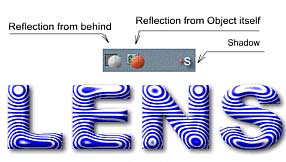
Where the other lenses can reflect only what is behind, the Thick border and Thick Center lens have the ability to reflect also the texture of the object itself. You can switch between these two modes with the two buttons, which appear if you select this kind of lens. This way, if the object has a texture/bitmap layer, you can create various interesting effects - similar to environmental mapping where the texture follows the object shape. You can also create an interesting effect by pasting a bitmap image inside the vector object (with Paste Inside in menu Edit).
While the other lenses don't allow you to have a drop shadow and lens at the same time, the 2 border/center lenses can have a simple shadow by selecting the "S" button letter.
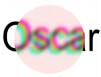
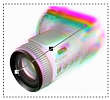
Defocus Lens
This is another very interesting lens for creating blured or defocused image. With Effect width you control the amount of defocus (or blur) and with the Offset together with the angle you can set a separation of rgb channels. On the image below the first is original. We then draw a square on top which covers the whole object and set its Effect property to Defocus Filter. Everything what is behind the lens will be blured (second and third image)
![]() Tip: You can apply a linear or circular transparency to the lens to get various defocus effects. You can simulate various depth of field or create some interesting effects:
Tip: You can apply a linear or circular transparency to the lens to get various defocus effects. You can simulate various depth of field or create some interesting effects:
You can also try to change the transparency of the lens only on some places with ![]() Paint-On Transparency tool. This way you can defocus just some part of the image.
Paint-On Transparency tool. This way you can defocus just some part of the image.
Lenses takes more CPU To be able to render all the scenes, lenses needs more CPU. This is especially true if you have more lenses on the scene. You can easily switch off displaying the lenses with the middle button in the Render Quality settings |
![]() Tip: Creating a complex shadow
Tip: Creating a complex shadow
Sometimes you need a shadow for a complex object. Here, instead of using a drop shadow on each component, you can create a new object which will represent the shadow. It is done very easily - just select all the objects that you need, and apply from menu: Bitmap - Create - Bitmap Shadow From Selected Objects.
This will create a new bitmap object behind the selected object - Shadow. Now you can scale it, rotate it, apply effects to it (such as Feather) or paint on it.
Effect Tools
A few effects such as Sparkle, Lens Flare and Push-Back from the Effect properties can be created directly from the toolbar.
You can either draw any object and then select the particular effect from effect properties or you can directly use them from this toolbar. These will essentialy create an circle and apply the particular effect to it in one step.