|
Push-Back Tool |
  
|
|
Push-Back Tool |
|
Real-DRAW Basics
Push-Back
The Push-Back can be accessible either from the Toolbar or by drawing an object and choosing Push-Back in Effect Properties.
What is it?
The Push-Back is in fact a very interesting and unique tool/effect. With good understanding this tool can help you achieve nontraditional results in just a seconds.
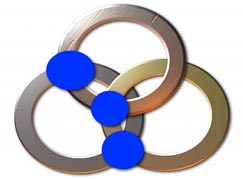
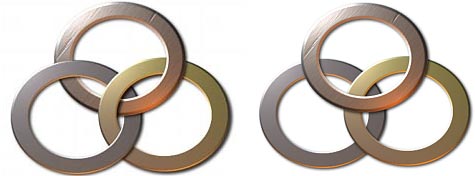
To understand the importance of this tool please look at the next image:
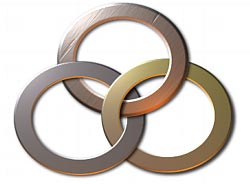
This may look pretty normal to many people, however in fact this is something no other software have serious tool for. In all traditional software the objects are in layers. It isn't possible for objects to cross layers, where part of the object is in one layer and other part in a different.
To do such image in a traditional software requires large amount of work. It involves a lot of clipping, cutting etc. and still the result may not be as smooth and natural as the image above. But with Real-Draw it took just few seconds.
The answer to this is the Real-Draw unique Push-Back tool.
The Push-Back tool can push the object behind it further into another layer. This simply allows to move part of the object into other layers, behind other objects.
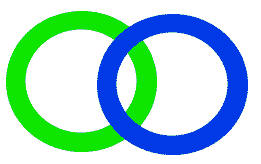
Please follow this simple example:
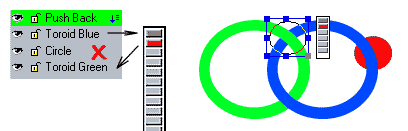
With the toroid tool we draw two rings - green and blue.
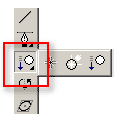
Now from the Toolbar select the Push-Back Tool.
Normally it is as subselection with the sparkle tool:
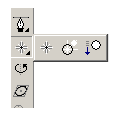
Just click on the bottom arrow on Sparkle to open subselection toolbar and select the Push-Back Tool: ![]()
Now with it selected simply draw a circle on the cross-section as on image below:
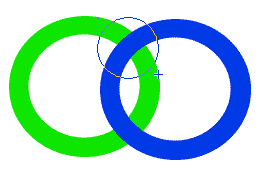
As you finish drawing the Push-Back object will be created:
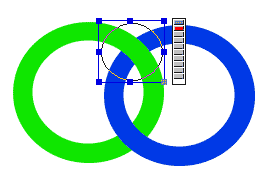
Now as you can see, the image behind the Object already changed. The Green ring is now over the blue one under the Push-Back object.
The selector on the right side of the Push-Back is a Layer selector. The second button from top is highlighted in red - that means an object behind the Push-Back will be "pushed" one layer below. You can simply click on it and select other button. If you select the top most box, the Push-back effect will be erased.
That is - your first Push-Back Object.
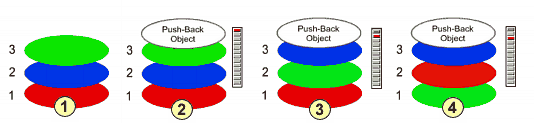
The Selector
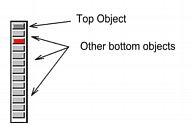
When you select Push-Back object a selector will automatically appear near it. The selector shows how many objects down we pushed the Top Object (That is a object right below Push-Back Object)
On the image above we have selected third button which means we push the top object (the grey button) below2 other objects behind it.
![]() Tip: For very small Push Objects you may not have enough layers visible in the selector - just zoom in the picture - the selector will show additional layers.
Tip: For very small Push Objects you may not have enough layers visible in the selector - just zoom in the picture - the selector will show additional layers.
How it works:
![]() Note: The layers for Push-Back are not the same as layers in Layer list. Push-Back use a local object list - created from objects in near proximity of Push-Back. It will simply skip not related layers or any other Push-Back object. This gives you more universal approach - for example Push-Back of one layer down will work on most cases, even if the objects are in real life much further apart in layer list.
Note: The layers for Push-Back are not the same as layers in Layer list. Push-Back use a local object list - created from objects in near proximity of Push-Back. It will simply skip not related layers or any other Push-Back object. This gives you more universal approach - for example Push-Back of one layer down will work on most cases, even if the objects are in real life much further apart in layer list.
Push-Back Pushes an object which is right behind it (top object) a number of object below.
The image above is sort of a "side view" of layers for better illustration.
The step ![]() are just three objects one on each other. The Green is the Top object.
are just three objects one on each other. The Green is the Top object.
Now in step ![]() we add a Push-Back on top of it, but set the Push layers in the selector to the top one. Nothing change.
we add a Push-Back on top of it, but set the Push layers in the selector to the top one. Nothing change.
In step ![]() we set the layer selector to the second button. That is - the Top Object (green) will be pushed one layer/object down, behind the blue object.
we set the layer selector to the second button. That is - the Top Object (green) will be pushed one layer/object down, behind the blue object.
In step ![]() we set it on third button, this will push the top object (green) 2 objects below - behind red and blue.
we set it on third button, this will push the top object (green) 2 objects below - behind red and blue.
![]() Note: Only objects behind the Push-Back are affected.
Note: Only objects behind the Push-Back are affected.
Now you see for the 3-ring example all we need to do is to use 3 Push-Back objects placed on each cross-section. And all of them are set just for one layer - this shows how the "local object list" works.
Layers List
Now lets go back to our simple example:
Check the Layers list. The Layer List will not change by applying Push-Back - it always shows the real object position.

Our situation is in the ![]() . No matter what we set in the selector, this will always appear this way in Layer List. The object below The Push-Back (Toroid Blue) marked as gray button in selector will be pushed one object below.
. No matter what we set in the selector, this will always appear this way in Layer List. The object below The Push-Back (Toroid Blue) marked as gray button in selector will be pushed one object below.
If we move the Push-Back object a layer down in Layer List ![]() this will have no effect, because the object below Push-Back cannot be pushed below any other object since they are none.
this will have no effect, because the object below Push-Back cannot be pushed below any other object since they are none.
The situation ![]() shows an additional Rectangle object on the very bottom and pushing the Blue Toroid two objects below.
shows an additional Rectangle object on the very bottom and pushing the Blue Toroid two objects below.
Because we don't have any other objects between the layers which are outside the Push-Back range the Layers list shows the same situation as Push-Back see its local object list. If, for example we draw another red circle completelly out of Push-Back range and move it behind Blue Toroid - it will appear in Layers, however it is not counted in the Push-Back local object list.
An object which is out of Push-Back range (doesn't lay below Push-Back boundaries) will be skipped by Push-Back selector.
That is: a push-back one object below will work on our toroids even there is a Circle between them in Layers (but it is positioned outside range so the Push-Back doesn't see it and so it will skip it). This has number of advantages.
Switching off Push-Backs
When you add few push-backs it may be hard to remember which object is really on top of others and which is just "pushed". The Push-Back does really good job in hiding this so it won't give you a visual clue. (only The Layers List shows the real situation).
It is easy to switch the Push-Backs off: Switch display from Full-Render to Lenses Off.
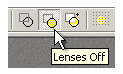
This will disable all Push-Backs and you will see the real object order. OK, the top ring is in fact the top most, that wasn't obvious from the left image!
![]() Note: Push-back works on any objects - it can be Polynome, Package, Text or even a Bitmap.
Note: Push-back works on any objects - it can be Polynome, Package, Text or even a Bitmap.
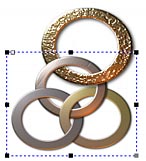
Here we Packaged our 3-ring sample and then used another Push-Back on the package with other ring. This is the beauty of Real-Draw Packages!
Push-Backs is an object as any other.
Yes, that's true. The basic Push-Back Object is nothing less than just a circle with Push-Back effect. But you can apply any other effects to it or change shape as you want (with the shape tool). Also you can create any shape and simply apply Push-Back to it in the Effect Properties.
You can for example make it semi- transparent or with some transparent texture. That means Push-Back can be used also for many different purposes. See some experiments with transparency below. We have just two solid objects and an elliptical Push-Back.
We used Linear Transparency, texture Transparency and Radial Transparency.
Other interesting effects can be achieved by - adding solid Outline, adding Bevel, or even adding Lights.
Notes:
![]() While you are experimenting with this tool always remember what the Push-Back really does - it pushes the top object to bottom layers. If you for example have no other object behind the Top Object (in the boundary covered by Push-Back) there will be no effect. This may happen when you move the Push-Back object around - on one part it has effect, on other not - simply because a number of objects right behind it change.
While you are experimenting with this tool always remember what the Push-Back really does - it pushes the top object to bottom layers. If you for example have no other object behind the Top Object (in the boundary covered by Push-Back) there will be no effect. This may happen when you move the Push-Back object around - on one part it has effect, on other not - simply because a number of objects right behind it change.
![]() Sometimes when you move or resize Push-Back it suddenly become with no effect. Just remember it works on a local layer list. That is, it counts only objects which boundaries are behind the Push-Back object. When you move the Push-Back the number of objects right behind it may change - this may affect the Push layer settings in selector.
Sometimes when you move or resize Push-Back it suddenly become with no effect. Just remember it works on a local layer list. That is, it counts only objects which boundaries are behind the Push-Back object. When you move the Push-Back the number of objects right behind it may change - this may affect the Push layer settings in selector.
![]() Some objects have also quite large "empty" boundary - for example a text. While your Push-Back object doesn't touch the text it may still count the text object as one because the boundary of text lay under it. So you have to accommodate this when you setting the number of "push" in the selector.
Some objects have also quite large "empty" boundary - for example a text. While your Push-Back object doesn't touch the text it may still count the text object as one because the boundary of text lay under it. So you have to accommodate this when you setting the number of "push" in the selector.
![]() If something doesn't work as it should, check also the Layers List. Because the Push-Back object is invisible, it may happen that you try to apply it on object which is above, not below it. The Layers List will show you the real position. Then you can move the Push-Back up or down layers to get to the desired object.
If something doesn't work as it should, check also the Layers List. Because the Push-Back object is invisible, it may happen that you try to apply it on object which is above, not below it. The Layers List will show you the real position. Then you can move the Push-Back up or down layers to get to the desired object.