|
Editing Brushes |
  
|
|
Editing Brushes |
|
Real-DRAW Advanced
Editing Brushes
You can easily create your own brushes, or you can create many interesting variations from the existing ones.
In case you want to adjust brushes or add a new brush, you can do it from the Brush Properties dialog box. To get to the Brush properties, select any brush from the Brush bar, and click with the right mouse button on it, or click the small arrow near the bottom of the Brush Library. Then from the Brush Library menu, select Edit.
If you want to create a new brush, click Add.
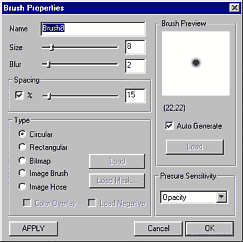
Name
The name of the brush - could be anything.
Size
In the case of Circular or Rectangular brushes, this is the size of the Brush.
Blur
In the case of Circular or Rectangular brushes, this is the Blur of the brush. The blur creates a smooth blending edge. Air Brushes for example, generally have a large Blur Value.
Spacing
The Spacing is the distance between the brush marks in the stroke. The value is a percentage of the brush Size. The different spacing is most visible on Non-circular brushes:

Enable or Disable Spacing. In order for most of the Brushes to work properly, they should have the Spacing Enabled by putting a check mark next to the Spacing slider. Otherwise, the steps will depend on the speed of the mouse as it travels across the image. In many Brushes this will result in the separation of the complete stroke into dots as you move faster. However, in some exotic brushes this could be a desired effect.
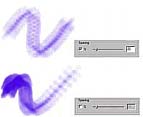
The first Brush uses Spacing, but the Second does not have the spacing enabled. Notice there is no check mark next to the Spacing slider.
The spacing will depend on the speed of the stroke. When you move slowly, the brush is denser, but more quickly, and it becomes sparser.
Type of Brushes
There are essentially 2 types of brush. A generated brush, such as Circular or Rectangular, and a brush created using different bitmaps and masks.
Circular or Rectangular
These are basic brushes, and you can set size, blur and spacing.
Bitmap
The Bitmap brush uses a bitmap for the brush mask. The bitmap brush doesn't take the color information from the bitmap but uses instead the intensity of the image to make the brush mask. Generally for Bitmap brushes, you would use black and white images. The black is transparent, and the white will be opaque, and the Bitmap Brush will paint the selected color.
An example of a Bitmap Brush is shown below.
|
|
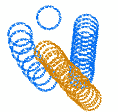
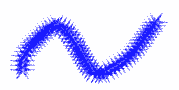
Here is an example of a type of Bitmap Mask, used for the Bitmap Brush. You can load the Bitmap with the button "Load Mask". Check "Negative" if you want to load the mask as a negative image. |
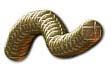
Above is what we painted with the Bitmap Brush. The effect was dependent on the spacing set. Now this is probably not a very useful brush unless you're drawing a "Slinky". Most brushes shouldn't be donut shaped. |
How to create a Bitmap Brush in Real-DRAW.
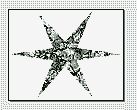
| • | In the document, draw a star, set the color black, select a Transparent Texture, and move the transparency to the fullest setting. |
| • | In the menu: Project, we select Trim Canvas, to make the size of the canvas, the same as the size of the star. |
| • | Go to Menu: File-Export |
| • | First we need to have the brush smaller, so we'll resize it to 40 %. You don't have to use sharpen |
| • | Select Alpha Mask Only. |
The preview should look something like this:

Export it in JPG, PNG or BMP format.
| • | Open a new document and press a New Paint Object tool, to get to the bitmap editing mode. |
| • | Right click on the Brush Library and select Add |
| • | On the Brush Properties, select Type Bitmap, and click the Load Mask button. |
| • | Select the previously saved file. You can leave all other parameters as they are and click OK |
| • | Now paint something with this brush. |
The result should be something like this
![]() Note: If you use a PNG Transparent image to load the Mask - the alpha channel from the image will be loaded.
Note: If you use a PNG Transparent image to load the Mask - the alpha channel from the image will be loaded.
Image Brush
This is an extension of the Bitmap Brush. While the Bitmap brush takes only the mask for the brush, the Image Brush takes the mask as well as texture - or image information. Basically we need to create 2 files, one is a mask and the other one is the image itself. Another way, is to load the Transparent PNG as a brush. The transparent PNG carries the information for the image and the mask. If you use 2 files, you first need to load the image with Load and then the mask with the Load Mask button. If you use the Transparent PNG, it is sufficient to just load it with the Load Button.
How to Create an Image Brush.

| • | In the document, we draw a circle and apply any of the styles from the Style Library. In the above picture you can see that that is has a metallic look, and a drop shadow. |
| • | In the menu: Project, we select the Trim Canvas Expanded to make the size of the canvas the same as the size of our object and drop shadow |
| • | Go to the menu: File-Export. |
| • | If you prefer you can resize it to a smaller size and use some sharpening to bring the details out. |
| • | Select the PNG Transparent format and the preview should look something like this. |
![]()
| • | Export it. |
| • | Open a new document and press a New Paint Object tool, to get to the bitmap editing mode. |
| • | Right click on the Brush Library and select Add. |
| • | On the Brush Properties, select Type Image Brush, and click the Load button. |
| • | Select the previously saved file. |
| • | You can leave all other parameters as they are and click OK. |
| • | Now paint something with this brush. |
The result should look like this ...
Interesting brush!
Notice that it doesn't matter which color you select, it always paints the brush with an image.
This is a great way to add interesting brushes. But what if you want to change color? For that function, Image Brush has a Color overlay option.
Color overlay
Color Overlay allows you to select any color for the Image Brush.
Open the previously created brush - Select the brush in the Library and click on it with a right mouse button to open the menu.
Select Edit.
In the Brush properties, Set the Color Overlay.

Click OK, select any color, and then paint.
Our Image Brush can now paint with any color.If you want to get more from this feature, you need to create the brush image with lighter colors.
You can see that the Image Brush is an incredibly strong type of brush. With some experimentation you can create very interesting, artistic and unique brushes. Try to experiment with the various transparencies.
For example.
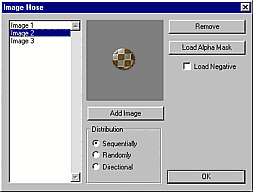
Image Hose
The image brush is very powerful, but how about adding a few different images in a row, into one brush? Here is an image Hose type of brush!
With the Image Hose, you have to click Settings on the Brush Properties to go to the more advanced options.
This is basically the same idea as with the Image Brush, but here we have a list of images. You can load the image with Add Image if you are using a PNG transparency as your source, or if not you can load the mask for each brush with the Load Alpha Mask.
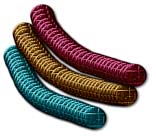
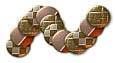
Let's modify the previous example. We'll apply different styles to our circle and save each one under a different name, as a PNG Transparency.
Now create a new brush, select Image Nozzle, open Settings and load images, one by one with the Add Image Button. Adjust the spacing a bit more, 30% for example.
Click OK and paint.
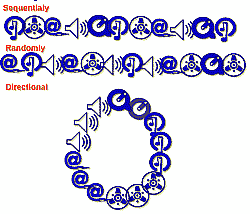
Distribution of the images
Sequentially - the images will be "sprayed" in the same order as they are listed in the list box.
Randomly - the images will be randomly chosen
Directional - the image will be chosen from the angle you paint. For example, if we have 5 images, 360 degrees divided by 5 is 72. That means that as we paint, that a different image will appear for every 72 degrees of change in the mouse travel angle.
![]() Note: 0 degrees (and image 1) is horizontally oriented to the right side. The angle used for image selection will continue in a clockwise direction at 72 degree increments in the above example.
Note: 0 degrees (and image 1) is horizontally oriented to the right side. The angle used for image selection will continue in a clockwise direction at 72 degree increments in the above example.
Example of different distributions
The Directional distribution is great for Brushes, which should follow your path as you draw. For example, arrows. Below we we created 8 images of an arrow, each rotated 45 degrees from the previous angle. Don't touch that calculator :-) 45 x 8 is 360 degrees, so we needed 8 images.

The Image Hose type of Brush has the Color overlay option as well.
Pressure Sensitivity.
This works if you have a Pressure Sensitive Tablet. There are a few options as to how the brush will behave regarding the pressure information i.e. how hard you press with your stylus.
None. No Pressure will be applied. This would be useful for Image Nozzles for example.
Pressure. This will change according to how hard you press on the brush. This is a good choice for Natural and Artistic brushes, because it simulates the real situation.
Opacity. This will change the opacity of the resulting brush, according to the pressure on the stylus. A good choice for "Airbrush" like brushes.
Press. & Opacity. A combination of Pressure and opacity
Speed. This one actually works without a Pressure sensitive Tablet. It isn't related to the pressure on the stylus, but it takes into account the speed of your drawing stroke. If you draw slowly, the stroke will be denser than if you draw fast. The minimum density is set by the Spacing parameter, and in order for Speed to work, the Spacing must be enabled.
The rest are various combinations of the above.
Brush preview
You can let the software generate the preview for you automatically, or if you want a specific image, for example, for Nozzles, you might want to show the path. You can paint anything and save it as a file. In the Brush properties window, turn the Auto generate switch off, and Load the saved image. This image will now be the preview image seen in the library list box. A Secret: Instead of loading the image, you can even paste an image from the clipboard into the preview by pressing Alt-P
Note: Real-DRAW has the same format of brushes as does the Photo-Brush software from www.photobrush.com.
Working with the Brush library
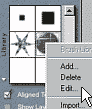
If you select any brush and then click on the library with right mouse button, a menu will appear. You can also use a small arrow near the left bottom of the library.
Add
Add a new brush. For more info about creating a new brush see Brush Properties.
Delete
Delete the currently selected brush from the Brush Library.
Edit
Edit the Brush Properties.
Import / Export
Import or Export one brush from/to current Library. The brush has the extension *.br1
You can use Export and Import if you (for example) want to move or copy a brush from one Library into another.
Load / Save Library
This loads or saves the *.brs library. The Brush Library is a set of Brushes grouped into one library.
To make a library available for Real-DRAW it has to be in the directory of Brushes. Then next time Real-DRAW starts, it will show the new library in the Library combo-box on the Brushes Tool bar.
Sort
Sort the brushes in the library. For example, if you would like to have the brushes that you use the most on the top. You can also change a name of a brush here.
Creating your own library
You can use User1 library for your new creation.
Or, if you want to add a totally new library you can ...
| • | Save any Library under a different name in the directory Brushes, then exit and start Real-DRAW again. |
| • | Copy an empty .brs file from the Brushes\Empty folder into the Brushes folder, then rename it and start Real-DRAW. |
![]() Note: Brush libraries will be sorted alphabetically in the Library Selection Combo Box.
Note: Brush libraries will be sorted alphabetically in the Library Selection Combo Box.