|
Export |
  
|
|
Export |
|
EXPORT
After you've created your artwork you'll want to show it to the whole world! This is done via the Export dialog.
From menu: File select Export
|
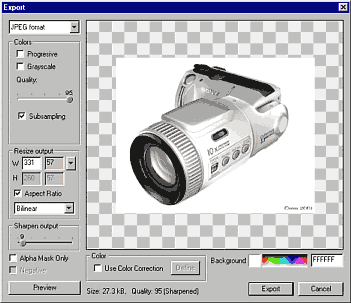
The Export window has many options for output. First, you select the type of the image you want to save. There are several different built in image formats: JPG, BMP, PNG, Transparent PNG, Mega Render JPG, E-JPG and SVG
There is also the capability to import plug-ins, thereby providing additional formats. You can always see the total size of the file at the bottom of the export window. If you are saving a JPG file or E-JPG file then you can change the quality to achieve a smaller size output file. |
JPG File
JPG is probably the most popular image file format in use today, and Real-DRAW produces one of the best looking JPGs. This is achieved by sub-sampling color components and you can set Progressive, or Grayscale JPG.
![]() Note: Whilst all web browsers can read Progressive JPGs, there are many other programs which may have a problem reading them.
Note: Whilst all web browsers can read Progressive JPGs, there are many other programs which may have a problem reading them.
So use the Progressive option with caution !
Set DPI
For JPG files you can also set a DPI flag to the desired number. It is important to undrstand that it is just a flag some other software may read and find interesting. It doesn't affect the image at all. You can type anything you want there. Because you are creating the image from scratch there is no prior knowledge of the size of your artwork measured in inch. That's why the DPI isn't important but some software really wants this number just to confuse users.
Real-DRAW saves a project as an *.rdw file. However you can also export it in the Real-DRAW exclusive E-JPG format as well.
E-JPG is a JPG compatible image format and you can use it on your web pages, or open it in any graphics editor. However if you open an E-JPG in Real-DRAW you will again be able to edit its objects, text or whatever else you like. The quality or size of the JPG image you see doesn't affect the quality of the editable objects. In other words you can just show it as a small thumbnail on your web page, but then if somebody downloads it and opens it in Real-DRAW, they will be able to edit it in full quality, and save it in the size or quality preferred.
The advantages:
| • | You don't have to make two files; a thumbnail and a file to download. The thumbnail is already the project file |
| • | You can show the image in small size and let the user recreate the image, in a quality, size and file format he likes. Because of the small size of the project data, the file will be much smaller than a JPG of the original size and best quality. |
| • | Versatility and no quality loss. You can preview the file as a JPG with low quality, but with Real-DRAW, you can recreate the file again to any format and to any quality desired. |
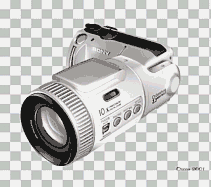
PNG and Transparent PNG
|
Unlike JPG, PNG is a lossless format (the quality doesn't change) while still producing small file sizes. It is recommended that you use PNG as much as you can. All graphics software should be able to load it... Transparent PNG also saves the alpha channel (as if you have no canvas), andit is indicated by showing the image on the check board.
Real-DRAW can also load transparent PNGs back as images with their alpha transparency.
Transparent PNG is also a great way to create new brushes or Nozzles. |
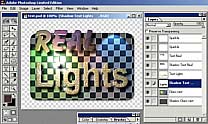
Real-DRAW can save a whole project as an Adobe Photoshop PSD project, and each object and its shadow, will be in separate layers so you can continue to work on them in Photoshop if you need to.
|
Real-DRAW will export each object and it's shadows as a separate layer. Real-DRAW can handle a large number of layers easier than Photoshop. It is recommended that you pack logical groups of objects into the Packages so you don't export each small line as a separate object. This will reduce the number of layers and you will then be able to work better in either Real-DRAW or Adobe Photoshop. Image on left: A Real-DRAW project exported entirely into Adobe Photoshop with all objects in separate layers. |
The layers in Photoshop will be named as the Labels of objects and each shadow layer will have the name Shadow, before its label.
![]() Note: Some Real-DRAW specific effects such as lenses will obviously not be present in Photoshop.
Note: Some Real-DRAW specific effects such as lenses will obviously not be present in Photoshop.
You can also use MegaRender feature to export the project into PSD format in enhanced resolution.
SVG - scalable vector format for web
Real-DRAW can save a vector drawing as an SVG format.
SVG is a vector image format for the web, and all new browsers supporting XML are able to display it. Note though. that SVG is a pure vector format, and supports color fills, outlines and transparency, but other effects such as texture and bitmaps will not show.
The advantage of SVG is that the files are very small, and are XML commands, which is something like HTML language.
Mega Render
This is an advanced export option, allowing you to export a design in a much larger size than the one it was designed in. You can find a more thorough description on the next page.
Plugins
You can also use additional formats to the built in ones, and only need to download the plug-ins for them. On the www.real-draw.com home page there are some plug-ins, and links to other sites. There is also simple SDK available to allow you to develop your own export plug-in.
Background Color
![]() You can temporarily change the background color of your image during export, and this is most useful if you want to try the image on various background colors for the web. You can also directly change the color of a web style.
You can temporarily change the background color of your image during export, and this is most useful if you want to try the image on various background colors for the web. You can also directly change the color of a web style.
Color Correction
Another filter you may want to use is a Color Correction. Here, if enabled you can set the color feel of the image - you can make it warmer or colder, etc. This will not change the project image, only the image you export. The Color Correction settings are saved with the project file.
Resize on Export
You can resize the output image to the required size. If you want to create a small web graphic, it is always a good idea to design it larger, with many details, and then resize it during export. Note: Sharpen it also, as resizing makes an image softer
There are four algorithms used to resize an image.
The most used are Cubic and Bilinear. The Cubic resizes a sharp image with good quality. The Bilinear uses more antialiasing and the result has smoother details, but is less sharp. You can use the Cubic resizing for line graphics and screen captures and the Bilinear for photography and smoother effects.
Sharpen Image
It is a good idea to sharpen an image if you are down-sizing it so you can produce a small graphic with a lot of detail. For JPGs, the sharpening doesn't change the file size too much, but it gives you better overall quality, even if you save with a low JPG quality.
You can use low sharpening even if you don't resize the image and in most cases a sharper image looks better on the web.
Export Alpha Mask Only
If you want to export only the alpha mask, you can do it by selecting this option. It may be useful for some authoring packages if you need alpha transparency, or have a program which doesn't support PNG, with transparency. The Alpha channel, is the information for the overall image transparency.
Using Crop Tool
![]() Note: Normally, if you don't use Crop, Real-DRAW exports the Canvas area, but if you have objects outside the canvas then you'll have to resize the canvas.
Note: Normally, if you don't use Crop, Real-DRAW exports the Canvas area, but if you have objects outside the canvas then you'll have to resize the canvas.
The easiest way is to use the command Trim Canvas (Ctrl-Q) or Trim Canvas Expanded.
These commands will resize and move the canvas so all the objects are inside the canvas.
Trim Canvas Expanded leaves a small border around the objects and adjusts the size to include the drop shadows. Trim Canvas trims the canvas as close as possible to the union of all objects.
Often, you might like to export only a part of the screen. It would be painful to always have to resize the canvas, so Real-DRAW has non-destructive Export Crop feature .![]()
Click on the Crop Tool icon and click on the canvas, holding the mouse button down while moving. The same way you would draw a rectangle.
The Crop tool will create a border and everything inside it will export, and you can always move the crop borders using the two red squares.
If you would like to remove the crop, just drag one side of the crop rectangle, over to the opposite side creating a zero crop space and this will remove the crop.
You can also leave the Crop rectangle in place and switch it off with the Crop Tool button. The advantage of this is that the position of the crop rectangle will be saved with the document and you can recall the crop rectangle at anytime by clicking on the Crop Tool.
And you can also trim canvas by drawing a Crop rectangle and then selecting Crop Canvas from menu Object
Pure Vector Export
You can export the project in Pure Vector format (That means Shapes and Colors only). You have choice of few common formats:
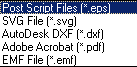
Pure Vector export is for a special cases when you want to use Real-DRAW tools to create some specific shape, or combination of objects to be used in other vector software or CAD. None of the real-Draw specific effect will be exported - only the shapes and fill color.
You have to think about this when you draw your project. Also Combination objects must be converted to Polynome (Create Single Shape) before export.
![]() Note: The SVG is presented both in normal Export and in Pure Export but it is not the same. In Export as described above will the SVG export also transparencies and outline to match more closely the project. In Pure Vector Export it will be much more lean - just the fill color and shapes.
Note: The SVG is presented both in normal Export and in Pure Export but it is not the same. In Export as described above will the SVG export also transparencies and outline to match more closely the project. In Pure Vector Export it will be much more lean - just the fill color and shapes.