|
Surface Skin |
  
|
|
Surface Skin |
|
Real-DRAW Intermediate
Surface Skin
To add even more natural feel to some objects you can use Surface Skin properties.
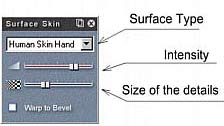
The Surface Skin adds very subtle uniform texture to the object which needs to look natural. You can add various skin types, textures, rust, various noise and more. With the Intensity slider you can adjust the intensity of the texture applied over the object. With the Size slider you can set the overall magnification of the Surface texture.
Unlike other settings in Real-Draw this will not dramatically change the look of the object. It will only add more details to the previously flat-looking surface.
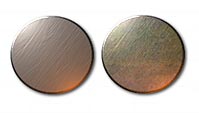
Warp to Bevel option can be used only if the object has a 3D Bevel. The Skin texture will somehow bend around the bevel.
The right object has a Warp to Bevel option on the Mosaic Surface Skin.
![]() Tip: You can use Surface Skin on airbrushed objects to create realistic human skin. The combination of skin colored tones and gentle Surface Skin can create photographic quality objects.
Tip: You can use Surface Skin on airbrushed objects to create realistic human skin. The combination of skin colored tones and gentle Surface Skin can create photographic quality objects.
|
|
|
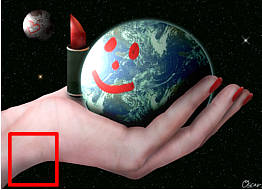
Image created in Real-Draw PRO |
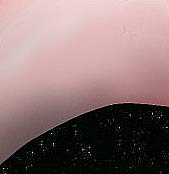
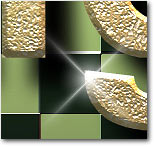
A detail of the hand object before Surface Skin. (Airbrush painted on object) |
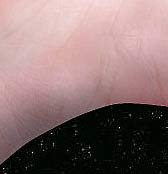
The same detail with Surface Skin applied (Human Skin Hand) |
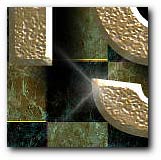
Another example below shows the Surface Skin applied on an object where we aready used a texture. This allows us to mix the Texture and Surface Skin to create a different new feel of the object material.
|
|
We already used a Chess texture on the background object. |
We can create a new feel by simply adding a Marble Surface Skin to the object. |
![]() Tip: Another trick is to add some very little noise with the Surface Skin Noise to objects which are too smooth or un-natural. This adds more photography-like quality to it.
Tip: Another trick is to add some very little noise with the Surface Skin Noise to objects which are too smooth or un-natural. This adds more photography-like quality to it.
![]() Note: There is no need to use Surface Skin on EVERY object. This effect is a gentle after-touch to enhance details of some previously boring objects. The Surface Skin will be not very visible on objects which have already many texture details.
Note: There is no need to use Surface Skin on EVERY object. This effect is a gentle after-touch to enhance details of some previously boring objects. The Surface Skin will be not very visible on objects which have already many texture details.
New Surface Skin
To create the desired effect, Surface Skin uses a special texture. Unlike normal texture, the surface skin texture is an uniform texture. The texture should not have strong repeating pattern and the color must be uniformly adjusted around the middle of intensity, sometimes with very subtle colorization. You should remember that when creating your own Surface Skin texture.
The texture files are in jpg format in the Surface directory and when viewed outside Real-Draw they will look pale or washed out.
Another MediaChance software Photo-Brush can be perfectly used for creating such textures. (The default textures were created this way) Here is small how-to.
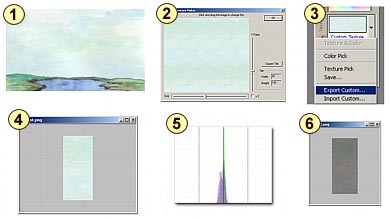
![]() We loaded an interesting texture of painting to Photo-Brush.
We loaded an interesting texture of painting to Photo-Brush.
![]() We used Texture Pick (menu Tool or from menu on Color & Texture Bar) to simply create seamless texture. Clicking ok will add this texture to the Color & texture bar
We used Texture Pick (menu Tool or from menu on Color & Texture Bar) to simply create seamless texture. Clicking ok will add this texture to the Color & texture bar
![]() From the menu on Color & Texture bar chose Export Custom and save it.
From the menu on Color & Texture bar chose Export Custom and save it.
![]() Now load it again in PhotoBrush
Now load it again in PhotoBrush
![]() Run Menu: Image-Adjust-White Balance and slide the each RGB slider so all the RGB peaks are around the middle line on the graph - initially the peaks would be probably each in different place. If youcan't move sliders far enough, you simply apply as far as you can and do White Balance again.
Run Menu: Image-Adjust-White Balance and slide the each RGB slider so all the RGB peaks are around the middle line on the graph - initially the peaks would be probably each in different place. If youcan't move sliders far enough, you simply apply as far as you can and do White Balance again.
![]() Now you have Uniform Texture. For stronger effect you can use Image-Adjust-Levels and move the Left (0) and Right (255) sliders on the Input closer to the middle. Then do the WHite Balnce again.
Now you have Uniform Texture. For stronger effect you can use Image-Adjust-Levels and move the Left (0) and Right (255) sliders on the Input closer to the middle. Then do the WHite Balnce again.
![]() all you have to do is to export such texture into Real-Draw SURFACE folder (not skin!) Next time you run Real-Draw the skin texture will be there.
all you have to do is to export such texture into Real-Draw SURFACE folder (not skin!) Next time you run Real-Draw the skin texture will be there.
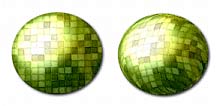
This texture adds a subtle - rustic looking feel to the object (left without, right with):