Component is a group of objects (Movies, menus) in Connections.
It has several practical applications:
| • | Group and enclose objects in connections into logical blocks for easier designing (See also Sub-Views) |
| • | Export the component and reuse it many times |
| • | Create a Smart-Components that runs like a wizards |
To create simple component
Component can be created with the Component button on the left Connection tool bar.
![]()
Select the Component button and draw a rectangle around objects that you want to enclose into Component.
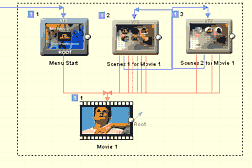
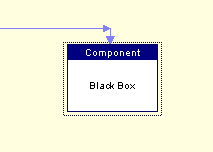
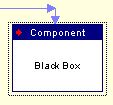
A component will be created. It will be named by default "Black Box"
To Open the component, double click on it.
To Close the component, double-click anywhere inside the component (on the white area) or right click on component and from menu select Component - Open/Close.
To Move open component, click anywhere inside the component - on its white area and drag it.
To Move objects inside component, simply click on the object and drag. The component will be resized to accommodate the changes.
Component Control menu
Open component has a small arrow on the right top corner. This open a control menu for special commands.

Input and Output
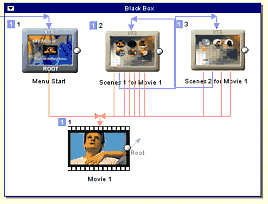
When you open the component you can freely link from/to the objects inside, as if the component doesn't exist. If the component is closed you can specify Input and Output points of the component. Then you can link to closed component and work with it as if it is really "black box".
To specify Input, right click on object inside open component and from pop-up menu select Component-Set Component Input.

Similarly you can set Output. Once the Object is set as input/output a red arrow will appear near it.
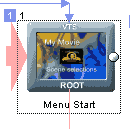
This will also show on a closed component as small red arrow
Now even if the component is closed we can draw a link to it. If we specify output we can also draw link out of closed component.
![]() Note: Since the components can be exported and reused later, the Input and Output marks what is intended input or output for the group of objects inside. This allows us to work with the component as with a box without need to look inside.
Note: Since the components can be exported and reused later, the Input and Output marks what is intended input or output for the group of objects inside. This allows us to work with the component as with a box without need to look inside.
Rename Component
To rename component, select it and press F2. This is same as with any other object.
Add Object to component
Right click on any object outside component to open Pop-up menu. Select Component - Add Object to Component. A menu with list of all components will appear. Select the desired component and the object will be moved there.
Remove Object from Component
Right click on any object inside open component to open Pop-up menu. Select Component - Remove Object from Component. The object will be removed and placed outside the component.
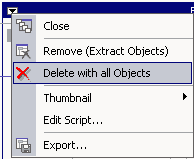
Remove Component - Extract the objects
Right click on component to open Pop-up menu. Select Component - Remove (Extract Objects) . All objects will be removed and placed outside the component and the component will be removed.
Delete Component and all objects inside
Either delete all the objects from inside by pressing Del button or Click on the Component control arrow and from menu select Delete with all Objects.
Change Component Thumbnail.
A closed component can be represented by a thumbnail. You can load your own thumbnail that will be saved with the component. Click on the Component Control arrow in top left corner and select Thumbnail - Change Thumbnail. Any image can be used - it will be resized to correct size. To remove existing thumbnail select Thumbnail - Remove Thumbnail.
Export Component.
Once you do all necessary changes to the component you can export it. Either from Component Control arrow or right click on component and from menu select Component - Export
Component has the extension *.box and by default it will be saved in Extras\Components\ folder.
Import Component
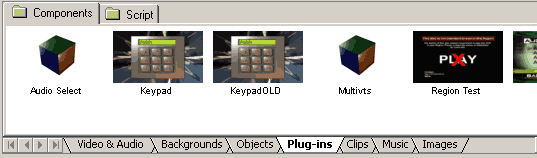
All exported component to Extras\Components\ folder will appear in the Assets - Plug-ins tab under Components Sub-tab.
You can simply drag and drop component from there to Connection window. Alternatively you can also import components that are not saved to Extras\Components\ folder and don't appear in the asset window. To do so, right click on a canvas in connection and from pop-up menu select Component - Insert.
Smart Components (PRO version)
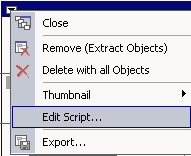
A component can use labTALK script to create reusable wizards. To edit script associated with Component, click on the Component Control arrow in left top corner and select Edit Script.
The script will be run every time you drag the component from Asset Plug-ins window to Connection and can initialize the component various ways. For example it can create menus depending on the user input.
All default components that can be found in the Plug-ins tab are scripted in labTALK.
![]() Note: If you don't want to run the script when adding the component to Connections, hold down SHIFT.
Note: If you don't want to run the script when adding the component to Connections, hold down SHIFT.
Writing script.
For more information about labTALK see the appropriate topics. Here are just some important notes about labTALK usage for Components.
1. To access component objects from within the component script you have to use special access.
In order to know which objects belongs to the component three array variables are filled up:
menusInBlackBox, vmgsInBlackBox, moviesInBlackBox
Example: menusInBlackBox returns the number of menus in box and menusInBlackBox[1] returns what is the order number relative to project of the first menu in box, see the code below:
print "Number of Menus in this Component: ",menusInBlackBox
for menu=1 to menusInBlackBox
print "Menu #",menu," in Component is a Menu #",menusInBlackBox[menu]," in the whole project"
next menu
Simply if we want to use menu number one we can't use Firstmenu = 1 because that is not true, but we have to use
Firstmenu = menusInBlackBox[1]
2. After you edit the Component script you don't have to press save button in the lab-TALK window, simply just close the lab-TALK window and then export the component.
3. Because the component script often changes the component itself, it is important to keep an original, unchanged copy of the component while you debugging the script. For example the Keypad component has initially just one menu. If we run its script it will create couple of new menus inside the component. Obviously we want to keep the component before the script is run.
There are few scripts in the appendix that can help with understanding lab-TALK's use inside Components.