|
Align |
  
|
|
Align |
|
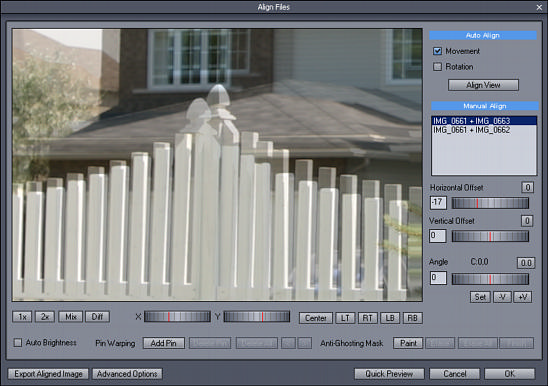
If the images were taken without tripod we will need to align them. The Align dialog will automatically try to align the images as a first thing, but a further alignment may be necessary.
This dialog offers many advanced features to perfectly align any type of image.
Images
One of the images from the set is automatically chosen as a Base image. This is always the Image that has the best exposure (closest to 0 EV). Other images will be aligned against the Base image. That means if we have 3 Images as source, we will see two lines in the image list BASE + Image A and BASE + Image B, where the BASE will be 0EV and image A and B will be under and over -exposed. If we have only two images as or source then we will see only one line.
We are always aligning only two images at a time, Base + other image. After you verify and align one set, don't forget to click on the list and select the next sets to verify and or align!
Navigation
You can move the view by simply clicking on the image and dragging it, or you may use X and Y dials.
![]()
The buttons beside the sliders will quickly move the view to the center, Left Top corner, Right Top corner, Left Bottom or Right Bottom corner.
Zoom and Image display
You can see the image at 1:1 pixel ratio or 2x zoomed.
![]()
The other two buttons are to display the two images we are currently aligning as Overlay (Mix) or Difference (Diff)
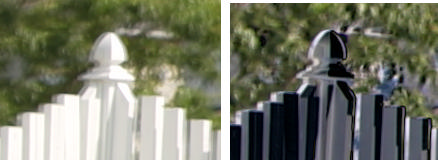
In overlay mode, the sharpest the image, the better alignment.
In Diff mode when the image looks embossed, it is not correctly aligned. More flat it looks the better alignment it has.
Auto Brightness
Sometimes it is not easy to see the two images because of different exposures.
You can use Auto-Brightness button that will compensate the brightness on the view for both images separately.
![]()
Auto-Align View button (Auto-assisted aligning)
Whenever the button is pressed the current view will be aligned.

It is important to realize that the image will be aligned based on the current view. As we will see later with camera roll, pitch or yaw, the alignment could be correct in one corner, but incorrect in other corner of the image. If the Auto-Align feature cannot align the images correctly, just move the view where the image may be clearer.
Basic aligning
To align images you need to change the Horizontal and Vertical Offset. You can drag the dials, type a value or use Arrow keys.
Holding Control + Arrow keys will move the offset in larger increments.
The "0" buttons will reset the dials (and the images) into 0 position.
Note: If you have to shift images too much you may start to see some stretching effect on the edges of the preview window.
Angle Aligning
When the image is aligned in one view but misaligned in different part, we have camera angle problem.
For a simple camera roll we can adjust the Roll Angle. You can do this with arrow keys Left and Right while holding SHIFT.
The image is rotated against a center of rotation marked by a cross.
Initially this is placed at the center of image, marked by C:0,0
You can reset a new center of rotation by moving the view and pressing Set button.
It is nearly impossible to visually determine where a center of the rotation could be, so the center of image is a good start.
Add/Remove Vector
This feature is to assist with location of a center of rotation. If you suspect there is a camera roll and it has center rotation different than the center of image you may align the image at one place and then press +V.
This will add a vector of the shift and a perpendicular infinite red line.
You then move to different place of image, align the view and add another Vector.
In theory, the red lines will intersect at the actual center of rotation.
With only a small offset adjustments the lines will not all cross at one place but rather converge to the part of the image where the center of rotation is. In many cases however, the center of rotation is usually outside the image borders.
In many cases a camera angle misalignment is not by a pure camera roll, but also combination of yaw and pitch. Instead of trying to figure out the angle and center of rotation, we added a more robust and simpler system called Pin Warping.
Quick Preview
This will quickly merge the images into HDR and tone-map it (using Auto-Adaptive setting) for a preview. This is a great way to determine if all images are aligned or if there is any ghosting (by moving people, cars, foliage)